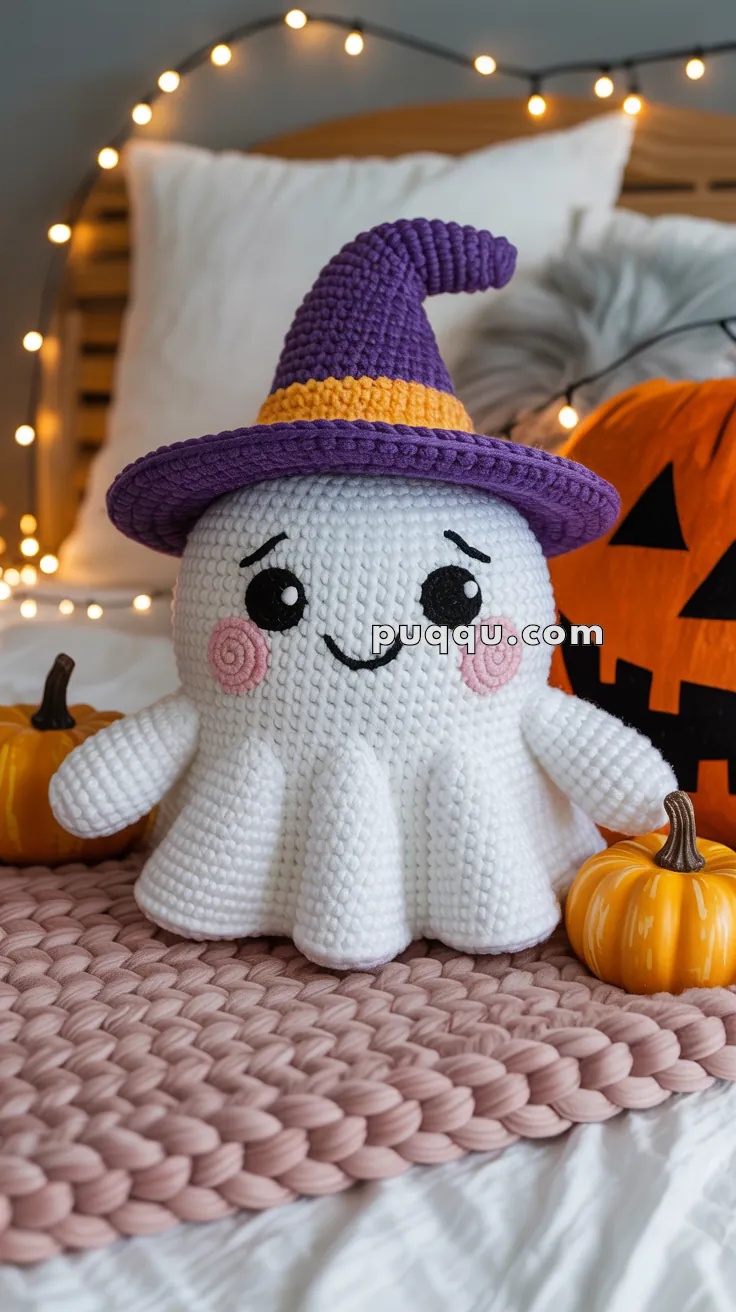
Add a playful twist to your spooky-season crafting with the Amigurumi Ghost with Witch Hat, a charming little specter who’s more sweet than scary! 👻🧶 With its soft, rounded shape and a floppy purple witch hat perched on top, this friendly ghost is ready to float into your Halloween décor with a smile. Whether it’s sitting on a shelf, tucked into a treat basket, or gifted to a fellow Halloween fan, it’s sure to bring delight wherever it haunts.
Perfect for crocheters who love quick, whimsical projects, this pattern is a fun way to explore seasonal colors and character design. Customize the hat, add a tiny broom, or stitch up a whole ghostly gang for a festive display. The Amigurumi Ghost with Witch Hat is a joyful way to stitch up charm, giggles, and a sprinkle of handmade Halloween magic—one loop at a time! 🧵🎃✨
🎃 Amigurumi Ghost with Witch Hat Crochet Pattern
This irresistibly cute crochet ghost is the perfect mix of spooky and sweet! With a wide, upturned witch hat, blushing cheeks, and a soft plush body, it’s an adorable Halloween decoration or cozy cuddle companion. Whether displayed on your bed, couch, or shelf, this ghost brings warm handmade charm to your fall décor. 🕯️🧶
✨ Skill Level
Confident Beginner to Intermediate – You’ll practice shaping, ruffle edging, and light embroidery. Perfect for anyone familiar with amigurumi basics.
📏 Finished Size
Approx. 28–30 cm (11–12 in) tall when made with plush chenille yarn and a 4.5 mm hook.
🧶 Materials
Yarn (plush/chenille recommended):
- White – 150 g (ghost body & arms)
- Purple – 100 g (witch hat)
- Orange – 30 g (hat band)
- Pink – small amount (cheeks)
- Black – small amount (eyes, mouth, eyebrows)
Tools & Supplies:
- Crochet hook: 4.5 mm
- Polyester fiberfill stuffing
- Tapestry needle & scissors
- Optional:
- Thin craft wire (for hat brim shaping)
- Black & white felt (for eyes)
- Fabric glue
💡 Recommended yarns: Himalaya Dolphin Baby, Bernat Blanket, or any soft velvet yarn for the cozy, ribbed look in the photo.
🔤 Abbreviations (US Terms)
MR – Magic Ring
sc – Single Crochet
inc – Increase (2 sc in same stitch)
dec – Decrease (sc2tog)
sl st – Slip Stitch
ch – Chain
FLO – Front Loop Only
BLO – Back Loop Only
st(s) – Stitch(es)
FO – Fasten Off
👻 Ghost Body
With white yarn:
1️⃣ MR, 6 sc (6)
2️⃣ inc ×6 (12)
3️⃣ (sc, inc) ×6 (18)
4️⃣ (2 sc, inc) ×6 (24)
5️⃣ (3 sc, inc) ×6 (30)
6️⃣ (4 sc, inc) ×6 (36)
7️⃣ (5 sc, inc) ×6 (42)
8️⃣ (6 sc, inc) ×6 (48)
9–22️⃣ sc around (48)
Stuff gradually and shape as you go.
23️⃣ (6 sc, dec) ×6 (42)
24️⃣ (5 sc, dec) ×6 (36)
25️⃣ (4 sc, dec) ×6 (30)
FO and weave in ends.
🌀 Floating Ruffle Base (Photo-Accurate Version)
Attach white yarn to the open bottom edge.
Round 1:
(sc, ch 4, sl st in same st, sc in next st) repeat around entire base.
👉 This creates 8–10 small scalloped waves, matching the photo’s evenly spaced “floating” ghost hem.
Fasten off and weave in ends neatly.
💪 Arms (Make 2)
With white yarn:
1️⃣ MR, 6 sc (6)
2️⃣ inc ×6 (12)
3–10️⃣ sc around (12)
11️⃣ (4 sc, dec) ×2 (10)
12–14️⃣ sc around (10)
Stuff lightly — keep the top portion softer so the arms drape naturally.
FO, leaving a long tail for sewing.
📍 Placement: Sew arms just below eye level (around R11–13), angled slightly forward and outward like the photo.
🎩 Witch Hat (with Upturned Brim)
With purple yarn:
1️⃣ MR, 6 sc (6)
2️⃣ inc ×6 (12)
3️⃣ (sc, inc) ×6 (18)
4️⃣ (2 sc, inc) ×6 (24)
5️⃣ (3 sc, inc) ×6 (30)
6️⃣ (4 sc, inc) ×6 (36)
7–26️⃣ sc around (36)
Continue increasing to shape the tall cone:
27️⃣ (5 sc, inc) ×6 (42)
28–32️⃣ sc around (42)
Switch to orange for hat band:
33–35️⃣ sc around (42)
Switch back to purple for brim:
36️⃣ (FLO) (5 sc, inc) ×8 (56)
37️⃣ (6 sc, inc) ×8 (64)
38️⃣ (7 sc, inc) ×8 (72)
39️⃣ sc around in BLO (72) ← helps curl brim upward
40️⃣ sc around (72)
FO and weave in ends.
💡 Shaping Tips:
- Insert thin wire into the final round to form that beautiful lifted brim.
- Lightly stuff the top ⅓ of the hat and bend the tip to the side for a playful look.
🧵 Facial Details
🖤 Eyes (2 Options)
Crochet Eyes:
1️⃣ MR, 6 sc with black yarn (6)
2️⃣ inc ×6 (12)
FO and sew or glue in place. Add a small white embroidery stitch or felt dot for highlights.
Felt Eyes:
Cut two black ovals and small white dots. Glue or sew securely.
📍 Placement: Between rounds 9–11, spaced about 7 stitches apart.
🌸 Cheeks
With pink yarn:
1️⃣ MR, 6 sc (6)
2️⃣ (sc, inc) ×3 (9)
FO and sew just below and beside each eye.
(Alternatively, use pink felt or blush for a soft tint.)
😄 Mouth & Eyebrows
Using black yarn or embroidery thread:
- Mouth: Stitch a small curved smile between the cheeks.
- Eyebrows: Create two angled short lines above eyes for that expressive, slightly worried look seen in the photo.
🪡 Assembly
1️⃣ Stuff the ghost body evenly and firmly.
2️⃣ Sew the arms onto the sides below the face.
3️⃣ Position the witch hat slightly tilted to one side. Sew around the rim’s inner edge.
4️⃣ Adjust the hat brim upward at the sides for a perky finish.
5️⃣ Add gentle bends to the brim or tip using steam shaping or wire if desired.
🕯️ Finishing Touches
✨ Display your ghost among pumpkins and fairy lights for a warm, magical vibe.
🪄 Try other colors — like black and orange hats — for matching Halloween pairs.
🎁 Perfect for gifting, decorating kids’ rooms, or adding handmade charm to your autumn décor.
🎃 You Did It!
Your Amigurumi Ghost with Witch Hat is complete — cuddly, expressive, and full of Halloween cheer. With its lifted hat brim, round scalloped hem, and plush chenille softness, it looks exactly like the one in the photo.