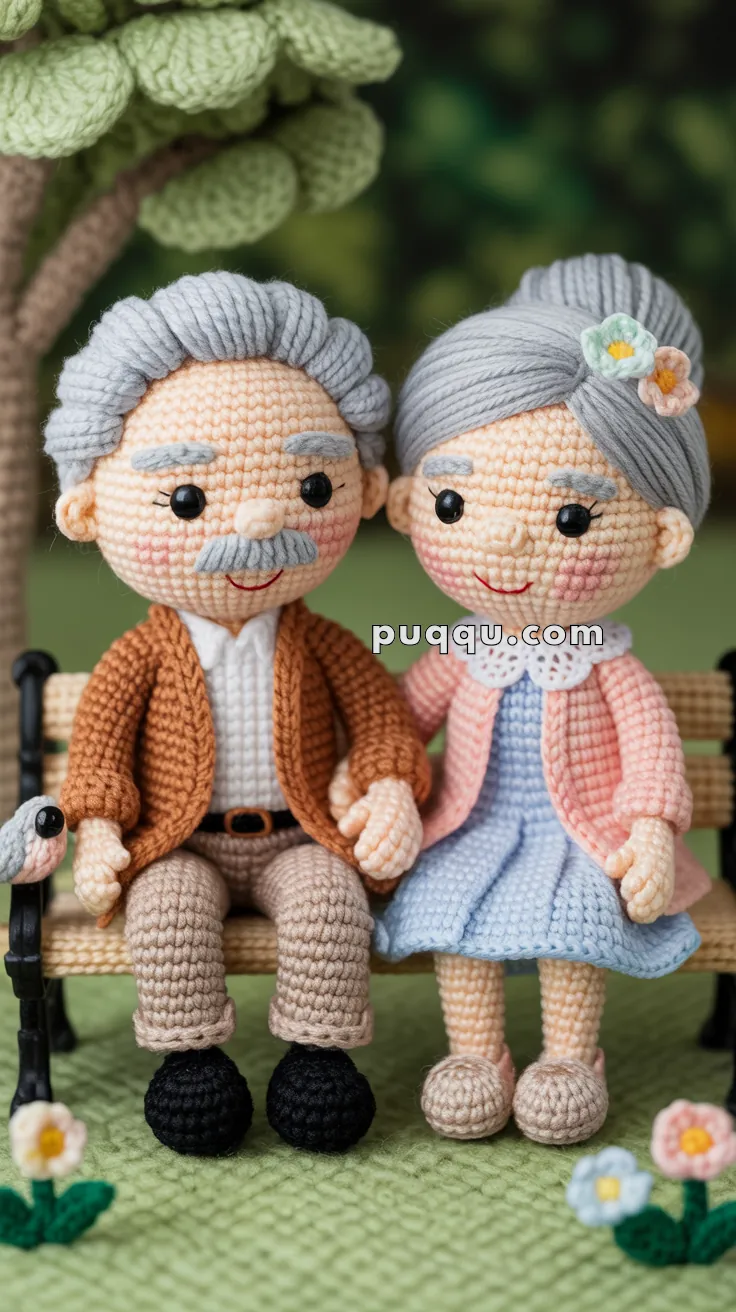
Celebrate love, wisdom, and cozy companionship with the Amigurumi Grandparents on a Park Bench, a heartwarming crochet scene that’s full of charm and storytelling magic! 🧶👵👴 This delightful duo features a sweet elderly couple seated side by side, complete with gentle smiles, soft outfits, and a classic park bench that sets the scene for peaceful moments and cherished memories. Whether you’re crafting a tribute to your own grandparents or simply adding a touch of warmth to your handmade collection, this pattern is sure to tug at the heartstrings.
Perfect for crocheters who adore character-driven designs and meaningful details, this pattern invites you to personalize each grandparent with favorite colors, accessories, or even tiny spectacles and walking canes. Add a little bird on the bench, stitch a bouquet of flowers, or create a whole park scene to bring your story to life. The Amigurumi Grandparents on a Park Bench is a beautiful way to stitch up love, legacy, and a sprinkle of handmade nostalgia—one loop at a time! 🧵🌳💕
👵🧓 Amigurumi Grandparents on a Park Bench Crochet Pattern
Bring this tender park-bench moment to life with a charming elder couple holding hands, complete with pink cardigan + blue dress, brown jacket + beige trousers, soft gray hairstyles, tiny slippers and shoes, a little bird, flowers, and a simple bench. 💕🌳
✨ Skill Level
Confident Beginner–Intermediate — you’ll use basic stitches, shaping, color changes, neat finishing, and simple garment construction.
📏 Finished Size
Each doll: ~18–20 cm (7–8 in) tall when standing; seated height ~14–15 cm, using DK yarn and a 2.75–3.0 mm hook.
🧶 Materials (DK/Light Worsted)
Hooks: 2.75–3.0 mm for dolls/clothes; 3.5 mm for bench pieces
Stuffing: Polyester fiberfill
Safety eyes: 8 mm (2 pairs)
Pipe-cleaners or craft wire (optional) for poseable arms
Stitch markers, yarn needles, scissors
Fabric glue (optional)
Yarn colors & approximate amounts:
- Skin (light peach): 60 g / 165 yd (both dolls)
- Gray (hair, brows & mustache): 45 g / 125 yd
- Black (grandpa shoes & bench legs): 25 g / 70 yd
- White (collar, shirt & sock trim): 20 g / 55 yd
- Pink/Coral (grandma cardigan): 25 g / 70 yd
- Soft Blue (grandma dress): 35 g / 95 yd
- Beige/Tan (grandpa trousers & grandma slippers): 40 g / 110 yd
- Brown/Rust (grandpa jacket): 30 g / 85 yd
- Dark Brown (belt): 5 g / 14 yd
- Pastels for flowers (pink, light blue, yellow, peach): scraps
- Bench Beige/Wheat: 30 g / 85 yd
- Bench Black (legs/arms): 25 g / 70 yd
- Bird (light gray, white, orange beak): scraps
- Flower stems/leaves (green): scraps
📝 Abbreviations (US terms)
MR = magic ring
ch = chain
sl st = slip stitch
sc = single crochet
hdc = half double crochet
dc = double crochet
inc = increase (2 sc in same st)
dec = invisible decrease (sc 2 sts together)
BLO/FLO = back/front loop only
rep = repeat
FO = fasten off
🧡 Core Doll Parts
Work in a spiral unless stated. Stuff as you go.
Head (make 2, Skin color)
R1: MR 6 sc (6)
R2: inc x6 (12)
R3: (sc, inc) x6 (18)
R4: (2 sc, inc) x6 (24)
R5: (3 sc, inc) x6 (30)
R6: (4 sc, inc) x6 (36)
R7: (5 sc, inc) x6 (42)
R8: (6 sc, inc) x6 (48)
R9: 48 sc (48)
R10: 48 sc (48)
R11: 48 sc (48)
R12: 48 sc (48)
R13: 48 sc (48)
R14: 48 sc (48)
R15: 48 sc (48)
Insert 8 mm safety eyes between R13–R14, 8 sts apart for both dolls
R16: (6 sc, dec) x6 (42)
R17: (5 sc, dec) x6 (36)
R18: (4 sc, dec) x6 (30)
R19: (3 sc, dec) x6 (24)
R20: (2 sc, dec) x6 (18)
R21: (sc, dec) x6 (12)
R22: BLO 12 sc (12) leave front loops for collar
R23: 12 sc (12)
Continue to body or FO with long tail
Nose (make 2, Skin)
R1: MR 5 sc (5)
R2: 5 sc (5)
FO with tail, sew between eyes centered at R14–R15
Ears (make 4, Skin)
R1: MR 6 sc (6)
R2: (sc, inc) x3 (9)
R3: 9 sc (9)
Fold slightly and sew to heads at R14–R15, about 7–8 sts behind each eye
Arms (make 4: 2 for each doll)
Hand (Skin):
R1: MR 6 sc (6)
R2: (inc, sc) x3 (9)
R3: 9 sc (9)
R4: 9 sc (9)
R5: (dec, 7 sc) (8)
R6: 8 sc (8)
Switch to Sleeve Color (Grandma = Pink; Grandpa = Brown)
R7: 8 sc (8)
R8: 8 sc (8)
R9: 8 sc (8)
R10: 8 sc (8)
R11: 8 sc (8)
R12: 8 sc (8)
R13: 8 sc (8)
R14: 8 sc (8)
Lightly stuff the first third only. Flatten and sc across to close (4 sts). FO leaving a long tail for sewing.
👵 Grandma Doll
Legs with Slippers (make 2)
Slipper (Beige/Tan):
R1: MR 6 sc (6)
R2: inc x6 (12)
R3: (sc, inc) x6 (18)
R4: 18 sc (18)
R5: (sc, dec) x6 (12)
R6: 12 sc (12)
Switch to Skin for leg:
R7: BLO 12 sc (12)
R8: 12 sc (12)
R9: 12 sc (12)
R10: 12 sc (12)
R11: 12 sc (12)
R12: 12 sc (12)
R13: 12 sc (12)
R14: 12 sc (12)
R15: 12 sc (12)
R16: 12 sc (12)
R17: 12 sc (12)
R18: 12 sc (12)
FO leaving long tails for sewing to body later
Slipper Top Rim: Join white at R7 FLO and work 12 sc; FO
Body & Dress (worked from Grandma head’s R23)
Switch to Blue (dress bodice):
R1: inc x12 (24)
R2: (sc, inc) x12 (36)
R3: (2 sc, inc) x12 (48)
R4: 48 sc (48)
R5: 48 sc (48)
R6: 48 sc (48)
R7: 48 sc (48)
R8: 48 sc (48)
R9: 48 sc (48)
R10: 48 sc (48)
R11: 48 sc (48)
R12: 48 sc (48)
R13: 48 sc (48)
Hem – Simple edge:
R14: 48 sc (48)
FO, weave ends
Attach Arms: sew at R2–R3 of the bodice, sides aligned
Attach Legs: position legs under dress, spaced evenly; sew so the doll sits naturally with legs slightly forward
White Scalloped Collar
Join white yarn at back neck in the exposed front loops of Grandma head R22
Round 1: (sc, ch 2, skip next loop) rep around (~6 scallops), sl st to first sc
Round 2: (sc in ch-2 space, 3 dc in same space) around
FO and weave
Pink Cardigan (worked flat in rows)
Back Panel (Pink):
Row 1: ch 25, sc in 2nd ch from hook and across (24)
Row 2: ch 1, turn, 24 sc (24)
Row 3: ch 1, turn, 24 sc (24)
Row 4: ch 1, turn, 24 sc (24)
Row 5: ch 1, turn, 24 sc (24)
Row 6: ch 1, turn, 24 sc (24)
FO
Front Panels (make 2, Pink):
Row 1: ch 13, sc in 2nd ch and across (12)
Row 2: ch 1, turn, 12 sc (12)
Row 3: ch 1, turn, 12 sc (12)
Row 4: ch 1, turn, 12 sc (12)
Row 5: ch 1, turn, 12 sc (12)
FO
Assembly: Sew shoulders (top 3 sts of each front to back panel). Sew sides leaving armholes. Slip on doll.
Sleeves (work in rounds into armholes):
Round 1: pick up 18 sc evenly around armhole (18)
Round 2: 18 sc (18)
Round 3: 18 sc (18)
Round 4: (sc, dec) x6 (12)
Round 5: 12 sc (12)
Round 6: 12 sc (12)
FO. Repeat for other sleeve
Grandma Hair – Wrapped Side Bun Style (Gray) 🎀
Main Hair Cap:
R1: MR 6 sc (6)
R2: inc x6 (12)
R3: (sc, inc) x6 (18)
R4: (2 sc, inc) x6 (24)
R5: (3 sc, inc) x6 (30)
R6: (4 sc, inc) x6 (36)
R7: (5 sc, inc) x6 (42)
R8: (6 sc, inc) x6 (48)
R9: 48 sc (48)
R10: 48 sc (48)
R11: 48 sc (48)
R12: 48 sc (48)
FO
Fit the cap to cover the entire head, sew securely all around
Creating the Wrapped Yarn Texture:
Cut 70–90 strands of gray yarn (≈16–20 cm each)
Using a latch hook or crochet hook, attach strands densely around the entire cap, starting from the hairline and working toward the crown
Space them evenly for full coverage – you want a thick, dense application
Forming the Side Bun:
Once all strands are attached, smooth them back from the face
Gather all the yarn strands and pull them to the RIGHT side of the head (when looking at the doll from front)
Begin wrapping the gathered yarn horizontally around itself, creating visible wrapped ridges
Form a rounded bun shape positioned on the lower right side of the head
As you wrap, use matching gray thread to tack the layers in place, securing the wrapped texture
The finished bun should show distinct horizontal wrapped ridges and sit prominently on the side/back right
Flower Accent:
Make 2 small flowers in pastel colors (try light blue and peach, or mint and peach):
Flower: MR: (sl st, ch 2, 2 dc, ch 2, sl st) x5
Add tiny yellow French-knot center to each
Sew both flowers together in a small cluster on the front/top of the bun
Face details:
Embroider soft gray eyebrows above eyes (curved, gentle shape)
Embroider a gentle smile in red/pink thread
Add pink blush with a dab of pink yarn or fabric paint
🧔 Grandpa Doll
Shoes & Legs (make 2)
Black Shoes:
R1: MR 6 sc (6)
R2: inc x6 (12)
R3: (sc, inc) x6 (18)
R4: 18 sc (18)
R5: 18 sc (18)
R6: (sc, dec) x6 (12)
R7: 12 sc (12)
R8: 12 sc (12)
Switch to Beige/Tan (trousers):
R9: BLO 12 sc (12)
R10: 12 sc (12)
R11: 12 sc (12)
R12: 12 sc (12)
R13: 12 sc (12)
R14: 12 sc (12)
R15: 12 sc (12)
R16: 12 sc (12)
R17: 12 sc (12)
R18: 12 sc (12)
FO leaving long tails
Shoe Cuff (optional detail): Join white at R9 FLO and work 12 sc around; FO
Body with Shirt, Belt, Trousers (worked from Grandpa head’s R23)
Switch to White (shirt):
R1: inc x12 (24)
R2: (sc, inc) x12 (36)
R3: 36 sc (36)
R4: 36 sc (36)
R5: 36 sc (36)
Switch to Dark Brown (belt):
R6: 36 sc (36)
Switch to Beige (trousers):
R7: 36 sc (36)
R8: (4 sc, dec) x6 (30)
R9: 30 sc (30)
R10: (3 sc, dec) x6 (24)
R11: 24 sc (24)
R12: (2 sc, dec) x6 (18)
R13: 18 sc (18)
FO and sew legs to base so he can sit on the bench naturally
Attach Arms: sew at R3–R4 (white shirt rounds)
Grandpa Jacket (Brown; open front)
Back Panel:
Row 1: ch 25, sc in 2nd ch and across (24)
Row 2: ch 1, turn, 24 sc (24)
Row 3: ch 1, turn, 24 sc (24)
Row 4: ch 1, turn, 24 sc (24)
Row 5: ch 1, turn, 24 sc (24)
Row 6: ch 1, turn, 24 sc (24)
FO
Front Panels (make 2):
Row 1: ch 13, sc in 2nd ch and across (12)
Row 2: ch 1, turn, 12 sc (12)
Row 3: ch 1, turn, 12 sc (12)
Row 4: ch 1, turn, 12 sc (12)
Row 5: ch 1, turn, 12 sc (12)
FO
Assembly: Sew shoulders (top 3 sts of each front to back). Sew sides leaving armholes.
Sleeves (worked in rounds):
Round 1: pick up 18 sc around armhole (18)
Round 2: 18 sc (18)
Round 3: 18 sc (18)
Round 4: (sc, dec) x6 (12)
Round 5: 12 sc (12)
Round 6: 12 sc (12)
FO. Repeat other sleeve
Grandpa Hair – Full Fluffy Wave Crown (Gray) ☁️
Hair Cap Base:
R1: MR 6 sc (6)
R2: inc x6 (12)
R3: (sc, inc) x6 (18)
R4: (2 sc, inc) x6 (24)
R5: (3 sc, inc) x6 (30)
R6: (4 sc, inc) x6 (36)
R7: (5 sc, inc) x6 (42)
R8: (6 sc, inc) x6 (48)
R9: 48 sc (48)
R10: 48 sc (48)
R11: 48 sc (48)
FO
Sew cap to cover the ENTIRE head – this doll has a full head of hair with NO bald spots
Creating the Fluffy Crown:
Cut 90–120 short strands of gray yarn (≈7–9 cm each for a fluffy cloud effect)
Using a latch hook or crochet hook, attach strands very densely all over the cap
Start from the front hairline and cover the entire top, sides, and back
The strands should be packed closely together to create thick, voluminous coverage
Forming the Wave Ridges:
Once all strands are attached, gently brush them with a pet slicker brush to create a softer, fluffier texture
Arrange the yarn strands in horizontal curved waves across the head
Using matching gray thread and a yarn needle, create the wave pattern by:
- Starting at the front, smooth a section of hair horizontally across
- Take small tack stitches underneath to hold this wave in place
- Move back about 1 cm and create the next horizontal wave
- Continue creating 4–5 distinct wave ridges from front to back
The waves should follow the natural curve of the head and create horizontal ridges that give the hair dimension and texture
The final result should look like a full, fluffy cloud of hair with gentle wave lines running horizontally across
Eyebrows:
Embroider two thick gray bars above eyes using satin stitch or duplicate stitch for a full, prominent look
Mustache:
Cut 15–20 strands of gray yarn (≈4–5 cm each)
Attach them in a horizontal line just below the nose, spreading across the width below the nose
Trim and shape into a full, bushy mustache that curves slightly upward at the edges
Brush gently with a wire brush or pet slicker brush for fuzzy texture
Secure edges with tiny stitches so the mustache sits prominently on the face
Face details:
Embroider a gentle smile in red/pink thread
Add pink blush
🪑 Simple Park Bench
Seat (Beige/Wheat; worked in rows)
Row 1: ch 34, sc in 2nd ch and across (33)
Row 2: ch 1, turn, BLO 33 sc (33)
Row 3: ch 1, turn, BLO 33 sc (33)
Row 4: ch 1, turn, BLO 33 sc (33)
Row 5: ch 1, turn, BLO 33 sc (33)
Row 6: ch 1, turn, BLO 33 sc (33)
FO
Make 2 identical pieces and whipstitch together for thickness
Backrest (Beige/Wheat; worked in rows)
Row 1: ch 34, sc in 2nd ch and across (33)
Row 2: ch 1, turn, BLO 33 sc (33)
Row 3: ch 1, turn, BLO 33 sc (33)
Row 4: ch 1, turn, BLO 33 sc (33)
FO
Make 2 and stitch together
Legs & Arm Supports (Black; make 2)
Vertical Leg:
R1: MR 6 sc (6)
R2: inc x6 (12)
R3: 12 sc (12)
R4: 12 sc (12)
R5: 12 sc (12)
R6: 12 sc (12)
R7: 12 sc (12)
R8: 12 sc (12)
Armrest Extension:
R9: ch 12, turn, sc back along chain (12), continue around leg
R10: sc around the joined shape
FO
Stiffen with pipe-cleaner if desired
Make two support pieces. Sew seat between the two supports. Attach backrest behind seat at top edge.
Bench Slat Detail:
Using beige yarn, surface slip stitch 3–4 horizontal lines across both seat and backrest for wood-plank texture
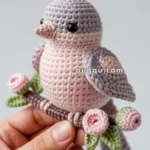
🐦 Tiny Bird
Bird (Light Gray):
R1: MR 6 sc (6)
R2: (sc, inc) x3 (9)
R3: 9 sc (9)
R4: 9 sc (9)
R5: (sc, dec) x3 (6)
Stuff very lightly, FO with tail for sewing
Wings (make 2, Light Gray):
ch 4, sc in 2nd ch from hook, hdc, dc in last ch, sl st back down
FO and sew to sides of body
Tail (Light Gray):
ch 5, sl st back along chain
FO and sew to rear of body, pointing slightly upward
Belly (White):
MR 5 sc, FO leaving tail
Sew to underside of bird body
Beak (Orange or Yellow):
ch 3, sl st back
FO and sew to center front of face (the beak should be small and triangular)
Eyes:
Use black embroidery thread to make 2 tiny French knots for eyes, positioned above the beak
Position bird on the bench arm or seat beside the dolls
🌼 Ground Flowers (make 3–4 in different colors)
5-Petal Flower (make in pink, white, light blue, or yellow):
MR: (sl st, ch 2, 3 dc, ch 2, sl st) x5
FO leaving a tail
Add a contrasting French-knot or tiny bead center (yellow works well for most colors)
Stem with Leaves (Green):
ch 10, sl st in 2nd ch from hook, sc in next 7 ch, sl st in last ch
For leaf: in the 4th or 5th ch from the starting end, work (ch 3, dc in same ch, ch 3, sl st in same ch)
FO
Attach flower head to top of stem
Assembly: Arrange flowers on a green crocheted base or felt piece to create the garden ground setting
🧷 Assembly & Finishing
- Prepare faces: Pin noses and ears. Embroider eyebrows, mouths, and add blush to both dolls.
- Style hair:
- Grandma: Attach yarn strands all around the head cap densely, then gather all strands to the right side and wrap them into a rounded bun with visible horizontal ridges. Secure with thread as you wrap. Add the two small pastel flowers to the front of the bun.
- Grandpa: Attach short yarn strands very densely all over the head cap for full coverage. Brush gently to fluff. Create 4-5 horizontal wave ridges across the head by smoothing and tacking sections with thread. Add bushy mustache below nose.
- Join hands: Attach arms so the hands touch and overlap. Stitch fingertips together to create the hand-holding effect 🤝
- Dress Grandma: Slip on dress, add cardigan over top, arrange white collar neatly.
- Dress Grandpa: Put jacket on over shirt. The white shirt should peek out at collar and cuffs.
- Position on bench: Sew legs so both dolls sit comfortably side-by-side on the bench edge. Adjust stuffing for natural sitting position with slight knee bend.
- Add accessories: Perch the bird on one arm of the bench. Place flowers at their feet on the green base.
- Final touches: Weave in all ends. Steam-block garments lightly if needed (avoid the dolls). Adjust hand position and ensure they look content together! 💕
💡 Tips for Success
✨ Hair texture: Use a wire pet brush to gently fluff the yarn after attaching for a softer, more natural look
✨ Seated position: Under-stuff the hips slightly so the dolls can sit naturally without toppling
✨ Hand-holding: Position hands so they overlap naturally – you can even weave the fingers slightly
✨ Facial expressions: The key to sweet expressions is placing the smile slightly off-center and keeping eyebrows soft and gentle
✨ Color matching: If you can’t find the exact colors, choose soft, muted tones that complement each other
Enjoy creating this sweet couple! They make a wonderful gift for grandparents or a touching decoration for any home. 🏡💕


Ficaram bonitos parabéns
Superbe couple