Bring a splash of riverside charm to your crochet collection with the Amigurumi Kingfisher With Fish, a vibrant and eye-catching project that’s full of personality! 🐦🧶 With its turquoise head and wings, warm ochre belly, crisp white throat band, and long charcoal beak, this little bird is a delightful tribute to nature’s boldest fisherman. Glossy safety eyes give it a lifelike sparkle, while the dangling mint fish adds a playful touch that’s sure to make you smile.
Perched on a twig with tiny orange feet, this kingfisher is perfect for bookshelf displays, nature-themed décor, or thoughtful handmade gifts. Whether you’re a bird lover, a fan of colorful projects, or simply looking for something unique to stitch, this pattern invites you to explore texture, contrast, and charm in every detail. The Amigurumi Kingfisher With Fish is a joyful way to stitch up beauty, whimsy, and a splash of handmade wonder—one loop at a time! 🧵🌿
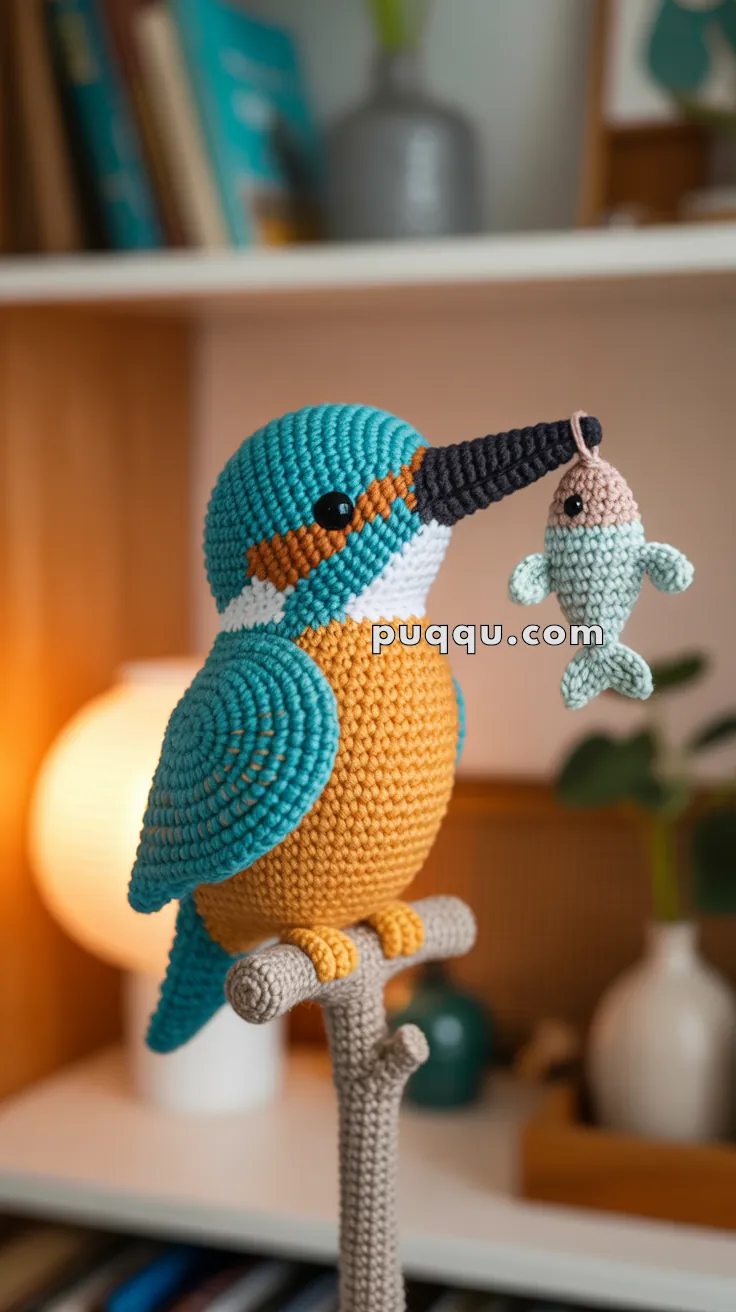
Amigurumi Kingfisher with Fish Crochet Pattern 🩵🐟
Add a touch of color and charm to your handmade collection with this stunning amigurumi kingfisher! Perched proudly on a crochet branch and holding a tiny fish in its beak, this bright bird captures every detail—from its vibrant turquoise feathers to the delicate orange chest. A showstopper for nature lovers and crochet enthusiasts alike! 🌿✨
🧶 Skill Level
Intermediate – includes shaping, color changes, and assembly of multiple pieces.
📏 Finished Size
Approximately 30 cm (12 in) tall including the branch.
Fish measures about 9 cm (3.5 in) long.
🪡 Materials
- DK-weight cotton or acrylic yarn
- Turquoise/Teal – 100 g (~265 m)
- Ochre/Golden Orange – 90 g (~240 m)
- White – 15 g (~40 m)
- Charcoal/Black – 25 g (~65 m)
- Light Mint – 25 g (~65 m)
- Pale Beige – 10 g (~26 m)
- Small amount of black thread for embroidery (optional)
- Crochet hook: 3.0 mm (US C/2–D/3)
- Safety eyes: 10 mm (bird), 6 mm (fish)
- Fiberfill stuffing
- Yarn needle, stitch marker, scissors
- Optional: 20 cm wooden dowel or wire for branch
- Small washer or coin for branch base stability
🧵 Pattern Instructions
All instructions use US crochet terms.
Work continuously in the round unless stated.
Abbreviations: MR – magic ring, sc – single crochet, inc – increase (2 sc in one stitch), dec – invisible decrease, ch – chain, sl st – slip stitch.
🟠 BODY (Ochre)
R1: 6 sc in MR (6)
R2: inc x6 (12)
R3: (sc, inc) x6 (18)
R4: (2 sc, inc) x6 (24)
R5: (3 sc, inc) x6 (30)
R6: (4 sc, inc) x6 (36)
R7: (5 sc, inc) x6 (42)
R8: (6 sc, inc) x6 (48)
R9: (7 sc, inc) x6 (54)
R10: (8 sc, inc) x6 (60)
R11–R13: sc around (60)
R14: (9 sc, inc) x6 (66)
R15–R17: sc around (66)
R18: (9 sc, dec) x6 (60)
R19–R20: sc around (60)
R21: (8 sc, dec) x6 (54)
R22–R23: sc around (54)
R24: (7 sc, dec) x6 (48)
R25–R26: sc around (48)
R27: (6 sc, dec) x6 (42)
R28–R29: sc around (42)
R30: (5 sc, dec) x6 (36)
R31–R32: sc around (36)
R33: (4 sc, dec) x6 (30)
R34: (3 sc, dec) x6 (24)
R35: sc around (24)
R36: sl st, fasten off, leave long tail for sewing.
Stuff firmly into an egg shape (wider at the bottom).
🩵 HEAD (Turquoise with White Throat)
R1: 6 sc in MR (6)
R2: inc x6 (12)
R3: (sc, inc) x6 (18)
R4: (2 sc, inc) x6 (24)
R5: (3 sc, inc) x6 (30)
R6: (4 sc, inc) x6 (36)
R7: (5 sc, inc) x6 (42)
R8: (6 sc, inc) x6 (48)
R9–R12: sc around (48)
R13–R14: Change to White, sc around (48)
R15: Change back to Turquoise, sc around (48)
R16: (6 sc, dec) x6 (42)
R17: sc around (42)
R18: (5 sc, dec) x6 (36)
📍 Insert 10 mm safety eyes between R11–R12, about 13 stitches apart.
R19: (4 sc, dec) x6 (30)
R20: sc around (30)
R21: (3 sc, dec) x6 (24)
R22: (2 sc, dec) x6 (18)
R23: (sc, dec) x6 (12)
R24: dec x6 (6)
R25: sl st, fasten off, stuff firmly.
Sew head to body with the white band facing front for a clean throat contrast.
🧡 CHEEK STRIPE (Ochre)
R1: ch 21, sc in 2nd ch from hook (20)
R2: ch 1, turn, sc across (20)
R3: ch 1, turn, dec, sc 16, dec (18)
R4: ch 1, turn, sc across (18)
R5: ch 1, turn, dec, sc 14, dec (16)
R6: ch 1, turn, sc across (16)
R7: ch 1, turn, dec, sc 12, dec (14)
R8: ch 1, turn, sc across (14)
R9: ch 1, turn, dec, sc 10, dec (12)
R10: ch 1, turn, sc across (12)
R11: ch 1, turn, dec, sc 8, dec (10)
R12: ch 1, turn, sc across (10)
R13: ch 1, turn, dec, sc 6, dec (8)
R14: ch 1, turn, sc across (8)
R15: ch 1, turn, dec, sc 4, dec (6)
R16: ch 1, turn, sc across (6)
R17: fasten off, leave tail.
Make 2 mirrored pieces. Sew diagonally under the eyes toward the beak.
⚫ BEAK (Charcoal)
R1: 4 sc in MR (4)
R2: sc around (4)
R3: (sc, inc) x2 (6)
R4: sc around (6)
R5: (2 sc, inc) x2 (8)
R6: sc around (8)
R7: (3 sc, inc) x2 (10)
R8: sc around (10)
R9: (4 sc, inc) x2 (12)
R10: sc around (12)
R11: (5 sc, inc) x2 (14)
R12: sc around (14)
R13: (6 sc, inc) x2 (16)
R14: sc around (16)
R15: (7 sc, inc) x2 (18)
R16–R18: sc around (18)
R19: sl st, fasten off, leave long tail.
Stuff lightly. Sew centered between eyes, slightly tilted upward.
🪽 WINGS ×2 (Turquoise)
Worked in BLO to form ridged texture.
R1: 6 sc in MR (6)
R2: BLO inc x6 (12)
R3: BLO (sc, inc) x6 (18)
R4: BLO (2 sc, inc) x6 (24)
R5: BLO (3 sc, inc) x6 (30)
R6: BLO (4 sc, inc) x6 (36)
R7: BLO (5 sc, inc) x6 (42)
R8: BLO (6 sc, inc) x6 (48)
R9: BLO (7 sc, inc) x6 (54)
R10–R11: BLO sc around (54)
R12: BLO (7 sc, dec) x6 (48)
R13: BLO (6 sc, dec) x6 (42)
R14: BLO sc around (42)
R15: sl st, fasten off.
Lightly stuff, sew symmetrically along body sides (align top edge with R18–R22).
🪶 TAIL (Turquoise)
R1: ch 9, sc in 2nd ch from hook (8)
R2: ch 1, turn, dec, 4 sc, dec (6)
R3: ch 1, turn, sc across (6)
R4: ch 1, turn, dec, 2 sc, dec (4)
R5: ch 1, turn, sc across (4)
R6: ch 1, turn, dec, dec (2)
R7: ch 1, turn, sc2tog (1)
R8: sc evenly around the edge, sl st to join.
Sew flat to back base, pointing slightly downward.
🧡 FEET ×2
R1: 5 sc in MR (5)
R2: inc, sc 4 (6)
R3–R5: sc around (6)
R6: sl st, fasten (first toe).
R7: Make second toe, don’t cut yarn; join both toes: sc 6 around first toe, sc 6 around second (12).
R8: (sc, dec) x4 (8)
R9–R10: sc around (8)
R11: sl st, fasten off.
Lightly stuff. Sew under front of body, curling around branch.
🌿 BRANCH (Grey)
R1: 6 sc in MR (6)
R2: (sc, inc) x3 (9)
R3–R5: sc around (9)
R6: (2 sc, inc) x3 (12)
R7–R20: sc around (12)
R21: sl st, fasten off.
Insert dowel or wire inside, stuff firmly. Attach smaller twig (6 sc in MR, work 6 rounds) to side.
🐟 LITTLE FISH (Mint & Beige)
Body:
R1: With Beige, 6 sc in MR (6)
R2: (sc, inc) x3 (9)
R3: sc around (9)
R4: Change to Mint, (2 sc, inc) x3 (12)
R5: (3 sc, inc) x3 (15)
R6–R7: sc around (15)
R8: (3 sc, dec) x3 (12)
R9: (2 sc, dec) x3 (9)
R10–R11: sc around (9)
R12: dec x3 (6)
R13: sl st, close, stuff lightly.
Add 6 mm safety eyes at R4–R5 sides.
Side Fins ×2:
R1: 5 sc in MR (5)
R2: (sc, inc) x2, sc (7)
R3: sl st, flatten and sew mid-body.
Tail:
R1: ch 7, sc in 2nd ch and next 5 (6)
R2: ch 1, turn, dec, 2 sc, dec (4)
R3: ch 1, turn, dec, dec (2)
R4: ch 1, turn, sc2tog (1)
Edge around, sew to back.
Loop:
R1: With Beige, ch 14, sl st to form loop, fasten off.
Attach to fish head top for hanging.
🧩 ASSEMBLY
- Sew head to body, aligning the white throat.
- Stitch cheek stripes diagonally under each eye.
- Attach beak, centered slightly upward.
- Sew wings symmetrically, angled back.
- Add tail to lower back.
- Mount bird on branch, sew feet gripping twig.
- Hang fish from beak loop.
- Steam-block wings to emphasize ridges.
🌟 Final Touches
Use gentle shaping around eyes for realism. Adjust perch angle for balance.
Your kingfisher is now ready to brighten up your space with its charming catch! 🩵✨