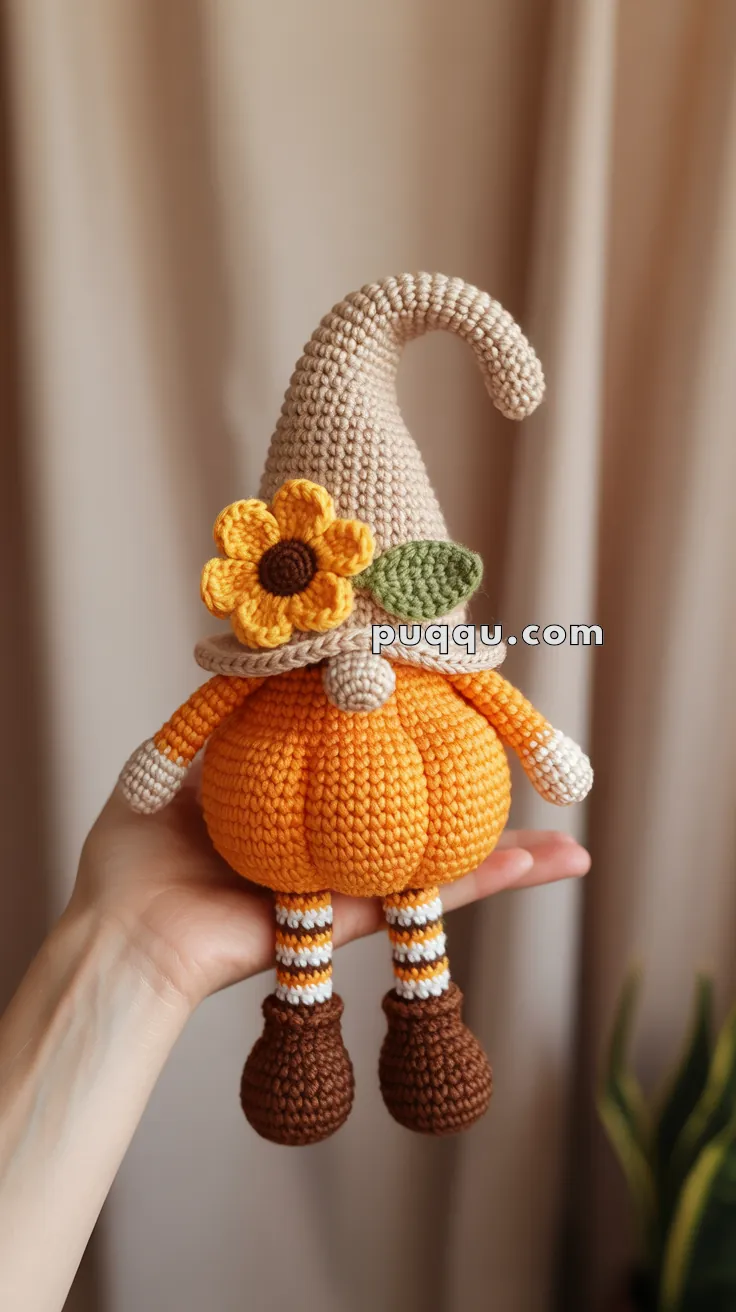
Welcome autumn with a burst of handmade charm thanks to the Amigurumi Pumpkin Patch Gnome, a cozy little character that’s brimming with seasonal sweetness! 🎃🧶 Featuring a plump pumpkin body with textured ridges, striped legs, and snug little boots, this gnome is ready to bring warmth and whimsy to your fall décor. His curved pointy hat, adorned with a sunflower and leaf, adds a delightful touch of harvest magic that’s perfect for Thanksgiving tables, Halloween shelves, or cozy corner displays.
Ideal for crocheters who love playful details and festive flair, this pattern invites you to mix rich autumn colors with soft textures and cheerful embellishments. Personalize your gnome with different hat decorations, add a tiny basket of mini pumpkins, or stitch up a whole patch of gnome friends to celebrate the season. The Amigurumi Pumpkin Patch Gnome is a joyful way to stitch up fall fun, one loop at a time! 🧵🍂🌻
🎃 Pumpkin Patch Gnome Amigurumi Pattern
Bring autumn charm into your home with this delightful Pumpkin Gnome! Featuring a plump pumpkin body with ridges, striped legs, cozy boots, and a whimsical curved pointy hat decorated with a sunflower and leaf, this gnome is perfect for fall decor, gifts, or seasonal displays.
📊 Skill Level
Intermediate – This pattern uses basic amigurumi techniques, color changes, shaping, and assembly. If you’ve completed a few amigurumi projects, you’ll love making this cozy autumn friend.
📏 Finished Size
Approximately 8–9 inches (20–23 cm) tall including hat (using DK/light worsted yarn and 2.5–3.0 mm hook).
🧶 Materials Needed
Yarn (DK or Light Worsted Weight)
- Orange (pumpkin body) – 35g
- Beige/Tan (hat, arms, nose) – 30g
- Brown (boots, flower center) – 20g
- White/Cream (leg stripes) – 15g
- Yellow (flower petals) – 8g
- Green (leaf) – 5g
Other Supplies
- Crochet hook: 2.5mm–3.0mm
- Safety eyes: 6mm black (or embroider eyes)
- Polyester fiberfill stuffing
- Yarn needle for sewing
- Stitch markers
- Scissors
- Optional: Wire or pipe cleaner for hat shaping
🔤 Abbreviations (US Terms)
- MR = Magic Ring
- sc = single crochet
- hdc = half double crochet
- dc = double crochet
- inc = increase (2 sc in one stitch)
- dec = decrease (sc 2 together)
- sl st = slip stitch
- ch = chain
- BLO = back loop only
- FLO = front loop only
- st(s) = stitch(es)
🧵 Pattern Instructions
Pumpkin Body (Orange)
Round 1: MR, 6 sc (6)
Round 2: inc in each st (12)
Round 3: (sc, inc) x6 (18)
Round 4: (2 sc, inc) x6 (24)
Round 5: (3 sc, inc) x6 (30)
Round 6: (4 sc, inc) x6 (36)
Round 7: (5 sc, inc) x6 (42)
Round 8: (6 sc, inc) x6 (48)
Rounds 9–20: sc around (48) – 12 rounds total
Round 21: (6 sc, dec) x6 (42)
Round 22: (5 sc, dec) x6 (36)
Round 23: (4 sc, dec) x6 (30)
Round 24: (3 sc, dec) x6 (24)
Round 25: (2 sc, dec) x6 (18)
Stuff firmly with fiberfill.
Round 26: (sc, dec) x6 (12)
Round 27: dec x6 (6)
Fasten off, close the opening.
Creating Pumpkin Ridges
Using a long strand of orange yarn and yarn needle:
- Insert needle from bottom center up through the top center
- Pull yarn down one side creating a vertical line
- Wrap around bottom and pull tight to create indent
- Repeat 6–8 times evenly around the body to create pumpkin segments
- Secure tightly at bottom and weave in end
Nose (Beige/Tan)
Round 1: MR, 6 sc (6)
Round 2: inc in each st (12)
Rounds 3–4: sc around (12)
Round 5: (sc, dec) x4 (8)
Stuff lightly, fasten off leaving long tail for sewing.
Legs (Make 2 – Striped)
Boot Section (Brown)
Round 1: MR, 6 sc (6)
Round 2: inc in each st (12)
Round 3: (sc, inc) x6 (18)
Rounds 4–6: sc around (18) – 3 rounds
Round 7: (sc, dec) x6 (12)
Rounds 8–9: sc around (12)
Striped Leg Section
Change colors every 2 rounds in this order:
- Rounds 10–11: White/Cream (12)
- Rounds 12–13: Orange (12)
- Rounds 14–15: White/Cream (12)
- Rounds 16–17: Brown (12)
- Rounds 18–19: White/Cream (12)
Fasten off, leaving long tail. Stuff boots firmly, legs lightly.
Arms (Make 2 – Beige/Tan)
Round 1: MR, 6 sc (6)
Rounds 2–10: sc around (6) – 9 rounds total
Fasten off, leaving long tail. Do not stuff. Flatten slightly.
Pointy Hat (Beige/Tan)
Round 1: MR, 6 sc (6)
Round 2: inc in each st (12)
Round 3: (sc, inc) x6 (18)
Round 4: (2 sc, inc) x6 (24)
Round 5: (3 sc, inc) x6 (30)
Round 6: (4 sc, inc) x6 (36)
Rounds 7–28: sc around (36) – 22 rounds total for tall pointed tip
Hat Brim
Round 29: Working in FLO, (5 sc, inc) x6 (42)
Round 30: (6 sc, inc) x6 (48)
Round 31: Working in BLO, sc around (48)
Round 32: sc around (48)
Fasten off, leaving long tail for sewing.
The FLO/BLO technique creates a natural rolled edge at the brim. Leave the hat unstuffed or very lightly stuff only the tip. Insert wire or pipe cleaner through center to create the curved droopy shape as shown.
Sunflower Decoration
Flower Center (Brown)
Round 1: MR, 6 sc (6)
Round 2: inc in each st (12)
Fasten off.
Flower Petals (Yellow)
Attach yellow yarn to any stitch on the brown center.
Petal pattern: (ch 4, sl st in 2nd ch from hook, hdc in next ch, dc in next ch, sl st in next st on center) – repeat 6–7 times around the center to create evenly spaced petals.
Fasten off, weave in ends. Gently shape petals outward.
Leaf (Green)
Foundation: Ch 8
Work back along the chain:
Leaf side 1: Skip first ch, sl st, sc, hdc, dc, hdc, sc, 3 sc in last ch (tip)
Leaf side 2: Working along opposite side of foundation chain: sc, hdc, dc, hdc, sc, sl st
Fasten off, leaving tail for sewing.
🧩 Assembly Instructions
Step 1: Attach Legs
Position legs at bottom of pumpkin body, spaced evenly and angled slightly outward. Sew securely using brown yarn tails from the boots.
Step 2: Attach Arms
Sew arms to upper-middle sides of pumpkin body, positioned horizontally extending outward from the body.
Step 3: Add Nose
Center the nose on the front of the pumpkin, approximately at the widest part of the body. Sew securely.
Step 4: Insert Safety Eyes
If using safety eyes, position them just above and to the sides of the nose, approximately 4–5 stitches apart. The eyes should be small and somewhat hidden by the hat. Alternatively, embroider small eyes or omit for a faceless gnome look.
Step 5: Attach Hat
Place hat on top of pumpkin body, positioning it slightly forward and tilted to one side for character. The brim should sit snugly around the top of the pumpkin. Sew around the brim edge to secure. Bend and shape the tip of the hat to create the curved droopy look.
Step 6: Add Flower and Leaf
Position the sunflower on the lower front part of the hat near the brim. Layer the green leaf behind the flower at a slight angle. Sew both pieces securely to the hat.
Step 7: Final Touches
- Weave in all remaining yarn ends
- Adjust hat curve and positioning
- Shape flower petals
- Fluff and shape as needed
🌟 Tips & Variations
- Hat Shaping: Insert a pipe cleaner or floral wire through the center of the hat before assembly for easier positioning of the curved tip. The hat should droop gracefully to one side.
- Stripe Variations: Try different color combinations for seasonal looks – red and white for Christmas gnomes, pastels for spring
- Embroidered Details: Add small stitches for a smile or rosy cheeks if desired
- Size Adjustments: Use thicker yarn (worsted weight) and 3.5mm hook for a bigger gnome, or fingering weight yarn for a miniature version
- Display Ideas: These gnomes look wonderful on shelves, mantels, or as table centerpieces. Make several for a complete autumn display!
🎃 Your Autumn Gnome is Complete!
This cheerful Pumpkin Patch Gnome with his plump pumpkin body, cozy striped legs, and flower-adorned hat is ready to bring autumn warmth to your home. Make a whole gnome family with different colored hats and flowers for a complete seasonal collection!
Happy Crocheting! 🧶✨