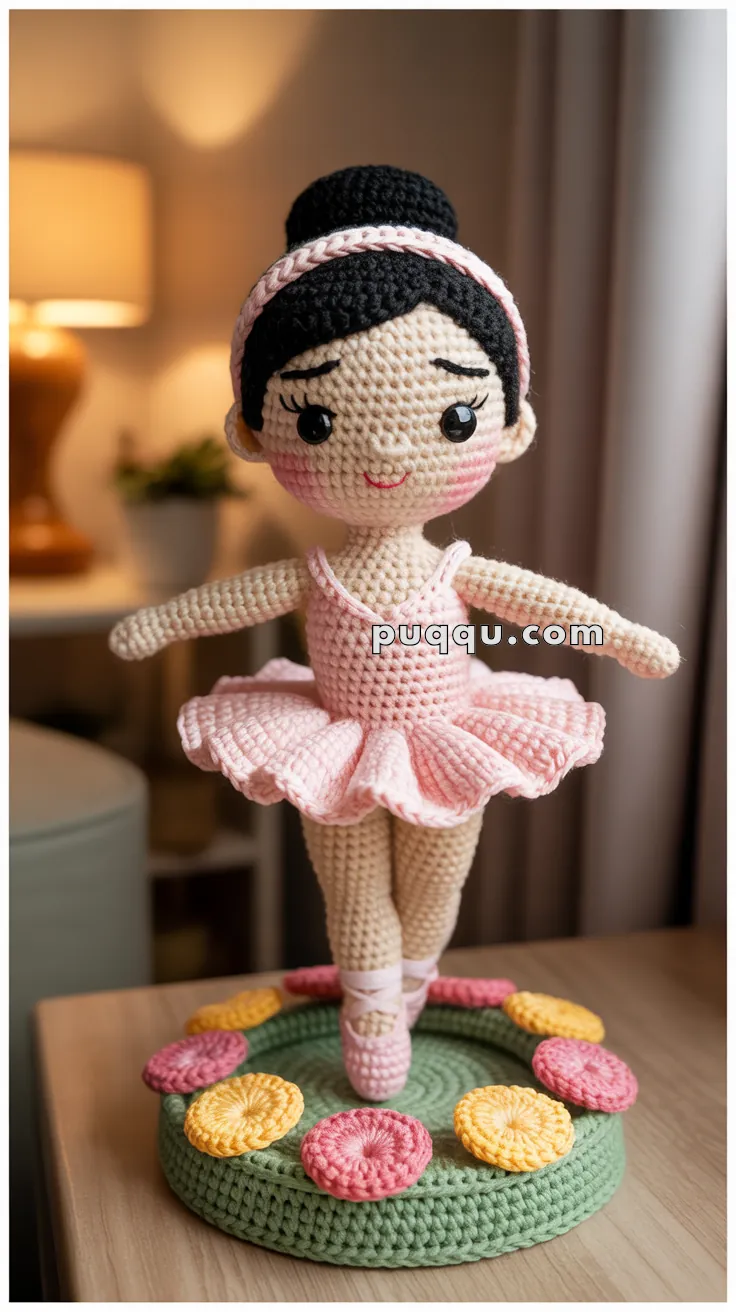
Grace your crochet collection with the Amigurumi Sweet Ballerina, a project that’s as elegant as it is enchanting! 🩰🧶 Standing en pointe atop her decorated performance base, she captures the magic of the ballet with every detail. From her soft pink leotard and beautifully ruffled skirt to the delicate crossed ribbons on her shoes, she’s a handmade treasure that radiates charm and poise.
Her high bun crowned with a braided headband completes the look, making her the perfect display piece for dancers, dreamers, and crochet lovers alike. Whether gifted to a ballet enthusiast or kept as a whimsical addition to your own décor, the Amigurumi Sweet Ballerina is a joyful way to stitch together grace, beauty, and a sprinkle of handmade magic—one loop at a time! ✨🧵🌸
🩰Amigurumi Sweet Ballerina Crochet Pattern
This graceful little ballerina brings a soft, dreamy charm to any room. With her high bun, delicate headband, fluttery tutu, and poised ballet stance, she looks ready to dance right off her stage. This project is joyful to make and beautifully detailed, especially if you love designing characters with personality and elegance.
Displayed on her colorful round stage, she stands tall and balanced, giving her the perfect presentation for nursery décor, gifts, or your handmade doll collection. Let’s bring this adorable ballerina to life step by step.
🧶 Skill Level
Intermediate – includes shaping, layered ruffles, surface slip stitching, and structured posing on a base.
✂️ Materials
- DK or Light Worsted yarn
- Skin tone (light beige) – 40g
- Black (hair) – 30g
- Light pink (leotard + tutu) – 50g
- Dark pink (cheeks + headband trim) – small amount
- Pink (ballet shoes) – 15g
- Green (base) – 50g
- Yellow + rose (base pads) – small amounts
- 2.5 mm or 3.0 mm hook (depending on your tension)
- 10 mm safety eyes
- Stuffing
- Stitch markers
- Tapestry needle
- Optional: wooden dowel or thick wire for support inside base + legs
🧁 Abbreviations
sc – single crochet
inc – increase
dec – invisible decrease
slst – slip stitch
ch – chain
FLO – front loop only
BLO – back loop only
st – stitch
rnd – round
🪄 Head
Skin tone.
Rnd 1: 6 sc in magic ring
Rnd 2: inc around (12)
Rnd 3: (1 sc, inc) ×6 (18)
Rnd 4: (2 sc, inc) ×6 (24)
Rnd 5: (3 sc, inc) ×6 (30)
Rnd 6: (4 sc, inc) ×6 (36)
Rnd 7: (5 sc, inc) ×6 (42)
Rnd 8: (6 sc, inc) ×6 (48)
Rnd 9–17: sc around (48)
Insert eyes between rnds 9–10, spaced 9 stitches apart.
Cheeks: Make two 12-st circles. Sew lightly below eyes.
Nose:
Rnd 1: 5 sc in magic ring
Rnd 2: (1 sc, inc, 1 sc) (7)
Rnd 3: sc around (7)
Stuff lightly and sew between eyes.
Mouth & Brows:
Use pink yarn for a soft curved smile.
Use black yarn for gently arched eyebrows.
Shape the head slightly by adding extra stuffing toward the lower half.
Rnd 18: (6 sc, dec) ×6 (42)
Rnd 19: (5 sc, dec) ×6 (36)
Rnd 20: (4 sc, dec) ×6 (30)
Rnd 21: (3 sc, dec) ×6 (24)
Rnd 22: (2 sc, dec) ×6 (18)
Rnd 23: dec around (9)
Close and fasten off.
🖤 Hair Cap
Black yarn.
Same increases as head until you reach 48 sts.
Work 6 more rnds of 48 sc.
Fasten off, leaving a long tail. Sew around the head, covering the upper hairline.
🖤 Bun
Rnd 1: 8 sc in magic ring
Rnd 2: inc around (16)
Rnd 3: (1 sc, inc) ×8 (24)
Rnd 4–6: sc around (24)
Rnd 7: (1 sc, dec) ×8 (16)
Stuff firmly.
Rnd 8: dec around (8)
Close and sew firmly to the top center of the head.
🎀 Pink Headband
Ch long enough to wrap around the head and bun (approx. 60–65 ch).
Slst back across to create a sturdy “braid” look.
Sew around hairline and behind bun.
🩰 Body & Leotard
Pink yarn.
Rnd 1: 6 sc in magic ring
Rnd 2: inc around (12)
Rnd 3: (1 sc, inc) ×6 (18)
Rnd 4: (2 sc, inc) ×6 (24)
Rnd 5: (3 sc, inc) ×6 (30)
Rnd 6–12: sc around (30)
Switch to light pink for leotard:
Rnd 13–20: sc around (30)
Rnd 21: (3 sc, dec) ×6 (24)
Rnd 22: (2 sc, dec) ×6 (18)
Rnd 23: (1 sc, dec) ×6 (12)
Stuff firmly.
Leave top open for sewing head.
Leotard Straps
Ch 18, slst to opposite shoulder. Repeat for second strap.
🩷 Tutu Skirt (two layers)
Attach to rnd 13 (BLO).
Layer 1
Rnd 1: FLO attach yarn → inc in every stitch (60)
Rnd 2: (1 sc, inc) ×30 (90)
Rnd 3: sc around (90)
Layer 2
Attach to unused loops behind layer 1.
Rnd 1: inc in every stitch (60)
Rnd 2: sc around (60)
Flare skirt outward with your fingers.
🫶 Arms (make 2)
Skin tone.
Rnd 1: 6 sc in MR
Rnd 2–12: sc around (6)
Switch to light pink for sleeve edge:
Rnd 13: sc around (6)
Stuff very lightly and sew to upper body.
🫶 Legs (make 2)
Skin tone.
Rnd 1: 6 sc in MR
Rnd 2: (1 sc, inc) ×3 (9)
Rnd 3–18: sc around (9)
Ballet Shoes
Switch to pink:
Rnd 19: (1 sc, inc) ×4, 1 sc (13)
Rnd 20–22: sc around (13)
Rnd 23: (1 sc, dec) ×4, 1 sc (9)
Rnd 24: dec to close.
Shape the toe into a soft point before stuffing.
Ballet Ribbons
Using pink yarn, surface-slip-stitch:
- Across the top of the shoe,
- Criss-cross up the front of the ankle,
- Wrap around back.
Tie off neatly.
🧘 Pose
Sew legs together at the upper 3–4 stitches.
Position so feet form the ballet pose shown (one foot forward, toes pointed).
You may add a support rod inside for stability (instructions below).
🌸 Base (green platform)
Green yarn.
Rnd 1: 6 sc in MR
Rnd 2: inc around (12)
Rnd 3: (1 sc, inc) ×6 (18)
Rnd 4: (2 sc, inc) ×6 (24)
Rnd 5: (3 sc, inc) ×6 (30)
Rnd 6: (4 sc, inc) ×6 (36)
Rnd 7: (5 sc, inc) ×6 (42)
Rnd 8: (6 sc, inc) ×6 (48)
Rnd 9: (7 sc, inc) ×6 (54)
Rnd 10–15: sc around (54)
Switch to BLO for flat top edge:
Rnd 16: sc around (54)
Rnd 17–20: sc around (54)
Stuff firmly. Optionally insert a weighted disk.
Fasten off and sew closed.
🌼 Base Decoration Pads
Make 10–12 pads in yellow and rose.
Rnd 1: 6 sc in MR
Rnd 2: inc around (12)
Rnd 3: (1 sc, inc) ×6 (18)
Fasten off and sew evenly around edges of base.
🦢 Attaching the Ballerina to the Base
You have two secure options:
Option A – Sew Only
- Position both feet where the doll should stand.
- Stitch around the base of each foot with several tight passes.
- Add extra stitches between the ankles for stability.
Option B – Support Rod (recommended)
- Insert a wooden dowel or thick wire into the center of the base.
- Push it upward through the legs until it reaches just below the body.
- Sew legs firmly around the rod.
- Attach feet to base as in Option A.
This creates the perfectly upright balancing stance seen in the model.
🧵 Final Assembly
- Sew head to body, angling it slightly forward for a gentle expression.
- Attach arms.
- Shape skirt upward with fingers.
- Adjust ribbons, smooth hair, and add final touches.
🌟 Outro
Your elegant little ballerina is complete—poised, graceful, and full of charm. Whether displayed on a shelf, gifted to a dance lover, or added to a collection, she has a magical presence that warms any room. Enjoy her delicate details and the joy she brings, stitch by stitch.