Curl up with some cozy cuteness and meet the Calico Cat Amigurumi, a patchwork purr-fection that’s ready to steal the spotlight! 🐾🧶 With its soft orange, gray, and white fur, embroidered smile, and charming curled striped tail, this little kitty is full of personality and warmth. Whether perched on a shelf, nestled in a gift basket, or snuggled into a child’s playroom, it’s the kind of handmade companion that melts hearts wherever it goes.
Perfect for crocheters who love playful details and cuddly textures, this pattern invites you to bring your own flair to every stitch. Mix up the patchwork colors, add a tiny collar or bell, or stitch up a whole litter of calico cuties for extra charm. The Calico Cat Amigurumi is a delightful way to stitch up love, whimsy, and a whole lot of feline fun—one loop at a time! 🧵🐱
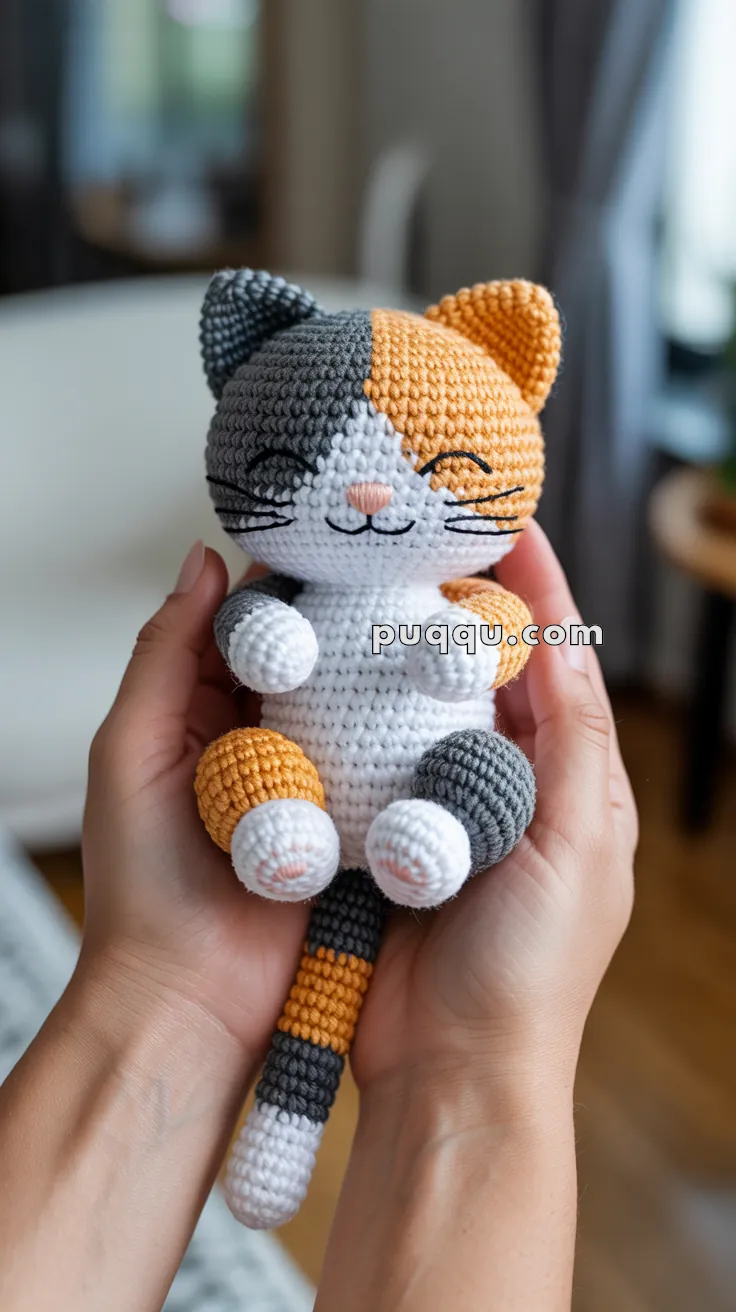
🐾 Amigurumi Calico Cat Crochet Pattern
Bring home a little bundle of joy with this adorable calico cat amigurumi! With its cozy orange, gray, and white patchwork fur, embroidered smile, and curled striped tail, this kitty will melt hearts. Perfect as a gift or as your own cuddly companion.
✨ Skill Level
Intermediate – involves color changes, shaping, sewing, and embroidery.
📏 Finished Size
~18–20 cm (7–8 in) tall using worsted yarn + 3.0–3.5 mm hook
🧶 Materials
- Worsted weight cotton or acrylic yarn:
- White – main body, paws, muzzle
- Orange – right ear, right patches, tail stripes
- Gray – left ear, left patches, tail stripes
- Pink – nose, paw pads (embroidery)
- Black – eyes, whiskers, smile (embroidery)
- Crochet hook: 3.0–3.5 mm
- Polyester fiberfill stuffing
- Yarn needle for sewing & embroidery
- Stitch marker
- Safety eyes 6-8mm (optional, or embroider)
- Scissors
🪡 Abbreviations (US Terms)
- MR = Magic Ring
- ch = chain
- sc = single crochet
- inc = increase (2 sc in same stitch)
- dec = decrease (sc 2 together)
- sl st = slip stitch
- st(s) = stitch(es)
- FO = fasten off
🐱 Pattern Instructions
HEAD
With white yarn:
- MR 6 sc (6)
- inc in each st (12)
- (sc, inc) × 6 (18)
- (2 sc, inc) × 6 (24)
- (3 sc, inc) × 6 (30)
- (4 sc, inc) × 6 (36)
- (5 sc, inc) × 6 (42) 8–13. sc around (42)
Begin calico coloring (asymmetric pattern):
- With gray yarn: 11 sc, switch to white: 10 sc, switch to orange: 11 sc, switch to white: 10 sc (42)
- This creates gray on upper left, orange on upper right
- Gray: 11 sc, white: 10 sc, orange: 11 sc, white: 10 sc (42)
- Gray: 10 sc, white: 11 sc, orange: 10 sc, white: 11 sc (42)
17–19. Continue with white only (42)
- The color patches are now in place at top of head
- (5 sc, dec) × 6 (36)
- (4 sc, dec) × 6 (30)
- Insert safety eyes between rounds 15-16, about 10 stitches apart (or mark placement for embroidery)
- (3 sc, dec) × 6 (24)
- Stuff head firmly
- (2 sc, dec) × 6 (18)
- (sc, dec) × 6 (12)
- dec × 6 (6)
FO, leaving tail. Weave through remaining stitches and close.
Embroidery:
- Eyes: If not using safety eyes, embroider black circles between rounds 15-16
- Nose: Pink triangle centered below eyes at round 17-18
- Whiskers: 3 black lines on each side from muzzle area
- Smile: Small curved line under nose in black
EARS (Make 2)
Right ear – Orange:
- MR 4 sc (4)
- (sc, inc) × 2 (6)
- (2 sc, inc) × 2 (8)
- (3 sc, inc) × 2 (10)
- sc around (10)
FO, leave long tail for sewing.
Left ear – Gray: Follow same pattern as right ear using gray yarn.
Positioning: Sew ears to top of head at rounds 7-9, orange ear on right side (where orange patch is), gray ear on left side (where gray patch is).
BODY
With white yarn:
- MR 6 sc (6)
- inc × 6 (12)
- (sc, inc) × 6 (18)
- (2 sc, inc) × 6 (24)
- (3 sc, inc) × 6 (30)
6–10. sc around (30)
Add calico patches:
- White: 8 sc, orange: 7 sc, white: 8 sc, gray: 7 sc (30)
- White: 8 sc, orange: 7 sc, white: 8 sc, gray: 7 sc (30)
- White: 9 sc, orange: 6 sc, white: 9 sc, gray: 6 sc (30)
14–16. Continue with white only (30)
- (3 sc, dec) × 6 (24)
- (2 sc, dec) × 6 (18)
- Stuff body firmly
- (sc, dec) × 6 (12)
- dec × 6 (6)
FO, close opening.
ARMS (Make 2)
Right arm (orange patch):
With white yarn:
- MR 6 sc (6)
- inc × 6 (12) 3–6. sc around (12)
Switch to orange: 7–12. sc around (12)
FO, leave tail. Stuff lightly (keep flexible).
Left arm (gray patch): Follow same pattern but use gray for rounds 7–12.
Positioning: Sew arms to sides of body at rounds 17-19.
LEGS (Make 2)
Right leg (orange patch):
With white yarn:
- MR 6 sc (6)
- inc × 6 (12)
- (sc, inc) × 6 (18) 4–6. sc around (18)
Switch to orange: 7–10. sc around (18)
- (sc, dec) × 6 (12)
12–13. sc around (12)
FO, leave tail. Stuff firmly at paw, lightly at top.
Embroider pink paw pads: On the white paw bottom, make 4 small pink circles for toe beans and 1 larger oval for the main pad.
Left leg (gray patch): Follow same pattern but use gray for rounds 7–10.
Positioning: Sew legs to bottom of body.
TAIL (Striped)
Start with orange:
- MR 6 sc (6)
- (2 sc, inc) × 2 (8)
- sc around (8)
4–6. sc around with orange (8)
7–10. Switch to gray, sc around (8)
11–14. Switch to white, sc around (8)
15–18. Switch to orange, sc around (8)
19–21. Switch to gray, sc around (8)
FO, leave long tail. Stuff lightly, keeping flexible.
Positioning: Sew to back of body at rounds 18-20, angled slightly to one side with a gentle curve.
🧵 Assembly Guide
- Head to body: Sew head securely to top of body, ensuring calico patches align nicely
- Ears: Position on head with orange ear on right, gray on left
- Arms: Attach to sides at shoulder level (body rounds 17-19)
- Legs: Sew to bottom of body, angled slightly forward for sitting position
- Tail: Attach to lower back, curve it gently
- Final details:
- Embroider or attach eyes
- Embroider pink nose, black smile
- Add whiskers with black yarn
- Embroider pink paw pads on bottom of feet
🎀 Tips for Success
- Color changes: Carry yarn along inside if sections are close together
- Patch placement: Check photo reference frequently while working colored sections
- Stuffing: Firm for head and body, light for limbs and tail for flexibility
- Expression: The slight smile and closed eyes give the sweetest look
- Paw pads: Use satin stitch or French knots for dimensional toe beans
📸 Your Calico Cat is Complete!
This sweet kitty with its patchwork fur, gentle smile, and curled tail is ready to bring joy! Perfect as a gift or shelf companion. 🧡🩶🤍