Add a sprinkle of holiday cheer to your tree with the Christmas Gnome Ornaments, a trio of festive friends that are as fun to make as they are to display! 🎄🧶 With plump fluffy beards, oversized hats with cozy brims, and tiny button noses, these gnomes bring a whimsical touch to your seasonal décor. Whether you’re crafting the Santa Hat Gnome, the Christmas Tree Hat Gnome, or the Candy Cane Hat Gnome, each one is packed with personality and perfect for gifting, decorating, or adding to your handmade ornament collection.
Ideal for crocheters who love quick, customizable projects, this pattern invites you to play with colors, textures, and embellishments to make each gnome uniquely yours. Add sparkly yarn, stitch on tiny stars, or personalize them with initials for an extra special touch. The Christmas Gnome Ornaments are a joyful way to stitch up warmth, whimsy, and a whole lot of holiday magic—one loop at a time! 🧵✨
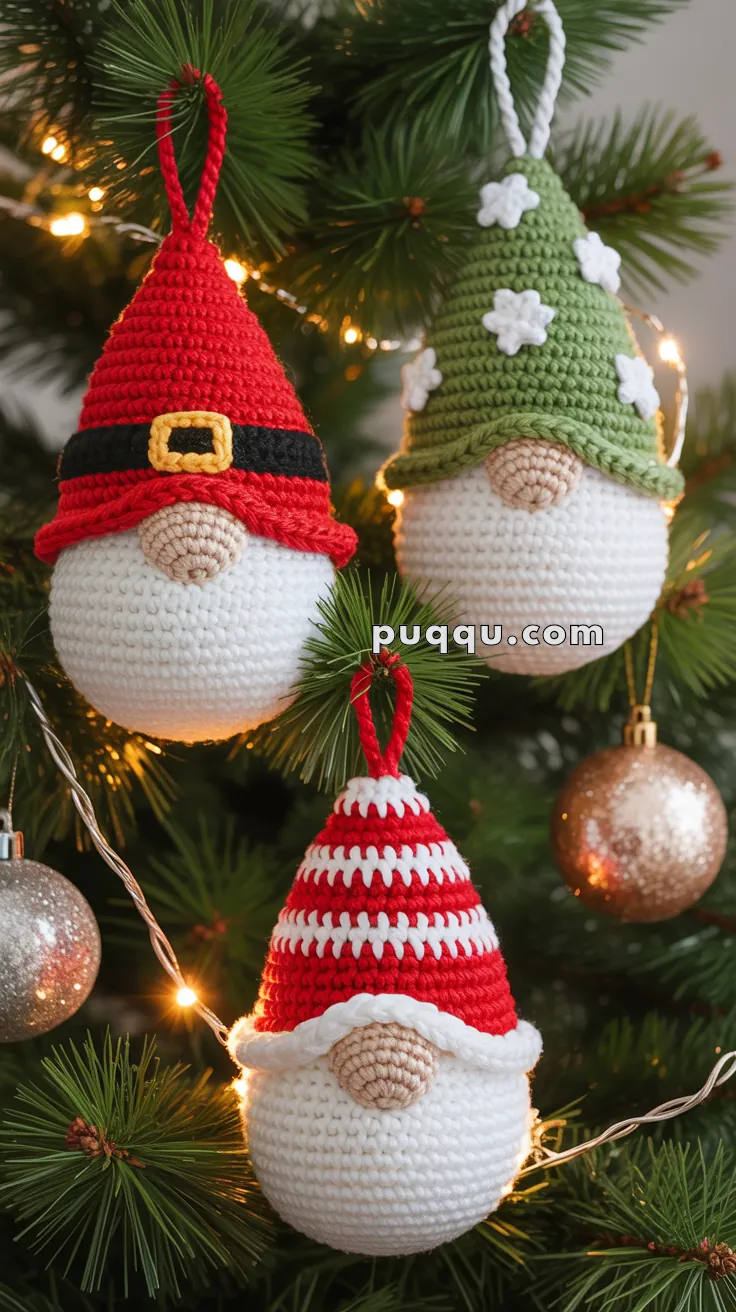
🎄 Christmas Gnome Ornaments Crochet Pattern
These adorable Christmas gnome ornaments are the perfect handmade touch for your holiday tree! With plump fluffy beards, oversized hats with cozy brims, and little button noses, they’re easy to make and fun to customize. This pattern includes three variations: Santa Hat Gnome, Christmas Tree Hat Gnome, and Candy Cane Hat Gnome.
✨ Skill Level
Easy – suitable for beginners comfortable with working in the round.
📏 Finished Size
Each gnome measures about 15–18 cm (6–7 inches) tall using DK yarn and 3.0 mm hook. Size will vary depending on yarn and hook.
🧶 Materials
Yarn (DK/Light Worsted)
- ⚪ White – beard and face (fuzzy/chenille yarn recommended for beard texture)
- 🟤 Beige/Tan – nose
- 🔴 Red – hat and details
- 🟢 Green – hat
- ⚫ Black – belt
- 🟡 Yellow/Gold – buckle
🛠️ Tools and Notions
- Crochet Hook: 3.0 mm (for body), 3.5 mm (for fluffy trim)
- Polyester fiberfill stuffing
- Yarn needle and scissors
- Stitch marker
- String or yarn loop for hanging
🔤 Abbreviations (US Terms)
- MR – Magic Ring
- ch – chain
- sl st – slip stitch
- sc – single crochet
- inc – increase (2 sc in one st)
- dec – decrease (sc 2 together)
- st(s) – stitch(es)
- FO – fasten off
- BLO – back loop only
- lp st – loop stitch (for fluffy texture)
🧡 Pattern Instructions
🧔 Base Gnome Body
Make 3 (one for each style)
Bottom of Body
With white yarn:
Round 1: MR, 6 sc (6)
Round 2: inc around (12)
Round 3: (sc, inc) x6 (18)
Round 4: (2 sc, inc) x6 (24)
Round 5: (3 sc, inc) x6 (30)
Rounds 6–8: sc around (30)
🧔 Beard Section
Add texture here:
Rounds 9–14: Work loop stitch around (30) OR use fuzzy/chenille yarn and sc around
😊 Face/Head Section
Continue with white:
Rounds 15–18: sc around (30)
Round 19: (3 sc, dec) x6 (24)
Round 20: (2 sc, dec) x6 (18) – stuff firmly
Round 21: sc around (18) – add more stuffing
Round 22: (sc, dec) x6 (12)
FO, weave closed.
💡 Loop Stitch Tutorial
If not using fuzzy yarn: Insert hook, wrap yarn over finger to create 1-inch loop, pull through, yarn over and pull through both loops. This creates a fluffy beard texture.
👃 Nose
Make 3
With beige/tan yarn:
Round 1: MR, 6 sc (6)
Round 2: inc around (12)
Round 3: (sc, inc) x6 (18)
Rounds 4–5: sc around (18)
FO, leave long tail for sewing. Stuff lightly.
🎩 Hat Variations
🎅 Santa Hat Gnome (Red Hat with Black Belt)
🔴 Hat Body
With red yarn:
Round 1: MR, 6 sc (6)
Round 2: (sc, inc) x3 (9)
Round 3: sc around (9)
Round 4: (2 sc, inc) x3 (12)
Round 5: sc around (12)
Round 6: (3 sc, inc) x3 (15)
Round 7: sc around (15)
Round 8: (4 sc, inc) x3 (18)
Round 9: sc around (18)
Round 10: (5 sc, inc) x3 (21)
Round 11: sc around (21)
Round 12: (6 sc, inc) x3 (24)
Round 13: sc around (24)
Round 14: (7 sc, inc) x3 (27)
Round 15: sc around (27)
Round 16: (8 sc, inc) x3 (30)
Rounds 17–18: sc around (30)
⚫ Belt Section
Switch to black yarn:
Rounds 19–20: sc around (30)
Switch back to red yarn:
Rounds 21–23: sc around (30)
FO.
☁️ Fluffy Brim
With white fuzzy yarn or 3.5mm hook:
Join white yarn to bottom edge of hat (round 1). Working in BLO or around posts: sc around loosely (30), creating a fluffy roll. Repeat for 2–3 rounds for extra fluff. FO.
🟨 Buckle
With yellow/gold yarn:
Ch 4, work 2 rows of 4 sc to create small rectangle. Or ch 8, sl st to form ring. Sew to center front of black belt.
🎄 Christmas Tree Hat Gnome (Green Hat with White Pom-Poms)
🟢 Hat Body
With green yarn:
Round 1: MR, 6 sc (6)
Round 2: (sc, inc) x3 (9)
Round 3: sc around (9)
Round 4: (2 sc, inc) x3 (12)
Round 5: sc around (12)
Round 6: (3 sc, inc) x3 (15)
Round 7: sc around (15)
Round 8: (4 sc, inc) x3 (18)
Round 9: sc around (18)
Round 10: (5 sc, inc) x3 (21)
Round 11: sc around (21)
Round 12: (6 sc, inc) x3 (24)
Round 13: sc around (24)
Round 14: (7 sc, inc) x3 (27)
Round 15: sc around (27)
Round 16: (8 sc, inc) x3 (30)
Rounds 17–23: sc around (30)
FO.
☁️ Fluffy Brim
With white fuzzy yarn:
Join white yarn to bottom edge of hat. Work 2–3 rounds of loose sc around (30) for fluffy trim. FO.
⚪ White Pom-Poms
Make 5–6
With white yarn:
Round 1: MR, 6 sc (6)
Round 2: inc around (12)
FO, leave long tail. Stuff lightly, cinch closed into ball. Sew randomly onto green hat in scattered pattern.
🍬 Candy Cane Hat Gnome (Striped Red & White)
🔴⚪ Hat Body
Alternating red and white
With red yarn:
Round 1: MR, 6 sc (6)
Round 2: (sc, inc) x3 (9)
Round 3: sc around (9)
Switch to white yarn:
Rounds 4–5: sc around (9)
Switch to red yarn:
Rounds 6–7: sc around (9)
Round 8: (2 sc, inc) x3 (12)
Switch to white yarn:
Rounds 9–10: sc around (12)
Switch to red yarn:
Rounds 11–12: sc around (12)
Round 13: (3 sc, inc) x3 (15)
Switch to white yarn:
Rounds 14–15: sc around (15)
Switch to red yarn:
Rounds 16–17: sc around (15)
Round 18: (4 sc, inc) x3 (18)
Continue alternating colors every 2–3 rows, increasing as needed:
- (5 sc, inc) x3 (21)
- (6 sc, inc) x3 (24)
- (7 sc, inc) x3 (27)
- (8 sc, inc) x3 (30)
Work even at 30 sts for 3–4 rounds, maintaining stripe pattern. FO.
☁️ Fluffy Brim
With white fuzzy yarn:
Join white yarn to bottom edge. Work 2–3 rounds of loose sc around (30) for thick fluffy trim. FO.
🧵 Assembly
Step 1: 👃 Attach Nose
Sew nose onto upper portion of body, centered, just below where hat will sit.
Step 2: 🎩 Attach Hat
Position hat so the brim overlaps slightly over the “face” area, with the nose peeking out below. The hat should cover the top portion and sit just above the nose. Sew securely around the brim.
Step 3: 🪢 Add Hanging Loop
With matching yarn, ch 20–25, sl st to form loop. Sew to tip of hat.
Step 4: ✨ Final Touches
- Make sure fluffy brim and beard are well-fluffed
- Add buckle to Santa hat
- Arrange pom-poms on tree hat
- Ensure all elements are secure
💡 Tips for Best Results
🧔 For extra fluffy beards: Use chenille or fuzzy yarn for the body, or brush out regular yarn with a pet slicker brush after completing.
💪 Starch the hats: Lightly starch hats to help them hold their pointed shape.
🎨 Vary your gnomes: Make each nose at slightly different angles for personality.
🎁 Gift packaging: These make wonderful gifts – make a set of three!
🎀 Hanging: Use ribbon, twine, or metallic cord for different looks.
📝 Notes
These charming gnome ornaments work up quickly and make delightful handmade decorations. The key to getting them to look their best is in the fluffy textures – don’t skip the fuzzy yarn or loop stitches for the beard! Each gnome has its own personality, and the trio makes a perfect holiday decoration set.
Happy crocheting! 🎅🎄✨