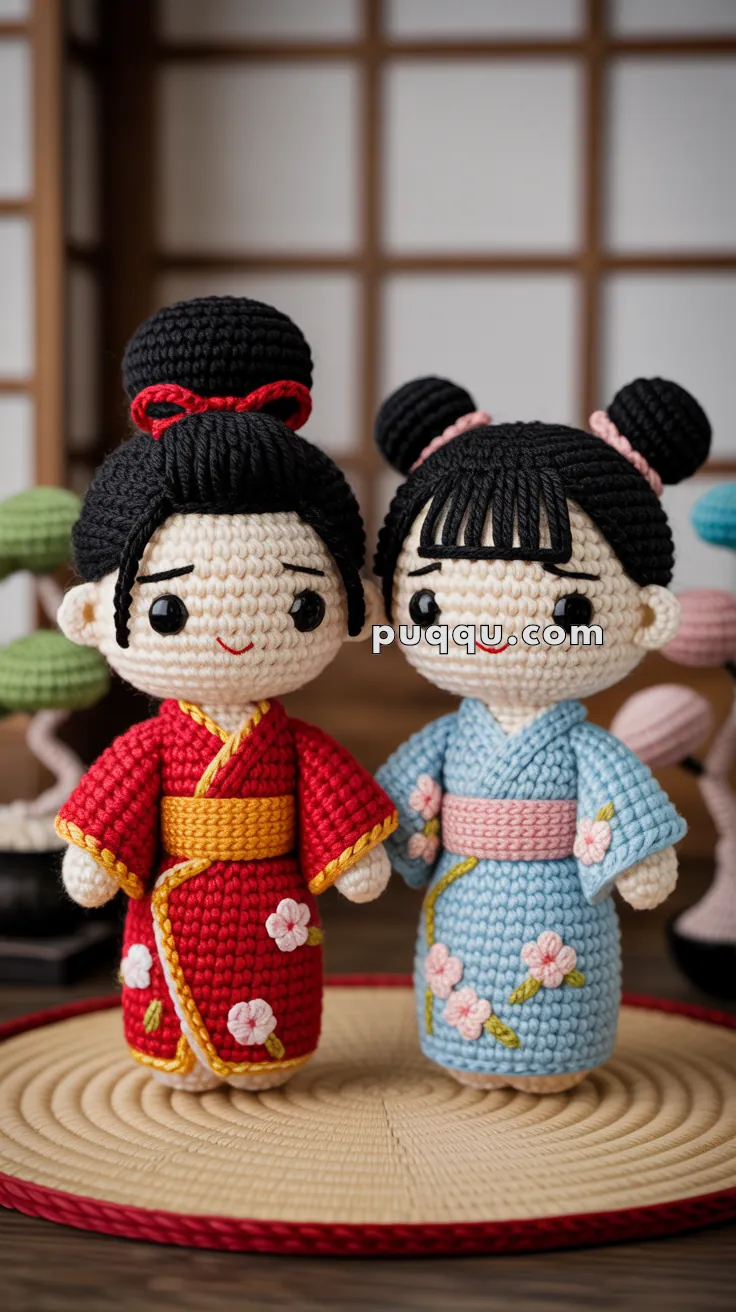
Celebrate tradition and charm with the Crochet Kokeshi Kimono Dolls, a beautifully detailed project inspired by the elegance of Japanese folk art! 🎎🧶 These sweet little dolls feature graceful kimono robes, delicate hairstyles, and serene expressions that make them perfect for thoughtful gifts or decorative keepsakes. Whether displayed on a shelf, tucked into a cozy corner, or used to add cultural flair to your handmade collection, they bring a sense of peace and artistry to every stitch.
Perfect for crocheters who love intricate designs and meaningful motifs, this pattern invites you to play with soft colors, layered textures, and personalized embellishments. Add floral accents, experiment with traditional patterns, or create a whole set of dolls with unique personalities. The Crochet Kokeshi Kimono Dolls are a lovely way to stitch up beauty, heritage, and a touch of handmade serenity—one loop at a time! 🧵🌸
🎎 Crochet Kokeshi Kimono Dolls Pattern
Create these enchanting Japanese-inspired kokeshi dolls dressed in beautiful kimonos with delicate cherry blossom embroidery, traditional hairstyles, and elegant obi belts. Perfect as cultural décor, thoughtful gifts, or collectible amigurumi art pieces!
📸 What You’ll Make
These adorable kokeshi-style amigurumi dolls capture the timeless beauty of traditional Japanese culture. Each doll features a seamless head-to-body construction, authentic kimono styling with contrasting trim, embroidered cherry blossoms, and distinctive hairstyles. The red kimono doll sports an elegant top bun with red bow, while the blue kimono doll showcases playful side buns with pink ties and sweet bangs.
These dolls embody the simplicity and elegance of traditional kokeshi wooden dolls, translated beautifully into crochet form.
✨ Skill Level
Intermediate – This pattern requires seamless construction, color work, detailed embroidery, hair attachment techniques, and precise assembly. Experience with basic amigurumi and embroidery stitches is recommended.
📏 Finished Dimensions
- Doll Height: 16-18 cm (6.3-7 inches) depending on hook size and tension
- Head Diameter: Approximately 6 cm (2.4 inches)
- Body Width: Approximately 5 cm (2 inches) at widest point
- Weight per doll: Approximately 35-40g when stuffed
Size Variations:
- 2.5mm hook + tight tension = 15-16 cm tall
- 3.0mm hook + medium tension = 17-18 cm tall
📐 GAUGE (IMPORTANT!)
Gauge for this pattern:
- 24 stitches × 26 rows = 10cm × 10cm (4″ × 4″) in sc
- Using 3.0mm hook and DK weight yarn
- Worked in continuous rounds
Gauge CHECK (recommended):
- Work a small swatch: MR, 6 sc, inc rounds to 24 sts, work 10 rounds
- Measure diameter of circle
- Should be approximately 7-8 cm across
- If smaller: Use larger hook
- If larger: Use smaller hook
WHY gauge matters:
- Correct gauge ensures doll is proper size
- Affects yarn amounts needed
- Too loose = floppy doll, stuffing shows through
- Too tight = stiff doll, hard to stuff
Don’t skip the gauge check if this is your first kokeshi doll!
🧶 Materials You’ll Need
Yarn
DK weight cotton yarn (sport weight also works):
Yarn amounts are APPROXIMATE and depend on:
- Your tension (tighter = more yarn, looser = less)
- Yarn weight (exact DK weight varies by brand)
- How firmly you stuff (more stuffing = slightly more yarn)
For BOTH dolls you’ll need TOTAL:
- Beige/Cream: 60-70g (heads, necks, hands)
- Black: 40-50g (hair caps, buns, bangs)
- Red: 35-40g (red kimono)
- Blue: 35-40g (blue kimono)
- Yellow: 30-35g (obi, trim)
- Pink: 30-35g (obi, trim, ties, embroidery)
- White: 10-15g (embroidery, collar)
- Green: 5-10g (embroidery stems/leaves)
TOTAL for both dolls: approximately 250-300g total
To make ONE doll only, divide amounts in half (except shared colors like beige and black).
Recommended: Buy full skeins and have extra on hand! Most DK yarn skeins are 50g, so:
- 2 skeins beige
- 1 skein black
- 1 skein each kimono color
- 1 skein each obi color
- Small amounts embroidery colors
Other Supplies
- Crochet hook: 2.5-3.0 mm (US B/1-C/2)
- Safety eyes: 8mm black (4 total – 2 per doll) OR embroidery floss for closed eyes
- Embroidery floss: Black (facial features), colors matching flowers
- Polyfill stuffing (approximately 60-70g for both dolls)
- Yarn needle (tapestry needle)
- Embroidery needle
- Scissors
- Stitch markers
- Straight pins (for assembly)
- Poly pellets or rice (optional, for weighted base)
- Small fabric pouch (if using pellets/rice)
- Water-soluble fabric marker (for marking embroidery placement)
🔤 Abbreviations (US Terms)
- MR = Magic Ring
- ch = chain
- sc = single crochet
- inc = increase (2 sc in one stitch)
- dec = decrease (sc2tog – single crochet 2 stitches together)
- sl st = slip stitch
- BLO = back loop only
- FLO = front loop only
- FO = fasten off
- ( ) × # = repeat instructions in parentheses # times
- R = Round
🎎Pattern Instructions
Part 1: Seamless Kokeshi Doll Body
IMPORTANT: Kokeshi dolls have a distinctive seamless construction where the head flows directly into the body with no visible separation. The entire doll is worked as ONE continuous piece.
Body Construction (Head to Bottom)
With beige/cream yarn:
HEAD SECTION
Round 1: MR, 6 sc (6)
Round 2: inc around (12)
Round 3: (sc, inc) × 6 (18)
Round 4: (2 sc, inc) × 6 (24)
Round 5: (3 sc, inc) × 6 (30)
Round 6: (4 sc, inc) × 6 (36)
Rounds 7-14: sc around (36)
[This creates the round head portion]
NECK SECTION
Round 15: (4 sc, dec) × 6 (30)
Round 16: (3 sc, dec) × 6 (24)
⚠️ CRITICAL TIMING NOTE ⚠️
If using SAFETY EYES, you MUST stop at Round 16 to insert them.
Safety eyes can ONLY be inserted while head is still open. Once you work past Round 18-19, it’s too late!
EYE INSERTION STEPS:
- Work through Round 16
- STOP working
- Position safety eyes between Rounds 9-10
- Space 6-7 stitches apart (center to center)
- Press backings onto safety eye posts firmly
- Stuff head firmly with polyfill
- NOW continue with Round 17
If using EMBROIDERED eyes, you can add them after doll is complete.
Round 17: (2 sc, dec) × 6 (18)
Round 18: (sc, dec) × 6 (12)
[This is the narrowest neck point – should create visible narrowing]
⚠️ SWITCH TO KIMONO COLOR (red or blue) ⚠️
BODY SECTION (Kimono Color)
Round 19: inc around (24)
Round 20: (3 sc, inc) × 6 (30)
Rounds 21-32: sc around (30)
[This creates the cylindrical body – work 12 rounds total in kimono color]
BOTTOM SHAPING
Round 33: (3 sc, dec) × 6 (24)
Round 34: (2 sc, dec) × 6 (18)
⚠️ Add weighted base now if desired:
- Insert small pouch with poly pellets or rice
- This helps doll stand upright
Continue stuffing body firmly as you decrease.
Round 35: (sc, dec) × 6 (12)
Round 36: dec around (6)
FO leaving long tail. Close opening completely and weave in end.
The body should now stand independently with a narrow neck, rounded head, and cylindrical body tapering to a rounded bottom.
✓ STITCH COUNT CHECKPOINT
After completing body, verify these measurements:
- Head (R7-14): Should be approximately 6 cm diameter
- Neck (R18): Should be approximately 3.5 cm diameter
- Body widest point (R21-32): Should be approximately 5 cm diameter
- Body length from neck to bottom: Should be approximately 8-9 cm
If measurements are off:
- Too small: Check tension – may be crocheting too tightly
- Too large: Check tension – may be crocheting too loosely
- Uneven: Recount stitches, may have missed increases/decreases
Don’t proceed to sleeves and details until body shape is correct!
Part 2: Kimono Sleeves with Hands
Traditional kokeshi dolls have no legs, but the arms are represented by kimono sleeves with small hands peeking out.
IMPORTANT: Sleeves are attached AFTER body is completely finished.
Right Sleeve
- With kimono color (red or blue)
- Insert hook into body at Round 20 (shoulder level)
- Position on RIGHT SIDE, approximately 5-6 stitches from center front
Round 1: Pull up loop, sc 6 working around in a small circle (6)
- Work into stitches of body itself
- Create small circular opening
Rounds 2-5: sc around (6) [sleeve tube, 4 rounds]
Round 6: Switch to beige/cream yarn, sc around (6)
Rounds 7-8: sc around (6) [hand extends from sleeve]
Stuff sleeve VERY LIGHTLY. Close opening with yarn needle. FO and weave in end.
Left Sleeve
Repeat on LEFT SIDE of body at same Round 20 level. Mirror the right sleeve placement.
Sleeve Positioning Guide:
- Both at Round 20 of body
- Each 5-6 stitches from center front
- Should angle slightly downward
- Space evenly left and right for symmetry
Part 3: Kimono Application & Trim
The kimono is created by working the colored section directly into the body during construction (Rounds 19-32 of body), but the authentic look comes from adding trim details.
✨ Kimono Trim (Essential Detail)
For Red Kimono (with yellow trim):
Using yellow yarn and tapestry needle:
V-Neckline:
- Mark a V-shape at front of body starting at Round 19
- V should point down to approximately Round 22
- Using whipstitch or surface crochet, create yellow trim line along both sides of V
- Each side of V should be approximately 2 cm long
Sleeve Edges:
- Whipstitch yellow yarn around the opening where hand meets sleeve on both arms
- Creates clean finish at cuff
Bottom Hem:
- Whipstitch or surface crochet yellow trim around Round 32-33
- Creates defined hemline
Optional Front Panel Edges:
- Add vertical yellow lines from V-neck down to hem on front panels
- Mimics traditional kimono construction
For Blue Kimono (with yellow trim):
Follow identical instructions using yellow yarn for trim on blue kimono.
🎌 Traditional Kimono Collar (Optional but Authentic)
With white or cream yarn:
Ch 20
Row 1: sc in 2nd ch from hook, sc across (19), ch 1, turn
Row 2: sc across (19)
FO leaving long tail
Assembly:
- Fold strip lengthwise to create narrow collar band
- Position along V-neckline inside the trim
- Sew in place with white yarn
- Creates authentic layered collar look
Part 4: Obi Belt (Traditional Sash)
The obi is the wide decorative belt that wraps around the kimono waist. It should be substantial and well-structured.
🎀 Main Obi Belt
IMPORTANT: Measure your doll before starting!
To determine correct chain length:
- Wrap measuring tape around doll’s waist (Round 26-27)
- Multiply measurement by 1.5
- Divide by your row gauge to get chain count
Standard sizing:
- If doll measures 15 cm around waist: Ch 75-80
- If doll measures 16 cm around waist: Ch 80-85
- If doll measures 17 cm around waist: Ch 85-90
For Red Kimono (yellow obi):
With yellow yarn:
Ch 80 (adjust based on your measurement)
Row 1: sc in 2nd ch from hook, sc across (79), ch 1, turn
Row 2: sc across (79), ch 1, turn
Row 3: sc across (79), ch 1, turn
Row 4: sc across (79)
FO leaving very long tail (at least 20 inches for sewing)
[Creates belt approximately 2.5-3 cm wide]
Test wrap: Belt should wrap 1.5 times around waist with slight overlap
- If too short: Add 10 chains and work another belt
- If too long: Can trim after working rows
For Blue Kimono (pink obi):
Follow identical instructions using pink yarn.
🎀 Obi Bow/Knot (Back Detail)
With same color as main belt:
Ch 12
Row 1: sc in 2nd ch from hook, sc across (11), ch 1, turn
Row 2: sc across (11), ch 1, turn
Row 3: sc across (11)
FO leaving long tail
🎀 Center Tie
With same color as main belt:
Ch 8
Row 1: sc in 2nd ch from hook, sc across (7)
FO leaving long tail
🎀 Obi Assembly
- Wrap main belt around doll’s waist (approximately Round 26-27 area)
- Wrap 1.5 times around body so ends overlap at back
- Sew ends securely at back center
- Attach bow piece vertically at back center where belt ends meet
- Wrap center tie around middle of bow piece to cinch it
- Secure all layers with multiple stitches through all layers
- Ensure obi is smooth, even, and sits flat against body
The obi should be prominent – about 2-3 cm wide and clearly visible from all angles.
Part 5: Hair Cap & Hairstyles
Each doll has a distinctive hairstyle. Start with the base hair cap, then create unique styling.
💇 Base Hair Cap (Both Dolls)
With black yarn:
Round 1: MR, 6 sc (6)
Round 2: inc around (12)
Round 3: (sc, inc) × 6 (18)
Round 4: (2 sc, inc) × 6 (24)
Round 5: (3 sc, inc) × 6 (30)
Round 6: (4 sc, inc) × 6 (36)
[Cap should now fit over doll’s head completely]
Rounds 7-10: sc around (36)
FO leaving very long tail (at least 24 inches) for sewing
Cap Placement:
- Position cap on head covering entire top and back
- Front edge should sit just above eyebrows
- Sew securely all around edge with long tail
- Use mattress stitch or whipstitch for invisible seam
- Ensure cap is smooth with no gaps
Part 6: Red Kimono Doll Hairstyle
This doll features an elegant top bun with a red bow.
💇 Top Bun
With black yarn:
Round 1: MR, 6 sc (6)
Round 2: inc around (12)
Round 3: (sc, inc) × 6 (18)
Rounds 4-6: sc around (18)
Round 7: (sc, dec) × 6 (12)
Stuff bun firmly to maintain round shape.
Round 8: dec around (6)
FO leaving long tail
Bun Placement:
- Position at very top center of head
- Should sit high on crown
- Sew securely through hair cap and into head
- Make sure bun is firmly attached and doesn’t wobble
🎀 Red Hair Bow
With red yarn:
Ch 20
Row 1: sc in 2nd ch from hook, sc across (19), ch 1, turn
Row 2: sc across (19)
FO leaving long tail
Bow Assembly:
- Fold strip accordion-style to create two loops
- Pinch center
- Wrap red yarn around center 5-6 times tightly
- Tie off and secure
- Sew bow to base of bun (where bun meets head)
- Bow should sit at front of bun, visible from front view
Part 7: Blue Kimono Doll Hairstyle
This doll features playful side buns with bangs and pink ties.
💇 Bangs
Materials: Black yarn cut into 10-12 pieces, each 3-4 cm long (this length allows for attachment + trimming)
Method 1: Latch Hook Technique
- Using latch hook or crochet hook
- Fold each yarn piece in half
- Insert hook between stitches at forehead (Round 7-8 of head)
- Pull loop through
- Pull yarn ends through loop and tighten
- Attach 10-12 pieces across forehead between eyes
After all pieces are attached: 7. Trim bangs to final length: 8-10mm long 8. Create straight-across edge at eyebrow level 9. Bangs should just reach the space between eyes and hairline
Method 2: Sewing Method
- Thread multiple strands through tapestry needle
- Insert needle at forehead area
- Pull through leaving equal lengths on both sides
- Secure with knot at base
- Repeat across forehead
- Trim to desired length (8-10mm)
Bangs should cover forehead area between eyes, creating a sweet, innocent look.
💇 Side Buns (Make 2)
With black yarn:
Round 1: MR, 6 sc (6)
Round 2: inc around (12)
Round 3: sc around (12)
Round 4: (sc, inc) × 6 (18)
Round 5: (2 sc, inc) × 6 (24)
Rounds 6-8: sc around (24) [3 rounds for larger buns]
Stuff buns VERY firmly.
Round 9: (2 sc, dec) × 6 (18)
Round 10: (sc, dec) × 6 (12)
Round 11: dec around (6)
FO leaving long tail
These create LARGER, more prominent side buns as shown in photo.
Bun Placement:
- Position one bun on each side of head
- Should sit above where ears would be
- Space evenly on left and right
- Sew securely through hair cap and into head
- Buns should protrude noticeably from sides
🎀 Pink Hair Ties (Make 2)
With pink yarn:
Ch 15
FO leaving long tail
Hair Tie Application:
- Wrap chain around base of bun (where bun meets head)
- Tie in small neat bow at front of bun
- Secure knot with needle and thread
- Trim excess if needed
- Add one tie to each bun
Hair ties should be visible as pink accents on each side bun.
Part 8: Facial Features
Create expressive, sweet faces for your dolls.
😊 Eyes – Two Options
Option 1: Safety Eyes (Open Eyes)
- Size: 8mm black safety eyes
- Position: Between Rounds 9-10 of head
- Spacing: 6-7 stitches apart (measured center to center)
- Insert before completing Round 17 during body construction
Option 2: Embroidered Closed Eyes (As shown in photo)
With black embroidery floss:
- Mark eye position between Rounds 9-10
- Space 6-7 stitches apart
- Embroider gentle curved lines (like smiling eyes)
- Curve should be approximately 5mm long
- Add 2-3 tiny lashes at outer corners (optional)
- Creates peaceful, content expression
🤨 Eyebrows
With black embroidery floss:
- Position: 2-3 rounds above eyes (approximately Round 7)
- Style: Thin, slightly curved lines
- Length: 3-4 stitches wide
- Angle: Very gentle upward curve
- Technique: Use backstitch or stem stitch
😊 Mouth
With red or pink embroidery floss:
- Position: 4-5 rounds below eyes (approximately Round 13-14)
- Style: Small gentle upward curve
- Length: 3-4 stitches wide
- Technique: Backstitch creating simple smile
- Should be subtle and sweet
🌸 Blush (Optional)
Option 1: Embroidered
- Use pink embroidery floss
- Create small French knot or satin stitch circles
- Position on cheeks below and slightly outward from eyes
Option 2: Chalk/Makeup
- Apply pink chalk pastel or blush makeup
- Blend gently for soft look
- Seal with fixative spray if desired
Part 9: Embroidery Stitch Tutorial
Before starting flower embroidery, familiarize yourself with these essential stitches.
🌸 Embroidery Stitch Guide
LAZY DAISY STITCH (for flower petals):
- Bring needle up at center point (A)
- Insert needle back down very close to A (creates loop)
- Bring needle up at petal tip (B), catching loop
- Make tiny stitch over loop to secure
- Repeat for each petal around center
FRENCH KNOT (for flower centers):
- Bring needle up at desired location
- Wrap yarn around needle 2-3 times
- Insert needle back down close to where it came up
- Hold wraps with finger while pulling needle through
- Creates small raised knot
BACKSTITCH (for stems and lines):
- Bring needle up at starting point
- Insert needle one stitch length back
- Bring up one stitch length forward
- Repeat, creating solid line
- Perfect for stems and smile lines
SATIN STITCH (for filling shapes):
- Outline shape first
- Fill with parallel straight stitches
- Stitches should lie flat and smooth
- Cover entire shape with no gaps
- Good for heart nose and closed eyes
Practice on scrap fabric before working on doll!
Part 10: Cherry Blossom Embroidery
The delicate cherry blossoms are key to the kimono’s beauty.
🌸 Flower Placement Guide (Specific Positions)
For RED KIMONO (white & pink flowers):
Large white flower:
- Position: Front center-right of kimono
- Height: Rounds 28-30 (lower body area)
- Should be below where obi will sit
Medium pink flower:
- Position: Front center-left of kimono
- Height: Rounds 24-26 (mid-body area)
- Should be above where obi will sit
Small accent flower:
- Position: Left side or front-left
- Height: Rounds 26-28
- Slightly overlapping with or near pink flower
Stems: Connect flowers with gentle curves
Leaves: Add 2-3 small leaves near each flower
For BLUE KIMONO (pink & white flowers):
Large pink flower:
- Position: Front center of kimono
- Height: Rounds 27-29
Medium pink flower:
- Position: Right side of kimono
- Height: Rounds 25-27
Medium white flower:
- Position: Left side of kimono
- Height: Rounds 25-27
Small accent flowers (1-2):
- Scatter near larger flowers
- Fill composition
⚠️ AVOID placing flowers where obi will cover (Rounds 26-28 at sides and back)
Focus embroidery on FRONT and front-sides of kimono where visible
🌸 Cherry Blossom Flowers – Detailed Instructions
For Red Kimono (White & Pink Flowers):
Large White Flower (Front lower kimono):
With white yarn and embroidery needle:
- Create 5 lazy daisy petals arranged in circle
- Position flower on front of kimono around Round 28-29
- Each petal approximately 5mm long
- Space petals evenly
- Add center with pink French knot
- Flower diameter: approximately 1.5 cm
Medium Pink Flower (Front upper kimono):
With pink yarn:
- Create 5 lazy daisy petals in circle
- Position around Round 24-25
- Each petal approximately 4mm long
- Add center with white French knot
- Flower diameter: approximately 1 cm
Small Accent Flower(s):
Add 1-2 smaller flowers using same technique:
- Can be white with pink centers or vice versa
- Position artistically on side or front
- Each approximately 0.7 cm
Green Stems & Leaves:
With green embroidery floss:
- Backstitch stems connecting flowers
- Add lazy daisy stitch leaves
- 2-3 leaves per stem
- Each leaf 3-4mm long
- Create organic, flowing arrangement
For Blue Kimono (Pink & White Flowers):
Follow same pattern but with:
- 2-3 pink flowers with white centers (more prominent)
- 1-2 white flowers with pink centers (accents)
- Distribute across front and side of kimono
- Position away from obi area
- Add green stems and leaves
Flower Placement Tips:
- Arrange flowers artistically, not symmetrically
- Consider natural growth patterns
- Some flowers can overlap slightly
- Vary flower sizes for visual interest
- Keep lower kimono area more decorated
- Avoid placing flowers where obi will cover
🎎 COMPLETE ASSEMBLY ORDER
Follow this sequence for best results!
Complete body construction first:
✓ Step 1: Finish entire body (head through bottom)
✓ Step 2: Add sleeves to body
✓ Step 3: Weave in all body/sleeve ends
Add kimono details:
✓ Step 4: Add yellow/pink trim to kimono edges
✓ Step 5: Make and attach obi belt
✓ Step 6: Attach obi bow at back
✓ Step 7: Add optional collar
Create and attach hair:
✓ Step 8: Make hair cap and sew to head
✓ Step 9: Make buns/bangs based on doll style
✓ Step 10: Attach buns securely
✓ Step 11: Add hair accessories (bow or ties)
✓ Step 12: Trim and shape bangs if applicable
Add facial features:
✓ Step 13: Mark feature placement with pins
✓ Step 14: Embroider or add safety eyes
✓ Step 15: Embroider eyebrows
✓ Step 16: Embroider mouth
✓ Step 17: Add blush (optional)
Final embroidery:
✓ Step 18: Mark flower positions on kimono
✓ Step 19: Embroider flowers
✓ Step 20: Add stems and leaves
✓ Step 21: Add any additional details
Finishing:
✓ Step 22: Check all elements are secure
✓ Step 23: Weave in any remaining ends
✓ Step 24: Test standing stability
✓ Step 25: Make adjustments if needed
⏱️ TIMING:
- Body construction: 2-3 hours
- Hair: 1-2 hours
- Embroidery: 2-3 hours
- Assembly & finishing: 1 hour
TOTAL per doll: 6-10 hours depending on experience
🎎 Standing Stability
Test: Place doll on flat surface. It should stand upright without support.
If doll tips over:
Solution 1: Add weighted base
- Carefully open bottom of doll
- Insert small fabric pouch with rice or poly pellets (5-10g)
- Resew closed
- Test again
Solution 2: Adjust body stuffing
- Remove some stuffing from upper body
- Add more stuffing to lower body
- This lowers center of gravity
Solution 3: Create support base
- Crochet small disc base (MR, inc to 24 sts)
- Sew to bottom of doll
- Provides wider, stable base
💡 Pro Tips for Success
Seamless Construction: The key to authentic kokeshi dolls is the seamless head-to-body transition. Don’t switch yarns at the neck – work it all in beige until Round 18, then switch to kimono color.
Consistent Tension: Maintain even, slightly tight tension throughout. Loose stitches will create gaps and affect the doll’s shape.
Stuffing Technique: Stuff firmly but evenly. Use small amounts at a time and pack tightly for best results. The neck area needs firm stuffing to maintain its narrow shape.
Kimono Trim Precision: Take time with the trim work. Neat, even trim makes a huge difference in the finished look. Use a water-soluble marker to mark trim lines before stitching.
Hair Attachment: Sew the hair cap extremely securely. It will be handled frequently and needs to stay in place. Use small, close stitches all around the edge.
Embroidery Practice: If you’re new to embroidery, practice lazy daisy and French knots on scrap fabric before working on your doll.
Obi Structure: Don’t skimp on obi size – it should be substantial and prominent. A skimpy obi loses the traditional kimono aesthetic.
Symmetry Check: Frequently view your doll from the front as you work to ensure even placement of features, especially eyes, sleeves, and hair buns.
🎨 Design Variations
Color Palette Options
Traditional Elegance:
- Deep red kimono with gold obi
- Navy blue kimono with cream obi
- Ivory kimono with burgundy obi
Pastel Sweetness:
- Soft pink kimono with lavender obi
- Mint green kimono with peach obi
- Baby blue kimono with pale yellow obi
Seasonal Themes:
- Spring: Cherry blossom pink with green accents
- Summer: Bright turquoise with yellow goldfish embroidery
- Autumn: Burnt orange with maple leaf embroidery
- Winter: White with red snowflake embroidery
Modern Twist:
- Rainbow gradient kimono
- Metallic gold or silver accent yarn
- Neon bright colors for contemporary look
Embroidery Variations
Different Flowers:
- Chrysanthemums (traditional Japanese symbol)
- Plum blossoms (winter/early spring)
- Peonies (prosperity and honor)
- Wisteria cascades
- Simple geometric patterns
Nature Motifs:
- Butterflies
- Dragonflies
- Flowing water patterns
- Mountain silhouettes
- Bamboo stalks
Seasonal Designs:
- Snowflakes for winter
- Maple leaves for autumn
- Fireworks for summer festivals
- Clouds and waves
Hairstyle Variations
Alternative Styles:
Double Top Buns (Odango style):
- Two smaller buns on top of head
- Can add braids or yarn tails
Long Hair:
- Create yarn tails from back of hair cap
- Braid or leave flowing
- Add ribbons
Simple Bob:
- Short hair cap only
- Add subtle bangs
- Minimal but elegant
Decorated Buns:
- Add flowers to buns
- Use patterned fabric wraps
- Attach small hair ornaments
Size Variations
Miniature Version:
- Use fingering weight yarn and 2.0mm hook
- Creates dolls approximately 10-12 cm tall
- Perfect for ornaments or keychains
Large Display Version:
- Use worsted weight yarn and 4.0mm hook
- Creates dolls approximately 25-30 cm tall
- Impressive display pieces
Family Set:
- Make various sizes to create parent and child dolls
- Use same color schemes for cohesive set
📷 Display & Photography Ideas
Traditional Display:
- Place on tatami mat or bamboo mat
- Add small bonsai or ikebana arrangement
- Include tea ceremony items
- Create Japanese-style backdrop with shoji screen pattern
Seasonal Settings:
- Cherry blossom branches in spring
- Autumn leaves for fall
- Snow or white fabric for winter
- Bright flowers for summer
Photography Tips:
- Natural daylight shows colors best
- Use simple, uncluttered backgrounds
- Photograph from slightly above for best angle
- Consider traditional Japanese aesthetic principles
- Group dolls in odd numbers (3 or 5) for visual harmony
Gift Presentation:
- Package in origami paper-lined box
- Tie with traditional Japanese cord (kumihimo style)
- Include small information card about kokeshi tradition
- Add tissue paper in complementary colors
🧹 Care & Maintenance
Cleaning:
- Spot clean only with damp cloth
- Do not machine wash or submerge
- Gently brush dust away with soft brush
- Keep away from direct sunlight to prevent fading
Storage:
- Store upright in cool, dry place
- Avoid crushing hair elements
- Keep in breathable container (not plastic)
- Use tissue paper to protect from dust
Repairs:
- Re-stuff if doll becomes soft
- Re-attach any loose hair elements
- Touch up embroidery if threads loosen
- Refresh obi bow if flattened
🎌 Cultural Notes
About Kokeshi Dolls
Kokeshi dolls originated in northern Japan during the Edo period (1600-1868). They were originally made by woodworkers as toys for children and souvenirs for visitors to hot spring resorts.
Traditional Characteristics:
- Simple, cylindrical body
- Large head with no arms or legs
- Hand-painted designs
- Each region has distinctive style
Symbolic Meaning:
- Represent good luck
- Given as gifts to children
- Collectible art form
- Symbol of Japanese folk craft tradition
Modern Kokeshi:
- Creative variations on traditional forms
- Designer collaborations
- Popular worldwide
- Bridges traditional and contemporary
Creating with Respect:
- These crochet dolls honor the tradition while adapting it to fiber arts
- The simplicity and elegance of kokeshi design translates beautifully to crochet
- Wearing kimono-inspired clothing shows appreciation when done thoughtfully
❓ Troubleshooting
Problem: Neck doesn’t show clear definition
- Solution: Ensure firm stuffing in head before decreasing. The decrease rounds (15-18) create the neck – work them carefully.
Problem: Doll won’t stand upright
- Solution: Add weighted base material (rice, poly pellets). Ensure bottom is firmly stuffed. Check that body is cylindrical, not lopsided.
Problem: Hair cap has gaps or doesn’t fit
- Solution: Check stitch count carefully. Cap should reach 36 stitches to fit properly. Sew with small, close stitches all around.
Problem: Sleeves don’t angle correctly
- Solution: Attach at proper position (Round 20). Stuff very lightly. Angle slightly downward when sewing closed.
Problem: Obi looks flat or flimsy
- Solution: Make sure belt has 4 rows (not fewer). Wrap tightly. Sew at multiple points. Add bow structure at back.
Problem: Embroidered flowers look messy
- Solution: Practice on scrap fabric first. Use water-soluble marker to plan placement. Keep stitches small and even.
Problem: Kimono trim isn’t even
- Solution: Mark trim lines with pins or marker before stitching. Work slowly. Use consistent stitch size.
Problem: Features look asymmetrical
- Solution: Use stitch markers to mark exact placement before attaching. Count stitches carefully. View from front frequently.
Problem: Color change shows gaps at neck
- Solution: Make sure to work color change tightly. Pull new color through firmly on first stitch. Weave in ends securely at color change point.
Problem: Body is wobbly or lopsided
- Solution: Check that increases/decreases were worked evenly. Redistribute stuffing. Add more stuffing to one side if needed.
Problem: Bangs look uneven
- Solution: Trim carefully with sharp scissors. Use ruler to mark even length. Cut small amounts at a time. Can dampen and comb flat before trimming.
Problem: Obi won’t stay in place
- Solution: Sew through to body at multiple points (front, sides, back). Don’t rely on just wrapping – secure with stitches.
🎁 Occasions & Gift Ideas
Perfect For:
- Cultural celebrations and festivals
- Japan enthusiasts and collectors
- Nursery or children’s room décor
- International friendship gifts
- Cultural education displays
- Handmade gift exchanges
- Craft fair sellers
- Japanese language teachers
- Study abroad going-away gifts
- Weddings (as cake toppers or favors)
Display Suggestions:
- On bookshelf with Japanese literature
- In shadow box frames
- As part of cultural display
- On office desk for personality
- In craft room for inspiration
- As seasonal décor rotation
🎎 Final Thoughts
These kokeshi kimono dolls are a beautiful way to honor Japanese traditional crafts while practicing your crochet and embroidery skills. The seamless construction creates an elegant silhouette, and the detailed finishing work brings each doll to life with personality.
While this pattern has many steps, each individual technique is quite accessible. The magic happens when all the elements come together – the smooth body shape, the colorful kimono with delicate embroidery, the distinctive hairstyles, and the carefully crafted facial features.
Take your time with each doll. Enjoy the meditative process of embroidering flowers, carefully arranging hair, and bringing these little characters to life. The result will be heirloom-quality pieces that can be treasured for years.
Whether you make them as a pair or create an entire collection in different colors and styles, these kokeshi dolls will bring a touch of Japanese elegance and charm to any space.
Happy crocheting! がんばって!(Ganbatte – Good luck!) 🎎🌸
📋 Quick Reference Checklist
Before You Start:
- Gather all materials
- Check gauge
- Read through entire pattern
- Practice embroidery stitches on scrap fabric
- Decide which doll to make first
Body Construction:
- Work head in beige (R1-18)
- Insert safety eyes if using (between R9-10)
- Stuff head firmly at R16
- Switch to kimono color at R19
- Work body in kimono color (R19-36)
- Add weighted base if desired
- Verify measurements match checkpoint
Sleeves & Kimono:
- Attach sleeves at R20 on body
- Add kimono trim (V-neck, cuffs, hem)
- Optional: Add collar
Obi Belt:
- Measure doll waist
- Make main belt (4 rows)
- Make bow piece
- Make center tie
- Assemble and attach to doll
Hair:
- Make and attach hair cap
- Red doll: Make top bun
- Blue doll: Make side buns
- Blue doll: Add bangs
- Attach hair accessories (bow or ties)
Face:
- Mark feature placement
- Add eyes (safety or embroidered)
- Embroider eyebrows
- Embroider mouth
- Optional: Add blush
Embroidery:
- Mark flower positions
- Embroider large flowers
- Embroider medium flowers
- Embroider small accent flowers
- Add stems and leaves
Finishing:
- Check all elements are secure
- Weave in all ends
- Test standing stability
- Make final adjustments
- Enjoy your finished doll!
🎨 Color Coordination Guide
Red Kimono Doll:
- Body: Beige
- Kimono: Red/Crimson
- Trim: Yellow/Gold
- Obi: Yellow/Gold
- Hair: Black
- Hair bow: Red
- Flowers: White & Pink
- Stems: Green
Blue Kimono Doll:
- Body: Beige
- Kimono: Light Blue
- Trim: Yellow/Gold
- Obi: Pink
- Hair: Black
- Hair ties: Pink
- Flowers: Pink & White
- Stems: Green
📖 Glossary of Terms
Kokeshi: Traditional Japanese wooden dolls with simple, cylindrical bodies and no limbs
Kimono: Traditional Japanese garment with straight seams and wide sleeves
Obi: Wide decorative sash/belt worn with kimono
Cherry Blossom (Sakura): National flower of Japan, symbolizes spring and renewal
Lazy Daisy Stitch: Embroidery stitch creating petal shapes
French Knot: Embroidery stitch creating small raised dots
Amigurumi: Japanese art of knitting or crocheting small stuffed figures
Magic Ring (MR): Adjustable loop to begin crocheting in the round
Thank you for choosing this pattern! I hope you enjoy creating these beautiful dolls as much as I enjoyed designing them. Happy stitching! 🧶✨