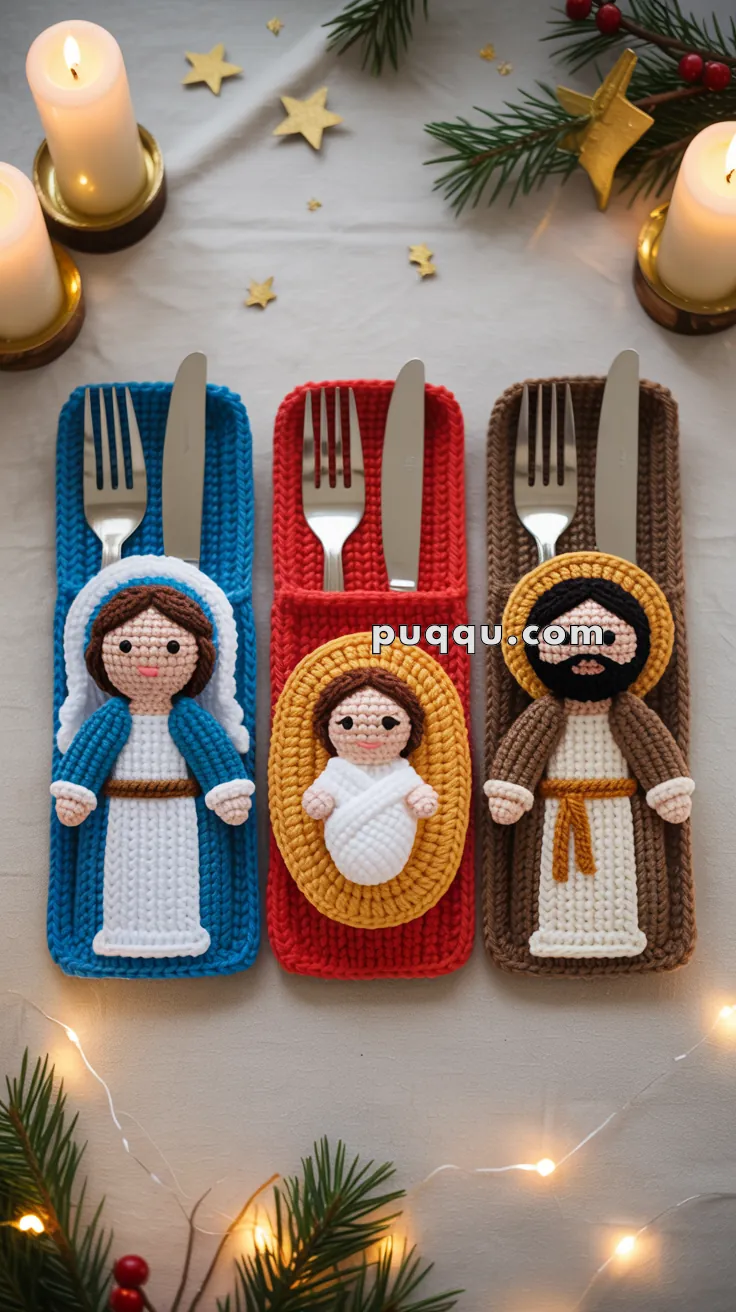
Add a heartfelt touch to your holiday table with the Crochet Nativity Utensil Holders, a beautiful blend of tradition and handmade charm! 🧶✨ Featuring Mary, Joseph, and Baby Jesus, each piece is thoughtfully designed to cradle your utensils while celebrating the true spirit of Christmas. Whether you’re hosting a festive dinner or creating a meaningful gift set, these holders bring warmth, reverence, and a touch of whimsy to every place setting.
Perfect for crocheters who love combining creativity with purpose, this pattern invites you to explore soft textures, gentle colors, and symbolic details. Stitch halos, robes, and swaddles with love, and personalize each figure to reflect your own holiday traditions. The Crochet Nativity Utensil Holders are a beautiful way to stitch up faith, family, and a sprinkle of handmade joy—one loop at a time! 🧵🌟
✨ Crochet Nativity Utensil Holders Pattern
Bring the true spirit of Christmas to your holiday table with these adorable Nativity utensil holders featuring Mary, Joseph, and Baby Jesus! These holders feature beautiful ribbed texture and flat,PixelArt-style characters worked on plastic canvas mesh for crisp, clean details.
🧶 Skill Level
Advanced Intermediate – requires plastic canvas work, duplicate stitch embroidery, and precise color changes
📏 Finished Size
- Each utensil holder: 20 cm tall × 8 cm wide (8″ × 3″)
- Holder depth: 2 cm (¾”)
🧵 Materials
Yarn:
- DK weight cotton yarn in:
- Deep Red
- Royal Blue
- Warm Brown/Taupe
- White/Cream
- Golden Yellow/Mustard
- Beige/Light Tan (skin tone)
- Medium Brown (hair)
- Black (details)
- Light Blue (Mary’s veil)
- Light Pink (cheeks – optional)
Other Supplies:
- 3.0mm crochet hook (for holders)
- Plastic canvas (7-count) – approximately 3 sheets
- Tapestry needle (blunt tip for canvas work)
- Scissors
- Stitch markers
- Blocking pins (optional)
🧷 Abbreviations (US Terms)
- ch – Chain
- sc – Single Crochet
- BLO – Back Loop Only
- sl st – Slip Stitch
- FO – Fasten Off
- RS – Right Side
- WS – Wrong Side
🌟 Special Techniques
Ribbed Stitch Pattern (for holders):
This creates the distinctive horizontal ribbing visible in the photo.
- All rows: Work sc in BLO only
- This creates raised horizontal ribs on the RS
Plastic Canvas Characters:
Characters are worked using the Continental stitch (also called tent stitch or half cross-stitch) on plastic canvas, then sewn onto the holders.
🍴 PART 1: Utensil Holder Base
Make 3 holders: 1 blue, 1 red, 1 brown
Foundation:
- Ch 22
- Row 1 (WS): Sc in 2nd ch from hook and in each ch across. (21 sc) Ch 1, turn.
- Row 2 (RS): Working in BLO, sc in each st across. (21 sc) Ch 1, turn.
- Rows 3-50: Repeat Row 2 (sc in BLO across). Ch 1, turn.
Note: Keep consistent tension for even ribbing. The ribs should run horizontally.
Assembly: 5. Do NOT fold yet. First, align Row 1 edge with Row 50 edge, wrong sides together. 6. Working through both layers along one SHORT edge (the side), sl st or sc together for approximately 30 rows (13 cm/5″), leaving the remaining 20 rows (7 cm/2.75″) unjoined as the flap. 7. This creates a pocket with an open top flap. 8. Working through both layers at the BOTTOM SHORT edge, sl st or sc across to close (21 stitches across). 9. Turn right side out. The seamed sides should be on the inside. 10. Weave in ends.
Finishing: 10. Optional: Work 1 round of sc evenly around the top opening edge for a clean finish. FO. 11. Block flat with steam or wet blocking.
👩 PART 2: Mary Figure (Blue Holder)
Step 1: Cut Plastic Canvas
Cut a rectangle approximately 13 holes wide × 18 holes tall
Step 2: Work the Design in Continental Stitch
Chart Pattern for Mary: (Work from bottom to top, reading the canvas with holes running vertically and horizontally)
Rows 1-2 (bottom of robe): White across all 13 holes Rows 3-12 (white robe body):
- Center 9 holes: White
- Side 2 holes on each edge: Unworked initially (will add light blue veil later)
Row 13 (waist/belt): Medium brown across center 9 holes Rows 14-15 (upper robe): White center 9 holes continue Arms (at shoulder level, approximately row 14-15):
- Add 2-3 beige stitches extending from each side of the robe
Rows 16-17 (neck area): Beige, 3-4 holes wide at center Rows 18-21 (head/face):
- Beige oval shape, approximately 5-6 holes wide at widest point (rows 19-20)
- Taper to 4 holes at top and bottom of face
Hair: Medium brown stitches around top and sides of head (2-3 rows at top) Veil/Head covering:
- Light blue stitches forming a rounded hood shape around the hair
- Start at row 18-19 on sides, curve up and over the head
- Add white edge stitches along the face opening of the veil
Halo: Golden yellow stitches in an arch shape, approximately 1-2 rows above the head
Step 3: Add Facial Features
Using tapestry needle and black yarn:
- Eyes: 2 small horizontal stitches or French knots, placed symmetrically
- Mouth: 2-3 small stitches forming a gentle smile
- Optional: Add tiny light pink stitches for rosy cheeks
Step 4: Attach to Holder
- Center the Mary figure on the blue holder
- Using matching yarn, whip stitch or overcast stitch around all edges to secure
- Ensure the figure lies completely flat
👶 PART 3: Baby Jesus Figure (Red Holder)
Step 1: Cut Plastic Canvas Pieces
- Manger/Crib: Cut an oval shape approximately 11 holes wide × 9 holes tall
- Baby Jesus: Cut a smaller rectangle approximately 7 holes wide × 8 holes tall
Step 2: Work the Manger
Using golden yellow yarn:
- Fill the entire oval shape with Continental stitch
- Work in concentric ovals from outside to inside for best appearance
- Optional: Add texture by working some stitches in a contrasting direction
Step 3: Work Baby Jesus
Rows 1-5 (swaddled body):
- White covering most of the area (5-7 holes)
- Work in a diagonal or wrapped pattern to suggest swaddling cloth
- Some rows may have 4-5 stitches, some 6-7, creating an irregular wrapped effect
Rows 6-8 (head):
- Beige oval shape (4-5 holes wide, 3 rows tall)
- Row 6: 3 holes
- Row 7: 5 holes
- Row 8: 4 holes (taper toward top)
Hair:
- 1-2 tiny brown stitches on top of head (row 8-9)
Facial features:
- 2 black stitches or French knots for eyes (placed on row 7)
- Small pink curved line or 2-3 stitches for mouth (below eyes)
Halo:
- Golden yellow stitches in an arch shape above the head (can extend onto the manger background)
Step 4: Assembly
- Layer Baby Jesus on top of the golden manger oval
- Stitch Baby Jesus to the manger using white yarn
- Center the complete piece on the red holder
- Whip stitch around the outer edge of the manger to secure to holder
👨 PART 4: Joseph Figure (Brown Holder)
Step 1: Cut Plastic Canvas
Cut a rectangle approximately 13 holes wide × 20 holes tall
Step 2: Work the Design
Rows 1-2 (bottom hem): Beige/cream across all 13 holes Rows 3-15 (main robe area):
- Center 9 holes: Beige/cream (inner robe)
- Outer 2 holes each side: Brown (cloak/outer garment)
Row 16 (belt line): Golden yellow across center 7-9 holes, brown continues on sides Rows 17-18 (upper body): Continue beige center, brown sides Arms (at row 17-18):
- Add 2-3 beige stitches extending outward on each side at shoulder level
Row 19 (neck): Beige, 3-4 holes wide at center Rows 20-23 (head and face):
- Beige oval (approximately 5-6 holes wide at widest)
- Row 20: 3-4 holes
- Row 21-22: 5-6 holes
- Row 23: 4-5 holes
Hair: Medium brown stitches across top of head (row 23-24) and around sides Beard:
- Black stitches covering lower half of face (starting at row 21)
- Extend down to cover chin and upper neck area (rows 20-21)
- Full, rounded beard shape (5-6 holes wide)
Head covering/Hood:
- Brown stitches forming hood frame around the head
- Start at row 20-21 on sides, curve over top
- May use golden brown or tan for edge detail/trim
Halo: Golden yellow arch shape above head (2-3 rows above row 24)
Step 3: Facial Features
- Eyes: 2 black horizontal stitches or French knots (placed on row 21-22, above the beard)
- Eyebrows: Optional brown small stitches above eyes
- Note: Most of lower face is covered by the full black beard
Step 4: Attach to Holder
- Center Joseph on the brown holder
- Whip stitch around all edges to secure
- Ensure beard section lies flat
🎨 Color Placement Tips
Mary (Blue Holder):
- Outer holder: Deep royal blue with horizontal ribbing
- Robe: Pure white with clean edges
- Veil: Light blue with white trim
- Skin: Light peachy beige
- Hair: Medium brown
- Halo: Bright golden yellow
Baby Jesus (Red Holder):
- Outer holder: Rich Christmas red with ribbing
- Manger: Golden yellow/mustard (darker than halo)
- Swaddling: Pure white with diagonal wrap appearance
- Skin: Light beige/pink
- Hair: Tiny brown wisps
- Halo: Bright golden yellow
Joseph (Brown Holder):
- Outer holder: Warm taupe/brown with ribbing
- Inner robe: Cream/light beige
- Outer cloak: Dark brown
- Beard: Black (full coverage)
- Hair: Medium brown
- Belt: Golden yellow
- Halo: Bright golden yellow
📐 Plastic Canvas Tips
- Keep tension consistent – not too tight (canvas will curl) or too loose (stitches will be uneven)
- Continental stitch direction – Work diagonally from bottom-left to top-right of each hole for consistent appearance
- Work in good light – precise stitch placement is crucial for the pixel-art appearance
- Count carefully – double-check your stitch placement, especially when changing colors
- Secure ends well – weave ends through the back of existing stitches (at least 3-4 stitches), trim close to work
- Block if needed – if canvas curls, lightly steam block on the wrong side with a pressing cloth
- Embroidery details last – add eyes, mouths, and small details after the main stitching is complete using duplicate stitch or straight stitches
- Color changes – When changing colors, secure the old color on the back and start the new color in the same hole or adjacent hole
🎄 Assembly & Finishing
- Block all three holders flat and allow to dry completely
- Attach figures securely with matching yarn, ensuring they’re centered
- Check pockets – make sure utensils can slide in easily
- Final steam – give a final light steam to ensure everything lies flat
- Quality check – trim any loose ends, check all stitching is secure
💡 Styling Suggestions
- Table setting: Place at each seat with fork and knife inserted
- Buffet display: Stand them in a row along the serving table
- Gift set: Wrap all three together with festive ribbon
- Add names: Embroider guest names on the back of holders
- Expand the set: Create additional holders with shepherds, angels, or wise men using the same technique
🌟 Skill Notes
Why plastic canvas? The photo shows extremely crisp, clean lines and pixelated character details that are impossible to achieve with traditional amigurumi or flat crochet appliqué. Plastic canvas allows for:
- Sharp edges and precise pixel placement
- Completely flat attachment to the holder
- Clean color transitions
- Professional, polished appearance
- Durability for repeated use
The ribbed holder technique creates the distinctive horizontal texture visible in the photo, achieved by working exclusively in back loops only.
⏱️ Time Estimate
- Each holder base: 2-3 hours
- Each plastic canvas figure: 3-4 hours
- Total per set: 15-20 hours
🎁 Make It Your Own
- Change skin tones to reflect your family
- Add metallic gold thread for halos
- Personalize with embroidered names
- Create matching napkin rings
- Make a full nativity scene with additional characters
Happy Crocheting & Blessed Christmas! 🎄✨
This pattern is written for personal use. Please credit the pattern if sharing your finished items online.