Treat yourself to a cozy dose of Halloween sweetness with the Crochet Pumpkin Mug with Whipped Topping, a delightfully whimsical project that’s overflowing with festive flair! 🎃🧶 This charming mug is topped with swirls of whipped cream and sprinkled with spooky-cute details like candy corn, a tiny pumpkin, a fluttery bat, and even a miniature witch hat. It’s the perfect handmade accent for your seasonal décor, guaranteed to bring smiles and a touch of magic to any shelf or centerpiece.
Ideal for crocheters who love playful textures and imaginative designs, this pattern invites you to mix vibrant autumn colors with fun embellishments for a truly eye-catching creation. Whether you’re crafting it as a gift, a photo prop, or a cheerful addition to your Halloween setup, the Crochet Pumpkin Mug with Whipped Topping is a joyful way to stitch up warmth, whimsy, and a whole lot of handmade charm—one loop at a time! 🧵🕸️🍬
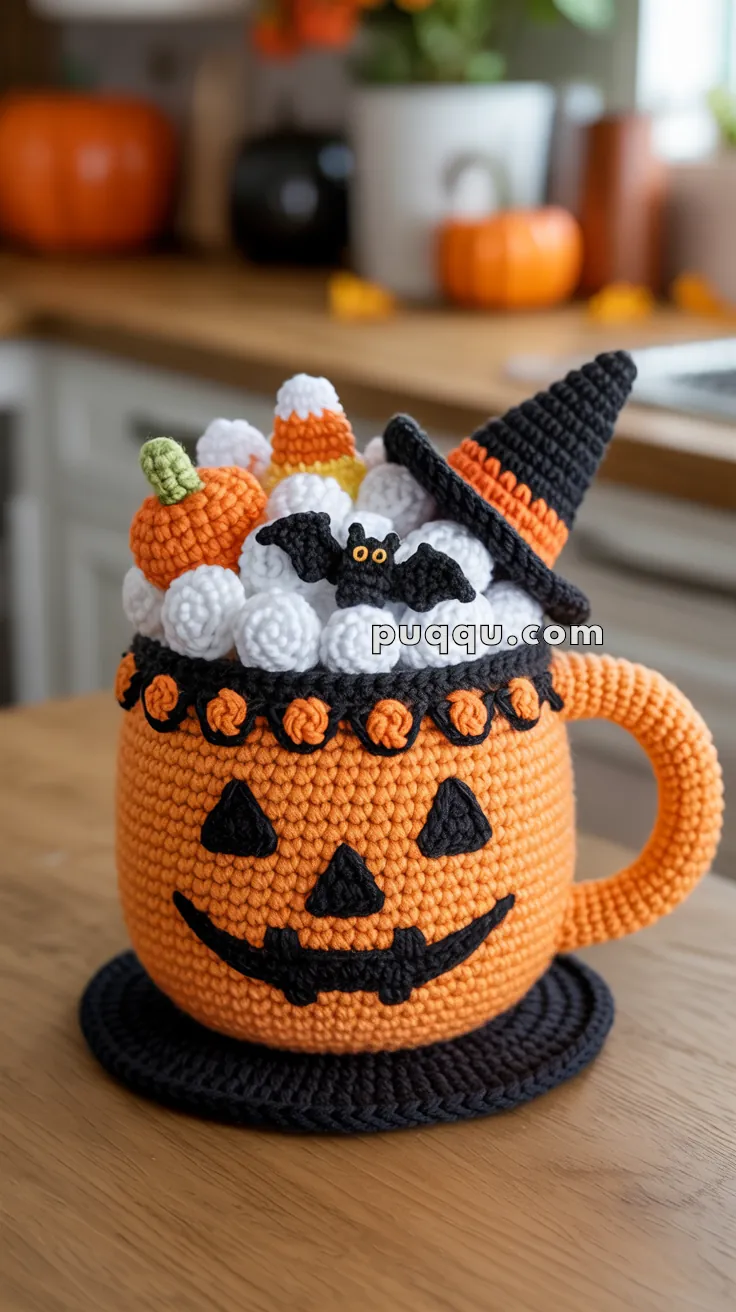
🎃 Crochet Pumpkin Mug with Whipped Topping Pattern
Celebrate Halloween with this adorable crochet pumpkin mug overflowing with whipped cream, candy corn, a tiny pumpkin, a bat, and a witch hat topper! Perfect cozy décor for spooky season.
✨ Skill Level
Intermediate – involves shaping, appliqué, bobble stitches, and small accessories.
📏 Finished Size
- Mug height: ~10 cm (body only)
- Mug diameter: ~9 cm
- Saucer diameter: ~11 cm
- Whipped topping height: ~12 cm
- Total height with toppings: ~22-25 cm
🧶 Materials
- Worsted weight yarn (#4):
- Orange: 100g (mug, handle, pumpkin, trim details)
- Black: 50g (face details, trim, saucer, bat, hat)
- Cream/Off-white or Light Ivory: 80g (whipped cream – NOT pure white)
- Yellow: 10g (candy corn)
- White: 10g (candy corn tips)
- Green: 5g (pumpkin stem)
- Tiny amount of yellow for bat eyes
- Hook: 3.5 mm (E) for tight, structured stitches
- Other supplies:
- Fiberfill stuffing
- Yarn needle
- Scissors
- Stitch markers
- Black embroidery thread (optional, for facial details)
🔤 Abbreviations (US Terms)
- MR = Magic Ring
- ch = chain
- sc = single crochet
- hdc = half double crochet
- dc = double crochet
- inc = increase (2 sc in same stitch)
- dec = decrease (invisible decrease/sc2tog)
- sl st = slip stitch
- BLO = back loops only
- FLO = front loops only
- yo = yarn over
- FO = fasten off
- st(s) = stitch(es)
- bobble = (yo, insert hook, yo, pull through, yo, pull through 2) 4 times in same st, yo, pull through all loops
🏺 PART 1: PUMPKIN MUG BODY
Mug Base (Orange)
Start from the bottom and work up:
Round 1: MR, 6 sc into ring, pull tight (6)
Round 2: inc in each st around (12)
Round 3: (sc, inc) × 6 (18)
Round 4: (2 sc, inc) × 6 (24)
Round 5: (3 sc, inc) × 6 (30)
Round 6: (4 sc, inc) × 6 (36)
Round 7: (5 sc, inc) × 6 (42)
Round 8: (6 sc, inc) × 6 (48)
Mug Sides
Rounds 9-10: sc in BLO around (48) – this creates the base ridge
Rounds 11-22: sc around (48) – work 12 rounds straight up for mug walls
Mug Rim with Decorative Bobble Band
Round 23: Switch to black yarn, sc around (48)
Round 24: sc around (48)
Round 25 (Decorative Bobbles with Orange): Switch to orange yarn. Work the following pattern:
- Bobble stitch: (yo, insert hook in st, yo, pull through, yo, pull through 2 loops) 4 times in same st, yo, pull through all 5 loops on hook
- Pattern: make bobble in next st, skip 1 st, sc in next 2 sts, repeat from * around
- You should have approximately 12 bobbles evenly spaced
Round 26: Switch back to black, sc around in remaining loops (48)
FO and weave in ends securely.
Stuff mug body firmly with fiberfill to maintain shape.
🎨 PART 2: JACK-O’-LANTERN FACE
Create the classic carved pumpkin face using black yarn.
Triangle Eyes (Make 2)
Row 1: Ch 2
Row 2: Work 3 sc in 2nd ch from hook, ch 1, turn (3)
Row 3: Dec, sc, ch 1, turn (2)
Row 4: Dec (1)
FO, leaving a long tail for sewing.
Flatten into triangle shape.
Triangle Nose (Make 1)
Row 1: Ch 2
Row 2: Work 2 sc in 2nd ch from hook, ch 1, turn (2)
Row 3: Dec (1)
FO, leaving tail for sewing.
This makes a smaller triangle for the nose.
Mouth
Using black yarn and yarn needle, embroider directly onto the mug:
- Create a wide curved smile shape
- Add 6-7 vertical stitches through the smile to create the classic jack-o’-lantern carved teeth effect
- Each vertical stitch should be about 0.5 cm long
Face Assembly
Position and sew the facial features onto the front of the mug:
- Eyes: Space about 3-4 cm apart, positioned in upper-middle area
- Nose: Centered below and between eyes
- Mouth: Below nose, creating happy carved expression
🍵 PART 3: MUG HANDLE
With Orange yarn:
Foundation: Ch 24
Row 1: Sc in 2nd ch from hook and across (23 sc)
Row 2: Ch 1, turn, sc across (23 sc)
Row 3: Ch 1, turn, sc across (23 sc)
FO, leaving a long tail (about 30 cm) for sewing.
Handle Attachment
- Curve the strip into a handle shape (like a “C”)
- Position on the side of the mug opposite the face
- Sew one end to the mug about 2 rounds below the rim
- Sew the other end about 5-6 rounds below the rim
- Make sure handle is firmly attached and can support the weight
⚫ PART 4: SAUCER BASE
With Black yarn:
Round 1: MR, 6 sc into ring (6)
Round 2: inc in each st around (12)
Round 3: (sc, inc) × 6 (18)
Round 4: (2 sc, inc) × 6 (24)
Round 5: (3 sc, inc) × 6 (30)
Round 6: (4 sc, inc) × 6 (36)
Round 7: (5 sc, inc) × 6 (42)
Round 8: (6 sc, inc) × 6 (48)
Round 9: (7 sc, inc) × 6 (54)
Round 10: sc in BLO around (54) – creates raised plate edge
Round 11: sc around (54)
FO, leaving long tail.
Weave in starting tail. The saucer should lie flat.
Attaching Mug to Saucer
Center the stuffed mug on the saucer and tack in place with several stitches around the base using matching yarn.
☁️ PART 5: WHIPPED CREAM TOPPING
This is the signature element! The key is making many small peaks that connect together into one fluffy cloud.
Individual Whipped Cream Peak (Make 24-28)
With Cream/Off-white yarn:
Round 1: MR, 5 sc into ring (5)
Round 2: inc in each st around (10)
Round 3: (sc, inc) × 5 (15)
Round 4: sc around (15)
Round 5: (sc, dec) × 5 (10)
Stuff moderately (not too firmly – should be slightly squishy).
Round 6: dec × 5 (5)
FO, leaving a 20 cm tail. Thread tail through remaining 5 stitches and pull to close, but don’t cut yarn yet – use tail for sewing.
Assembling the Whipped Cream Cloud
This is crucial for the photo-accurate look:
Bottom Ring (First Layer):
- Take 11-12 peaks
- Arrange them tightly around the rim of the mug, touching each other
- Sew each peak to the mug rim AND to the neighboring peaks on both sides
- The peaks should squish together creating a seamless ring with no gaps
Middle Layer (Second Layer):
- Take 8-10 peaks
- Position them on top of the first layer, offset so they sit in the gaps
- Sew to the peaks below and to each other
- Continue squishing them together for a cloud-like appearance
Top Layer (Third Layer):
- Take 5-6 peaks
- Arrange in a dome formation at the center top
- Sew securely to middle layer peaks
- The center should be the highest point
Important Tips:
- As you sew, press the peaks together firmly so they merge and look like one continuous whipped cream cloud
- Use small stitches with matching cream yarn so they’re invisible
- The whipped cream should tower above the mug and look voluminous
- Total height of whipped topping should be approximately 12 cm
🍬 PART 6: CANDY CORN (Make 2-3)
These should be small and tapered.
Start with Yellow yarn:
Round 1: MR, 3 sc into ring (3)
Round 2: sc around (3)
Switch to Orange yarn:
Round 3: (sc, inc) once, sc (4)
Round 4: sc around (4)
Round 5: inc in each st around (8)
Switch to White yarn:
Round 6: sc around (8)
Round 7: (sc, inc) × 4 (12)
Round 8: sc around (12)
Round 9: dec × 6 (6)
Stuff lightly with small amount of fiberfill.
FO, leaving tail. Thread through remaining stitches and close opening.
The finished candy corn should be about 4-5 cm tall with a distinctive tapered shape.
🎃 PART 7: MINI PUMPKIN
Pumpkin Body (Orange)
Round 1: MR, 6 sc into ring (6)
Round 2: inc in each st around (12)
Round 3: (sc, inc) × 6 (18)
Round 4: (2 sc, inc) × 6 (24)
Rounds 5-7: sc around (24) – work 3 rounds straight
Round 8: (2 sc, dec) × 6 (18)
Round 9: (sc, dec) × 6 (12)
Stuff firmly with fiberfill.
Round 10: dec × 6 (6)
FO, leaving long tail. Thread through remaining 6 stitches and pull tight to close.
Creating Pumpkin Segments
- Thread orange yarn on needle
- Insert needle from bottom center up through top center
- Bring it back down to bottom, slightly to the side
- Pull gently to create an indent
- Repeat 5-6 times around the pumpkin to create vertical segments
- This gives the realistic pumpkin shape
Pumpkin Stem (Green)
Round 1: MR, 3 sc into ring (3)
Rounds 2-4: sc around (3) – work 3 rounds
FO, leaving tail.
Sew stem securely to top center of pumpkin.
🦇 PART 8: BAT
Bat Body (Black)
Round 1: MR, 6 sc into ring (6)
Rounds 2-3: sc around (6) – work 2 rounds
FO, leaving long tail.
Stuff lightly with a small amount of fiberfill. Flatten slightly to create oval body shape.
Bat Wings (Make 2 – Black)
Foundation: Ch 7
Row 1: Starting in 2nd ch from hook: sl st, sc, hdc, dc, hdc, sc (6 sts)
Add small peak at top: Ch 2, sl st in 2nd ch from hook, sl st back into last st of wing.
FO, leaving tail for sewing.
The wing should have a curved, bat-wing shape.
Bat Assembly
- Sew one wing to each side of the body
- Position wings slightly upward as if in flight
- Using yellow yarn, embroider or sew two tiny dots for eyes (just 1-2 small stitches each)
🧙♀️ PART 9: WITCH HAT
The hat has an integrated orange stripe – don’t add it separately!
Witch Hat Cone
Start with Black yarn:
Round 1: MR, 6 sc into ring (6)
Round 2: (sc, inc) × 3 (9)
Rounds 3-4: sc around (9)
Round 5: (2 sc, inc) × 3 (12)
Rounds 6-7: sc around (12)
Round 8: (3 sc, inc) × 3 (15)
Rounds 9-10: sc around (15)
Switch to Orange yarn for hat band:
Rounds 11-12: sc around (15) – work 2 rounds with orange
Switch back to Black yarn:
Round 13: (4 sc, inc) × 3 (18)
Rounds 14-15: sc around (18)
Round 16: (5 sc, inc) × 3 (21)
Round 17: sc around (21)
Stuff the cone lightly to help it hold its pointed shape.
Witch Hat Brim (Black)
Round 18: (6 sc, inc) × 3 (24)
Round 19: (3 sc, inc) × 6 (30)
Round 20: (4 sc, inc) × 6 (36)
Round 21: (5 sc, inc) × 6 (42)
Round 22: sc in BLO around (42) – creates brim ridge
Round 23: sc around (42)
FO and weave in all ends.
The brim should lie relatively flat but with slight curve.
🪡 PART 10: FINAL ASSEMBLY
Now bring all the pieces together!
Step 1: Attach Whipped Cream to Mug
The whipped cream structure should already be built in layers directly on the mug rim (from Part 5).
Step 2: Position and Attach Decorative Elements
Looking at the mug from the front (where the face is):
Witch Hat:
- Position at the back-left area of the whipped cream
- Tilt it at about 45° angle (not straight up)
- Nestle the brim into the whipped cream peaks
- Sew securely through the brim into multiple whipped cream peaks using black thread
Candy Corn (2-3 pieces):
- Insert at various angles in the front-left and center-left area
- Some pointing up, some tilted
- Sew the wide white ends into the whipped cream
- They should look like they’re “stuck” in the cream
Mini Pumpkin:
- Position in the front-center to center-right area
- It should sit ON TOP of the whipped cream, not buried
- Sew the bottom securely to several whipped cream peaks
Bat:
- Position on the right side of the arrangement
- Place it slightly forward, as if flying over the whipped cream
- Sew body securely to whipped cream peaks
- Make sure wings are visible and not hidden
Step 3: Final Adjustments
- Check that all pieces are securely attached
- Adjust angles and positions for visual balance
- Make sure the whipped cream peaks still look fluffy and cloud-like
- Ensure the mug is stable on the saucer
- Weave in any remaining yarn ends
- Gently shape and fluff the whipped cream if needed
🎯 TIPS FOR PHOTO-ACCURATE RESULTS
Color Selection
- Use cream or light ivory for whipped topping, NOT bright white
- Orange should be a bright, vibrant pumpkin orange
- Black should be deep and rich
Whipped Cream Key
- Make enough peaks – don’t skimp! 24-28 minimum
- Press peaks together as you sew them – they should merge, not be separated
- Build in distinct layers – bottom ring, middle layer, top dome
- The cream should look like one fluffy cloud, not individual balls
Bobble Trim
- Make sure bobbles are evenly spaced around the mug rim
- They should be dimensional and rounded, not flat
- About 12 bobbles total around the circumference
Face Details
- Keep triangles small and neat
- Smile should be wide and happy
- Vertical tooth lines make it look carved
Decoration Placement
- Don’t overcrowd – leave some whipped cream visible
- Vary heights and angles for visual interest
- Witch hat tilted is more charming than straight
- Bat should look like it’s in motion
Structural Integrity
- Stuff mug firmly so it doesn’t collapse
- Sew decorations securely – they’ll be handled
- Balance weight – don’t put all heavy items on one side
📐 SIZING ADJUSTMENTS
To make a larger or smaller version:
For Larger Mug (1.5x size):
- Use 4.5mm hook
- Add 2 more increase rounds to base (60 sts)
- Work 4 more rounds for height
- Make 35-40 whipped cream peaks
- Increase all decoration sizes proportionally
For Smaller Mug (mini version):
- Use 3.0mm hook and light worsted yarn
- Stop at 36 sts for base
- Work only 8 rounds for height
- Make 16-20 whipped cream peaks
- Make smaller decorations
🧹 CARE INSTRUCTIONS
- Spot clean only – do not machine wash
- Use damp cloth for surface cleaning
- Do not submerge in water
- Store in cool, dry place away from direct sunlight
- Can be lightly misted with fabric protector spray
- Fluff whipped cream peaks gently if they flatten over time
⏱️ ESTIMATED TIME
- Mug and saucer: 2-3 hours
- Whipped cream peaks and assembly: 3-4 hours
- All decorations: 2-3 hours
- Final assembly: 1 hour
- Total project time: 8-11 hours
🎃 ENJOY YOUR CREATION!
This adorable pumpkin mug makes perfect Halloween décor, a thoughtful handmade gift, or a fun seasonal display piece. The whipped cream topping and all the tiny details make it truly special!
Happy Crocheting! 🧶✨🎃