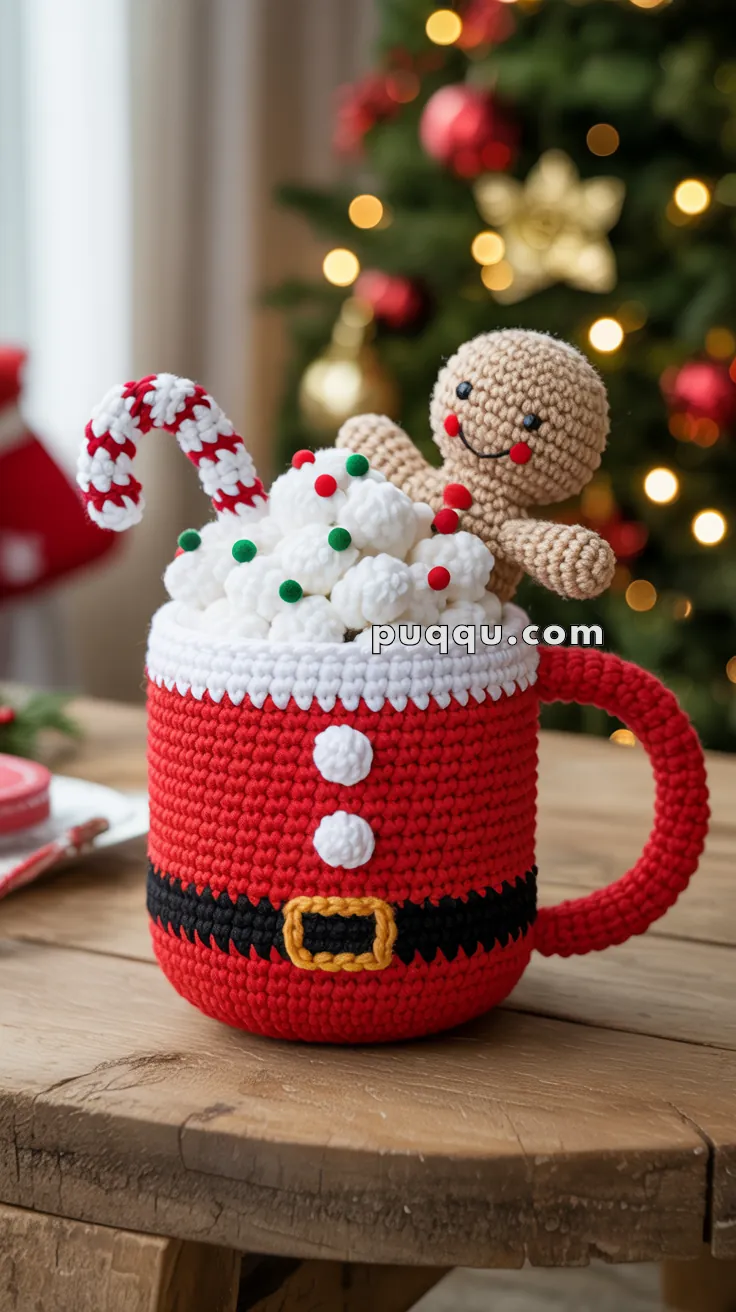
Sip up some holiday cheer with the Crochet Santa Mug, a festive and cozy creation that’s brimming with sweet seasonal charm! 🎅☕🧶 This adorable mug features Santa’s classic red suit wrapped around a cup overflowing with fluffy whipped cream, a cheerful candy cane, and the cutest little gingerbread friend peeking out from the top. It’s the perfect handmade accent for your Christmas décor, guaranteed to bring smiles and a sprinkle of magic to any shelf or centerpiece.
Perfect for crocheters who love playful textures and joyful details, this pattern invites you to mix rich holiday colors with whimsical embellishments. Add a twinkle to Santa’s belt, personalize the gingerbread cookie, or stitch up a whole tray of festive mugs for a cozy display. The Crochet Santa Mug is a delightful way to stitch up warmth, wonder, and a whole lot of handmade holiday happiness—one loop at a time! 🧵🎄🍬
🎅 Crochet Santa’s Hot Cocoa Mug Pattern – Perfect Holiday Décor!
Create this adorable Christmas centerpiece featuring a festive Santa mug overflowing with whipped cream, a candy cane, and an irresistible gingerbread friend!
📸 What You’ll Make
This charming amigurumi project combines everything we love about the holidays: a cozy mug designed like Santa’s suit, topped with fluffy whipped cream, a classic candy cane, and the sweetest little gingerbread man you’ve ever seen. Perfect for your holiday table, mantel, or as a handmade gift that will be treasured for years!
🧶 Skill Level
Intermediate – This pattern requires color changes, amigurumi shaping techniques, and assembly skills. If you’re comfortable with basic amigurumi, you’ll do great!
📏 Finished Dimensions
- Santa Mug: 10-11 cm tall × 9-10 cm wide
- Candy Cane: 10 cm long
- Gingerbread Man: 12 cm tall
- Complete Display: Approximately 16-18 cm tall
🧵 Materials You’ll Need
Yarn
Worsted weight yarn (weight 4) in:
- Red (100g) – mug body and handle
- White (50g) – whipped cream, trim, candy cane stripes, buttons
- Black (25g) – belt, facial features
- Yellow/Gold (15g) – belt buckle
- Beige/Tan (40g) – gingerbread man
- Bright Red (10g) – gingerbread buttons and sprinkles
- Green (10g) – sprinkles
Other Supplies
- Crochet hook: 3.5-4 mm (US E/4-G/6)
- Polyfill stuffing
- Yarn needle (tapestry needle)
- Scissors
- Stitch markers (optional but helpful)
- Black embroidery floss (for gingerbread features)
- Pink/red embroidery floss (for cheeks)
📖 Abbreviations (US Terms)
- MR = Magic Ring
- sc = single crochet
- inc = increase (2 sc in one stitch)
- dec = decrease (single crochet 2 together)
- sl st = slip stitch
- ch = chain
- dc = double crochet
- BLO = back loop only
- FO = fasten off
- ( ) × # = repeat instructions in parentheses # times
🎄 Complete Pattern Instructions
☕ Part 1: Santa Mug Base
With red yarn:
Round 1: MR, 6 sc (6)
Round 2: inc around (12)
Round 3: (sc, inc) × 6 (18)
Round 4: (2 sc, inc) × 6 (24)
Round 5: (3 sc, inc) × 6 (30)
Round 6: (4 sc, inc) × 6 (36)
Round 7: (5 sc, inc) × 6 (42)
Round 8: (6 sc, inc) × 6 (48)
Round 9: (7 sc, inc) × 6 (54)
Round 10: (8 sc, inc) × 6 (60)
Round 11: (9 sc, inc) × 6 (66)
Round 12: Work in BLO: sc around (66) [This creates the bottom rim]
Rounds 13-24: sc around (66) [Continue until mug measures approximately 10-11 cm tall]
Round 25: Switch to BLACK yarn: sc around (66)
Rounds 26-27: sc around (66) [This creates Santa’s belt]
Round 28: Switch back to RED yarn: sc around (66)
Rounds 29-30: sc around (66)
Round 31: Switch to WHITE yarn for scalloped trim:
(sc, skip 1 st, 5 dc in next st, skip 1 st) repeat around
sl st to join, FO
Weave in ends. Stuff mug firmly but leave top open for adding whipped cream later.
🔘 Part 2: White Buttons (Make 2-3)
With white yarn:
Round 1: MR, 6 sc (6)
Round 2: sl st to join, FO leaving long tail
Sew buttons vertically on the red section of the mug above the black belt.
🟨 Part 3: Belt Buckle
With yellow yarn:
Ch 8
Row 1: sc in 2nd ch from hook, sc across (7), ch 1, turn
Rows 2-4: sc 7, ch 1, turn (7)
Row 5: sc 7, FO leaving long tail
Buckle Detail:
With black yarn, embroider a rectangle in the center of the yellow piece to create the buckle’s center opening.
Sew buckle onto the center front of the black belt.
🔗 Part 4: Mug Handle
With red yarn:
Ch 28 (adjust if needed to fit your mug size)
Row 1: sc in 2nd ch from hook and across (27)
Row 2: ch 1, turn, sc across (27)
Row 3: ch 1, turn, sc across (27)
FO leaving long tail
Sew both ends of the handle securely to the side of the mug, positioning it so it curves nicely outward.
🍦 Part 5: Whipped Cream Clusters (Make 12-15)
Method: Small Puff Balls
With white yarn:
Round 1: MR, 6 sc (6)
Round 2: (sc, inc) × 3 (9)
Rounds 3-4: sc around (9)
Round 5: (sc, dec) × 3 (6)
FO leaving long tail. Stuff very lightly.
Make 12-15 of these small puffs. Arrange them on top of the mug in a mounded pile and sew together, creating a fluffy whipped cream effect.
🎄 Part 6: Whipped Cream Sprinkles (Make 8-10)
With red and green yarn:
For each sprinkle:
Ch 2, work 3 dc in 2nd ch from hook, pull tight, FO leaving 4-inch tail
Make approximately 5 red and 5 green sprinkles. Sew randomly onto the white whipped cream clusters for a festive touch.
🍬 Part 7: Candy Cane
With red and white yarn (worked in alternating stripes):
Round 1: With white, MR, 6 sc (6)
Rounds 2-3: sc around (6) – WHITE
Rounds 4-5: sc around (6) – RED
Rounds 6-7: sc around (6) – WHITE
Rounds 8-9: sc around (6) – RED
Rounds 10-11: sc around (6) – WHITE
Rounds 12-13: sc around (6) – RED
Rounds 14-15: sc around (6) – WHITE
Round 16: dec around (3), FO
Continue alternating red and white stripes until candy cane measures approximately 10 cm long.
Finishing:
- Do NOT stuff firmly – use yarn scraps or very light stuffing
- Gently bend the top 3 cm into a cane hook shape
- Steam lightly or dampen and shape, let dry
- Insert into whipped cream and secure with a few stitches
🍪 Part 8: Gingerbread Man
With beige/tan yarn:
Head and Body (worked as one piece)
Round 1: MR, 6 sc (6)
Round 2: inc around (12)
Round 3: (sc, inc) × 6 (18)
Round 4: (2 sc, inc) × 6 (24)
Rounds 5-8: sc around (24) [Head section]
Round 9: (2 sc, dec) × 6 (18)
Round 10: (sc, dec) × 6 (12) [Neck]
Stuff head firmly
Round 11: inc around (24) [Body begins]
Rounds 12-16: sc around (24) [Body section]
Round 17: (2 sc, dec) × 6 (18)
Round 18: (sc, dec) × 6 (12)
Stuff body firmly
Round 19: dec around (6)
FO, weave in end
Arms (Make 2)
With beige/tan yarn:
Round 1: MR, 6 sc (6)
Rounds 2-10: sc around (6)
FO leaving long tail
Stuff lightly. Sew to sides of body at shoulder area.
Legs (Make 2)
With beige/tan yarn:
Round 1: MR, 6 sc (6)
Round 2: (sc, inc) × 3 (9)
Rounds 3-10: sc around (9)
FO leaving long tail
Stuff lightly. Sew to bottom of body.
Facial Features
Eyes:
With black embroidery floss, create two French knots for eyes
Mouth:
With black embroidery floss, embroider a simple curved smile
Cheeks:
With red/pink embroidery floss, make French knot circles or satin stitch circles on each cheek
Buttons:
With bright red yarn:
- MR, 6 sc, sl st to join, FO (Make 2-3)
- Sew vertically down center of body
🪡 Assembly Instructions
Step 1: Prepare the Mug
- Ensure mug is stuffed firmly and maintains its shape
- Check that belt buckle and buttons are securely attached
- Verify handle is firmly sewn on both ends
Step 2: Create Whipped Cream Top
- Arrange 12-15 white puff balls on top of mug
- Sew them together to create a mounded, fluffy appearance
- Leave a small space for the candy cane
Step 3: Add Sprinkles
- Distribute red and green sprinkles randomly across whipped cream
- Sew each one securely in place
Step 4: Insert Candy Cane
- Position candy cane at the back-center of whipped cream
- Insert about 2-3 cm into the cream
- Sew in place with white yarn, hiding stitches
Step 5: Position Gingerbread Man
- Seat gingerbread man in the center-front of whipped cream
- Angle him slightly as if he’s relaxing in a bubble bath
- Sew securely at bottom and back for stability
Step 6: Final Touches
- Check all pieces are secure
- Weave in any remaining yarn ends
- Steam block gently if needed to even out stitches
- Add a light brush of pink chalk or eyeshadow to gingerbread cheeks for extra cuteness (optional)
💡 Tips for Success
Tension Matters: Keep consistent tension throughout, especially on the mug body, so it doesn’t wobble or lean.
Stuffing: Stuff the mug firmly to help it stand upright. The gingerbread man should be stuffed but remain flexible for posing.
Color Changes: When switching colors (like from red to black for the belt), carry yarn inside if possible to avoid extra ends.
Structural Support: If your mug seems floppy, you can insert a small plastic cup or cardboard tube inside before closing the bottom.
Steam Blocking: Lightly steam the mug body to smooth out stitches and help it hold its cylindrical shape.
Candy Cane Shaping: Shape your candy cane while the yarn is slightly damp for the best curve that holds.
🎁 Display & Gift Ideas
- Holiday Centerpiece: Place on your dining table surrounded by pine branches and fairy lights
- Mantel Décor: Display on your fireplace mantel with other Christmas decorations
- Kitchen Counter: Adds festive cheer to your coffee station
- Gift Idea: Perfect handmade gift for teachers, neighbors, or crafty friends
- Photo Prop: Adorable prop for Christmas card photos or social media posts
- Year-Round Storage: These pieces nest inside each other for compact storage
🔄 Variations to Try
Different Mug Designs:
- Snowman mug (white body, black buttons, orange carrot nose)
- Elf mug (green body with yellow belt and pointed collar)
- Reindeer mug (brown body with antlers on top)
Hot Cocoa Add-Ins:
- Mini marshmallows instead of whipped cream
- Chocolate bar piece tucked in the side
- Cinnamon stick instead of candy cane
Gingerbread Variations:
- Girl gingerbread with a bow or dress
- Baby gingerbread peeking out
- Gingerbread couple holding hands
❓ Troubleshooting
Mug won’t stand up straight:
- Add more stuffing to the base
- Insert a cardboard circle at the bottom for stability
- Ensure base rounds are worked evenly
Whipped cream looks flat:
- Make more puff balls (15-18 instead of 12)
- Stuff each puff slightly more
- Pile them higher in the center
Candy cane won’t hold its curve:
- Dampen with water and pin in place to dry
- Insert a pipe cleaner inside before closing
- Use less stuffing for more flexibility
Gingerbread man tips over:
- Sew more attachment points to the whipped cream
- Add weight to the mug base
- Position him leaning slightly back
💝 Final Thoughts
This whimsical crochet project brings together all the cozy feelings of the holiday season. While it requires some patience and multiple pieces, the final result is absolutely worth it! Each component is relatively simple on its own, making this a perfect weekend project or something to work on throughout the season.
The joy on someone’s face when they see this adorable display is priceless. Whether you keep it for yourself or gift it to someone special, this Santa’s Hot Cocoa Mug is sure to become a cherished holiday tradition.
Happy Crocheting and Merry Christmas! 🎄☕🎅