Add a flurry of handmade joy to your holiday décor with the Crochet Snowman Ornaments, a cheerful and beginner-friendly project that’s perfect for festive crafting! ⛄🧶 Each snowman features adorable button details, twig-like arms, a bright carrot nose, and a cozy little scarf—bringing classic winter charm to your Christmas tree, gift wrapping, or seasonal garlands. These ornaments work up quickly, making them ideal for last-minute gifts or joyful weekend projects.
Perfect for crocheters of all skill levels, this pattern invites you to play with soft textures, wintry colors, and playful embellishments. Customize each snowman with different scarf styles, button shapes, or even tiny hats to create a whole frosty family. The Crochet Snowman Ornaments are a delightful way to stitch up warmth, whimsy, and a sprinkle of holiday magic—one loop at a time! 🧵❄️
☃️Crochet Snowman Ornament Pattern
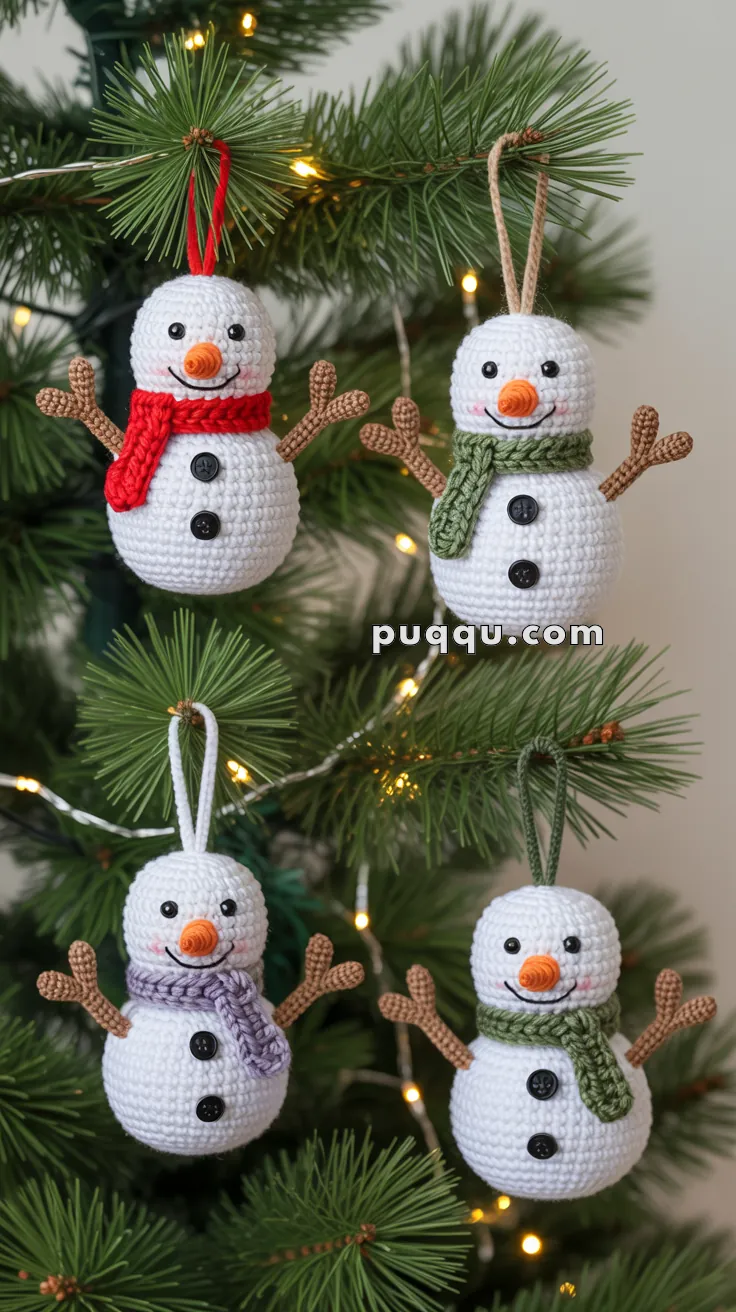
Transform your Christmas tree into a winter wonderland with these charming handmade snowman ornaments! With their rosy cheeks, cozy scarves, and cheerful smiles, these little snowmen capture the magic of the season perfectly.
✨ Skill Level
Beginner-Friendly – Perfect for learning amigurumi basics! Requires knowledge of basic stitches and simple assembly.
📏 Finished Size
Approximately 4.5–5 inches (11–13 cm) tall
🧶 Materials You’ll Need
Yarn:
- White worsted weight yarn (main body) – approx. 50g
- Orange yarn (carrot nose) – small amount
- Brown worsted weight yarn (arms) – small amount
- Worsted weight yarn for scarf in red, green, purple, or your choice – approx. 15g
- Black embroidery thread or thin yarn (smile & eyebrows)
- Pink embroidery thread or yarn (cheeks)
Other Supplies:
- 3.5 mm (E) crochet hook
- 6–8 mm black safety eyes or small black beads
- 2 small black buttons (approx. 8–10 mm)
- Polyester fiberfill stuffing
- Yarn needle
- Stitch marker
- Ribbon or yarn for hanging loop
- Scissors
🧷 Abbreviations (US Terms)
- MR – Magic Ring
- ch – Chain
- sc – Single Crochet
- inc – Increase (2 sc in same stitch)
- dec – Invisible Decrease (insert hook in front loops of next 2 sts, yarn over, pull through both, yarn over, pull through all loops)
- sl st – Slip Stitch
- st(s) – Stitch(es)
- FO – Fasten Off
🎄 Pattern Instructions
HEAD (Make 1)
With white yarn:
Round 1: MR, 6 sc into ring (6)
Round 2: inc in each st around (12)
Round 3: (1 sc, inc) × 6 (18)
Round 4: (2 sc, inc) × 6 (24)
Round 5: (3 sc, inc) × 6 (30)
Rounds 6–11: sc in each st around (30) — 6 rounds even
Round 12: (3 sc, dec) × 6 (24)
👀 Insert safety eyes between rounds 8 and 9, spacing them approximately 6–7 stitches apart.
Round 13: (2 sc, dec) × 6 (18)
Round 14: (1 sc, dec) × 6 (12)
Begin stuffing head firmly. Continue stuffing as you close.
Round 15: dec × 6 (6)
FO, leaving a long tail. Thread tail through remaining 6 sts and pull tight to close. Weave in end securely.
BODY (Make 1)
With white yarn:
Round 1: MR, 6 sc into ring (6)
Round 2: inc in each st around (12)
Round 3: (1 sc, inc) × 6 (18)
Round 4: (2 sc, inc) × 6 (24)
Round 5: (3 sc, inc) × 6 (30)
Round 6: (4 sc, inc) × 6 (36)
Rounds 7–11: sc in each st around (36) — 5 rounds even
Round 12: (4 sc, dec) × 6 (30)
Round 13: (3 sc, dec) × 6 (24)
Round 14: (2 sc, dec) × 6 (18)
Stuff body firmly.
Round 15: (1 sc, dec) × 6 (12)
Round 16: dec × 6 (6)
FO, leaving a long tail. Thread tail through remaining 6 sts and pull tight to close.
Assembly: Position head on top of body. Using the long tail from the body, sew head securely to body using whip stitch or mattress stitch all around the connection point.
CARROT NOSE (Make 1)
With orange yarn:
Round 1: MR, 4 sc into ring (4)
Round 2: sc in each st around (4)
Round 3: sc in each st around (4)
Round 4: (1 sc, inc) × 2 (6)
Round 5: sc in each st around (6)
FO, leaving a long tail for sewing.
Lightly stuff the nose with a tiny bit of fiberfill. Using the long tail, sew nose to center of face between and slightly below the eyes. The narrow end should point outward, with the wider base against the face.
ARMS/BRANCHES (Make 2)
With brown yarn:
Main Branch:
Ch 12, starting in 2nd ch from hook, sl st in each ch back to beginning (creates a twig-like piece).
Add Small Branch Fingers (make 2–3 per arm):
At various points along the main branch (approximately 3, 6, and 9 stitches from start):
- Ch 4
- Starting in 2nd ch from hook, sl st in each ch back to main branch
- Continue along main branch
FO, leaving a long tail for sewing.
Attach arms to sides of body at approximately round 3–4 of the body (upper-middle section). Angle them slightly upward for a cheerful, waving appearance.
SCARF (Make 1)
With your choice of colored yarn (red, green, purple, etc.):
Row 1: Ch 45 (or adjust to desired length, approximately 10–11 inches)
Row 2: Sc in 2nd ch from hook and in each ch across (44 sc)
Row 3: Ch 1, turn, sc in each st across (44 sc)
Row 4: Ch 1, turn, sc in each st across (44 sc)
FO, leaving a 6-inch tail.
Add fringe to both ends:
Cut 6 pieces of yarn, each 3 inches long. For each end of scarf:
- Take 3 strands, fold in half
- Insert hook through edge stitch
- Pull folded loop through
- Pull yarn ends through the loop and tighten
Wrap scarf around snowman’s neck (between head and body) and tie in a simple knot, adjusting for desired look.
EMBROIDERY DETAILS
Smile:
Using black embroidery thread, stitch a curved smile below the nose. Use backstitch or stem stitch for a smooth line. The smile should curve upward and be approximately 6–8 stitches wide, positioned 2–3 rounds below the nose.
Eyebrows (optional but recommended):
Using black thread, stitch small angled lines above and slightly to the outside of each eye (2–3 small stitches per eyebrow), angled upward toward center for a friendly expression.
Rosy Cheeks:
Using pink embroidery thread or yarn, create circular blush marks on each cheek using satin stitch or by making small straight stitches in a circular/star pattern. Position cheeks to the sides, between the eyes and smile level. Each cheek should be approximately 3–4 stitches in diameter for a subtle, sweet look.
Alternatively, you can use pink blush makeup or chalk pastel applied with a cotton swab or makeup brush, though embroidered cheeks are more durable and washable.
BUTTONS
Sew 2 small black buttons vertically down the front of the body, spacing them evenly. Position the top button at approximately round 8–9, and the bottom button at round 11–12.
HANGING LOOP
Option 1 – Crocheted Loop:
With white yarn, ch 30. Attach both ends to the top center of the head using yarn needle.
Option 2 – Ribbon:
Cut a 6-inch piece of ribbon, fold in half, and stitch the ends securely to the top of the head.
🎁 Finishing Touches
- Weave in all remaining yarn ends securely
- Adjust scarf for desired drape
- Ensure all parts are sewn firmly for durability
- Give your snowman a light steam (hover steamer 4–6 inches away) to smooth any fuzzy bits
- Optional: Add a light spray of fabric stiffener if you want the ornament to hold its shape even better
💡 Tips & Variations
Color Variations:
- Make scarves in your favorite holiday colors
- Try metallic yarn for a sparkly scarf
- Use variegated yarn for a rainbow effect
Size Adjustments:
- Use thinner yarn (DK weight) and smaller hook (2.5mm) for mini ornaments
- Use bulky yarn and larger hook (5mm) for jumbo decorations
Gift Ideas:
- Make a set of 4–6 with different scarf colors
- Attach to gift packages as decorative toppers
- Create matching snowman families with varying sizes
- String several together to make a garland
📸 About This Pattern
This pattern was carefully crafted to recreate the adorable snowmen photographed on the Christmas tree, with attention to proportion, detail, and that irresistibly cheerful expression. The rosy cheeks and waving stick arms give each snowman personality and charm.
Skill Building: This pattern teaches you important amigurumi techniques including working in continuous rounds, invisible decreasing, and assembling multiple pieces into a finished toy.
☃️ Happy Crocheting!
I hope you enjoy making these sweet snowman ornaments! They work up quickly—perfect for crafting marathons or last-minute gifts. Each one takes approximately 2–3 hours to complete.