Cozy up with a cup of winter cheer and the “Let It Snow” Crochet Mug, a festive little project that’s perfect for chilly days and warm hearts! ☕❄️🧶 This adorable mug design features classic snowy motifs and a snug, textured surface that’s just right for seasonal décor or gifting. Whether you’re decorating your craft space, adding a handmade touch to your cocoa station, or surprising a friend with a wintry treat, this crochet mug brings a flurry of charm to any setting.
Perfect for crocheters who love playful details and holiday vibes, this pattern invites you to mix frosty blues, snowy whites, and cozy stitches to create your own winter wonderland. Add a tiny marshmallow topper, stitch a matching coaster, or pair it with other seasonal accents for a complete display. The “Let It Snow” Crochet Mug is a joyful way to stitch up warmth, whimsy, and a sprinkle of handmade magic—one loop at a time! 🧵⛄
☕❄️ “Let It Snow” Crochet Mug Pattern
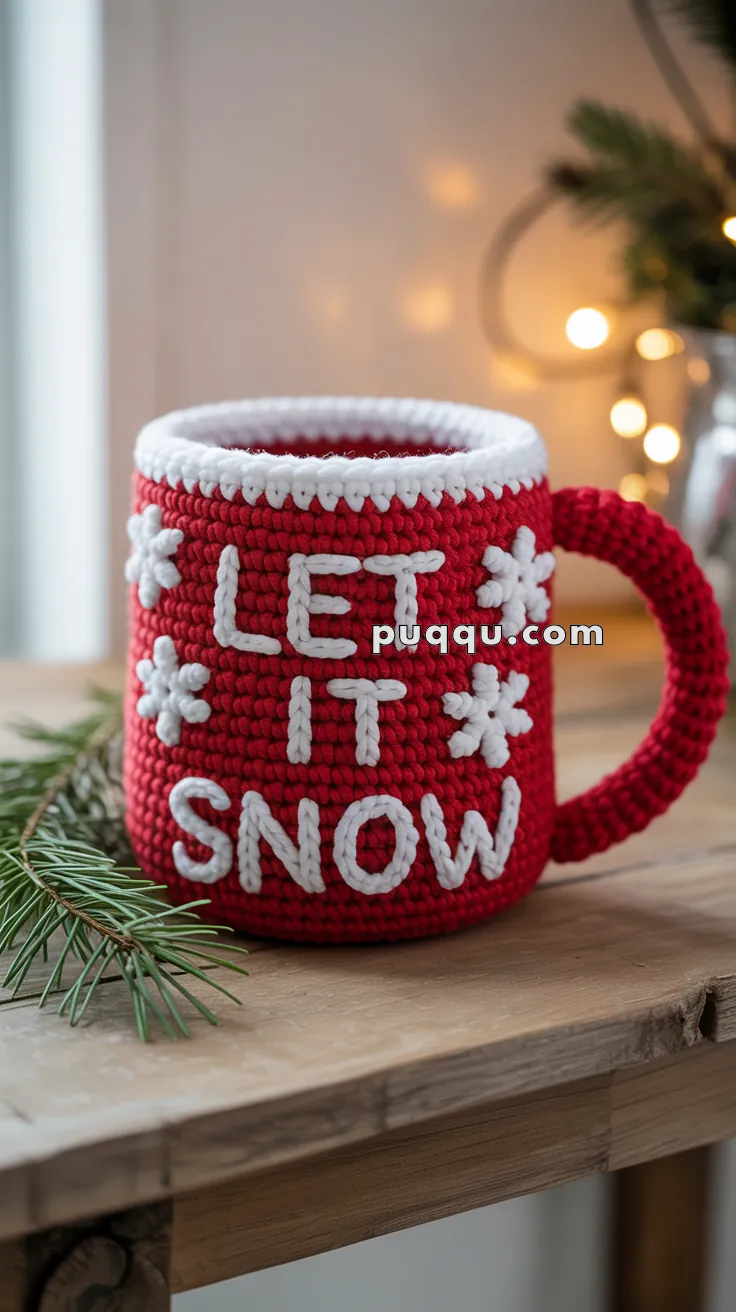
Bring a touch of cozy holiday magic into your home with this festive crochet mug! Featuring bold raised “LET IT SNOW” lettering, cheerful snowflakes, and a charming textured rim that mimics falling icicles, this piece is perfect as a holiday display, gift accent, or part of your winter décor. 🎄✨
🎯 Skill Level
Intermediate – You’ll work in the round, shape a handle, and use surface crochet for the lettering and textured edging.
📏 Finished Size
Approximately 10–11 cm (4–4.5 in) tall × 9 cm (3.5 in) wide, using worsted weight yarn and a 4.0 mm hook.
🧶 Materials
- Worsted Weight Yarn (#4):
- Red – 70 g (mug body and handle)
- White – 35 g (rim, lettering, and snowflakes)
- Crochet hook – 4.0 mm (G)
- Stitch marker
- Yarn needle
- Scissors
- Small amount of fiberfill stuffing (for handle only)
🧵 Abbreviations (US Terms)
- MR – Magic ring
- ch – Chain
- sc – Single crochet
- inc – Increase (2 sc in same stitch)
- dec – Decrease (sc2tog)
- sl st – Slip stitch
- BLO – Back loop only
- FLO – Front loop only
- sp-sc – Spike single crochet (insert hook into stitch one row below, pull up tall loop, yarn over and pull through both loops)
☕ Mug Base (Red)
Work in continuous spiral rounds. Use a stitch marker to mark the first stitch of each round.
Rnd 1: MR, 6 sc. (6)
Rnd 2: Inc around. (12)
Rnd 3: Sc 1, inc repeat around. (18)
Rnd 4: Sc 2, inc repeat around. (24)
Rnd 5: Sc 3, inc repeat around. (30)
Rnd 6: Sc 4, inc repeat around. (36)
Rnd 7: Sc 5, inc repeat around. (42)
Rnd 8: Sc 6, inc repeat around. (48)
Rnd 9: Working in BLO only, sc around. (48)
👉 This forms the sharp edge between the mug bottom and side walls.
🔴 Mug Body (Red)
Rnds 10–24: Sc in each st around. (48)
👉 The body should measure approximately 3.5″ tall before the rim begins.
Change to white in the final pull-through of Round 24.
🤍 White Rim with “Icicle” Textured Edge
Rnd 25: Working in BLO, sc around. (48)
This creates a defined border between the red body and white rim.
Rnds 26–27: Sc in each st around. (48)
Rnd 28 (Icicle Edge):
For each stitch, insert hook into the FLO of the red round two rows below, pull up a tall loop to rim height, yarn over and pull through both loops (sp-sc made). Repeat around.
👉 This creates the dangling, looped “icicle” effect seen along the top edge.
FO and weave in the white yarn end neatly inside.
🔴 Handle (Red)
Work in continuous rounds to create a firm tube.
Rnd 1: MR, 6 sc. (6)
Rnds 2–30: Sc in each st around. (6)
FO, leaving a long tail for sewing.
Lightly stuff with fiberfill. Shape into a “C” curve.
Attach Handle:
- Sew top end just below the white rim (Round 23–24).
- Sew bottom end around Round 11–12.
👉 The handle should arch outward in a smooth curve like a real mug handle.
✴️ Snowflakes (Make 4 – White)
Rnd 1: MR, 6 sc, sl st to first st. (6)
Rnd 2: (Ch 3, sl st in 2nd ch, sc in next ch, sl st in same sc) repeat around. (6 points)
FO, leaving a tail for sewing.
👉 The snowflakes should measure about 1.5 cm each and be sewn onto the mug around the lettering.
✍️ “LET IT SNOW” Lettering (White)
Use surface slip stitch embroidery for raised text.
- Thread white yarn and bring it up through the fabric where each letter begins.
- Insert your hook into the next stitch, yarn over from the back, and pull through both loops to form a neat surface chain.
- Continue forming bold block letters:
- “LET” – Top section (Rounds 20–22)
- “IT” – Middle section (Rounds 16–18)
- “SNOW” – Bottom section (Rounds 12–14)
- Space letters evenly with 3–4 rounds between rows.
- Keep each letter approximately 3–4 stitches wide and 4 rounds tall for balanced proportions.
Snowflake Placement:
- One to the left of “LET”
- One to the right of “LET”
- One beside “IT”
- One below-left of “SNOW”
🧶 Finishing
- Weave in all ends neatly inside the mug.
- Shape the rim evenly and steam lightly to define the icicle edge.
- Ensure the mug stands flat; reshape the base if needed.
- The handle should be firm but lightly stuffed for stability.
🌟 Display Ideas
🎁 Fill your crochet mug with:
- Mini ornaments or wrapped candies
- Faux pine sprigs or cinnamon sticks
- LED tealights for a cozy glow
💡 Create a matching set with phrases like JOY, NOEL, or HO HO HO for festive gifting or mantle décor!
⚠️ Important Note
This project is decorative only — not intended for use with liquids or heat.
Happy Crocheting! 🧶❄️☕
Bring handmade warmth to your winter décor with this cheerful “Let It Snow” mug — a perfect touch of holiday charm!


جميلا