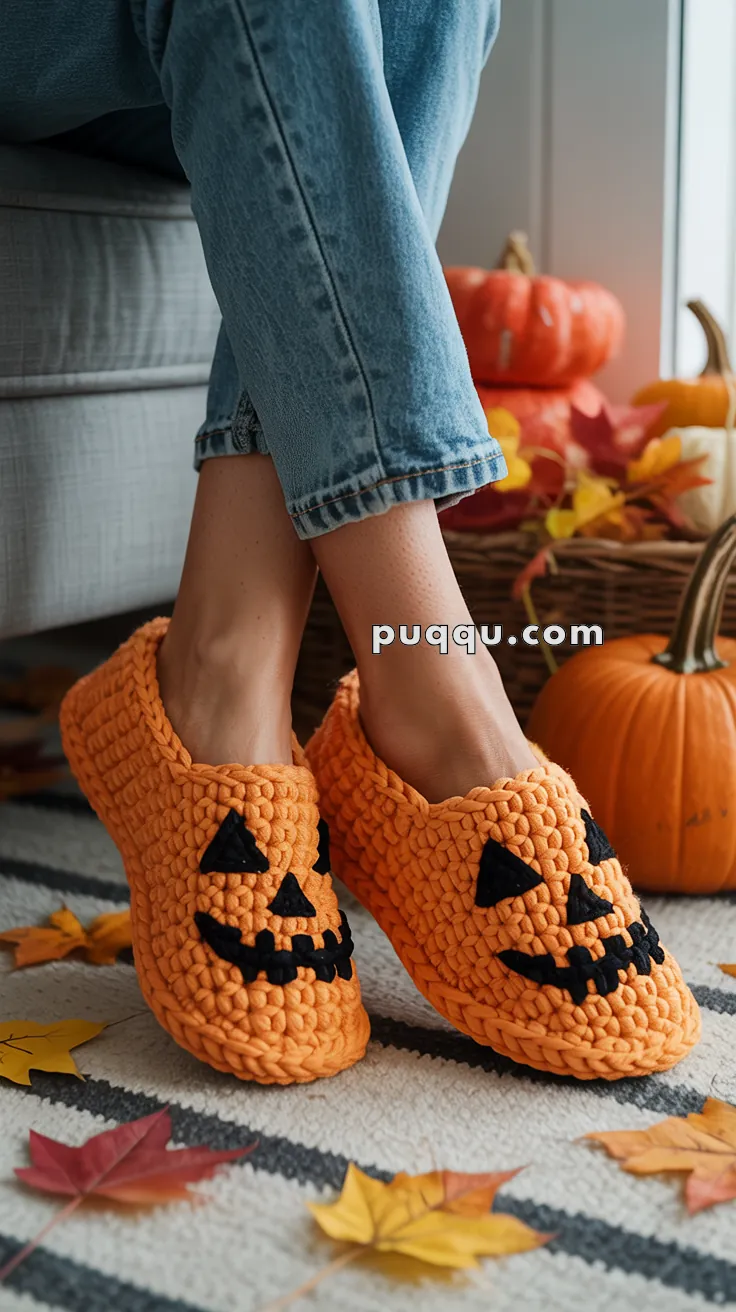
Step into spooky season with a smile thanks to the Pumpkin Jack-o’-Lantern Slippers, a cozy and playful crochet project that’s perfect for Halloween lounging! 🎃🧶 Worked in bright orange chunky yarn, these slippers are designed to look just like cheerful jack-o’-lanterns, complete with black felt or crocheted facial features that add a dash of personality to every step. Whether you’re curling up with a scary movie or greeting trick-or-treaters, these festive feet warmers are sure to be a hit.
Perfect for crocheters who love bold colors and seasonal fun, this pattern invites you to stitch up comfort with a twist of whimsy. Customize the faces to be spooky, silly, or sweet, and add extra embellishments like vines or leaves for a pumpkin patch vibe. The Pumpkin Jack-o’-Lantern Slippers are a delightful way to stitch up warmth, laughter, and a whole lot of handmade Halloween charm—one loop at a time! 🧵🕸️
🎃 Pumpkin Jack-o’-Lantern Slippers Crochet Pattern
Step into cozy autumn nights with these handmade Pumpkin Slippers! Worked in bright orange chunky yarn, they’re designed to look just like jack-o’-lanterns, complete with black felt or crocheted facial features. Perfect for Halloween lounging, these slippers are quick to make and fun to wear.
✨ Skill Level
Intermediate – requires knowledge of puff stitches, 3D shaping, and working in the round.
📏 Finished Size
- Fits: Adult Medium (US Women’s 7–9 / EU 37–39)
- Sole length: Approximately 9.5 inches
- Adjustable: See sizing notes at end
🧶 Materials
Yarn:
- Super bulky chenille yarn (Category 6)
- Orange – 200-250g (main color for both slippers)
- Note: Chenille or velvet yarn works best for the plush texture
Hook:
- 10mm (N/P) crochet hook (or size needed to achieve dense fabric)
For Face Details:
- Black craft felt (stiff/firm) – 1 sheet (9″ x 12″)
- Fabric glue (Aleene’s Fabric Fusion or similar) OR black thread
- Sharp fabric scissors
- Chalk pencil or fabric marker
- Pins for placement
Other Supplies:
- Yarn needle (large eye for chunky yarn)
- Stitch markers
- Scissors
- Non-slip fabric paint, puffy paint, or rubber slipper sole grips
Gauge:
- 7 puff stitches and 8 rounds = 4 inches in puff stitch pattern
- Gauge should create dense, non-see-through fabric
🔤 Abbreviations (US Terms)
- ch – chain
- sl st – slip stitch
- sc – single crochet
- hdc – half double crochet
- dc – double crochet
- inc – increase (2 sc in one stitch)
- dec – decrease (single crochet 2 together)
- puff – puff stitch (see special stitch)
- st(s) – stitch(es)
- BLO – back loop only
- FLO – front loop only
- rnd – round
- rep – repeat
🔧 Special Stitch
PUFF STITCH (puff):
- Yarn over, insert hook in indicated stitch
- Yarn over and pull up a loop (loosely, about ½ inch tall)
- Yarn over, insert hook in SAME stitch, yarn over and pull up a loop – repeat from * 2 more times
- You should have 7 loops on hook
- Yarn over and pull through all 7 loops
- Ch 1 to secure the puff
Tips for puff stitches:
- Pull loops up evenly to the same height
- Don’t pull final stitch too tight or puffs will flatten
- The ch 1 at the end is important for structure
- Each puff stitch counts as ONE stitch
🧡 PATTERN INSTRUCTIONS
👣 SOLE (Make 2)
The sole is worked in continuous spiral rounds, building from a foundation chain.
Foundation: With orange yarn, ch 14.
Rnd 1: Starting in 2nd ch from hook, sc in next 12 ch, 5 sc in last ch (this creates the rounded toe). Rotate to work along opposite side of foundation chain: sc in next 12 ch, 4 sc in last ch to complete the heel curve. Join with sl st to first sc. (34 sts)
Place stitch marker in first stitch and move it up as you work.
Rnd 2: Ch 1, 2 sc in first st, sc in next 12 sts, 2 sc in each of next 5 sts (toe expansion), sc in next 12 sts, 2 sc in each of last 4 sts (heel expansion). Join with sl st. (48 sts)
Rnd 3: Ch 1, sc in each st around. Join with sl st. (48 sts)
Rnd 4: Ch 1, working in BLO for this round only, sc in each st around. Join with sl st. (48 sts)
This BLO round creates a ridge/lip where the sole meets the slipper body.
Do not fasten off. Continue directly to body.
🎃 SLIPPER BODY
The body is worked in joined rounds, creating the puffy pumpkin texture.
Rnd 5 (First puff round): Ch 1, puff st in each st around, working in both loops. Join with sl st to first puff. (48 puffs)
Make sure you’re inserting hook under both loops of the stitch for Rnd 5 onwards.
Rnd 6: Ch 1, puff st in each st around. Join with sl st. (48 puffs)
Rnd 7: Ch 1, puff st in each st around. Join with sl st. (48 puffs)
Rnd 8: Ch 1, puff st in each st around. Join with sl st. (48 puffs)
Rnd 9: Ch 1, puff st in each st around. Join with sl st. (48 puffs)
Rnd 10: Ch 1, puff st in each st around. Join with sl st. (48 puffs)
Rnd 11: Ch 1, puff st in each st around. Join with sl st. (48 puffs)
Rnd 12: Ch 1, puff st in each st around. Join with sl st. (48 puffs)
You’ve now completed 8 rounds of puff stitches. The slipper should come up nicely on the foot.
👟 TOE SHAPING
Now we’ll decrease across the toe area to create the rounded pumpkin shape.
Rnd 13 (Begin decreases):
- Ch 1
- Puff st in next 17 sts
- [Skip next st, puff st in next st] 7 times (this decreases 7 sts across toe area)
- Puff st in remaining 17 sts
- Join with sl st. (41 puffs)
Rnd 14:
- Ch 1
- Puff st in next 16 sts
- [Skip next st, puff st in next st] 5 times (decreasing 5 sts)
- Puff st in remaining 16 sts
- Join with sl st. (36 puffs)
Rnd 15:
- Ch 1
- Puff st in next 15 sts
- [Skip next st, puff st in next st] 3 times (decreasing 3 sts)
- Puff st in remaining 15 sts
- Join with sl st. (33 puffs)
Rnd 16: Ch 1, puff st in each st around. Join with sl st. (33 puffs)
Rnd 17: Ch 1, puff st in each st around. Join with sl st. (33 puffs)
These two rounds allow the toe to round out smoothly without further decreasing.
🧦 ANKLE CUFF
Rnd 18: Ch 1, sc in each st around. Join with sl st. (33 sc)
Rnd 19: Ch 1, sc in each st around. Join with sl st. (33 sc)
Optional Rnd 20 (for looser fit): Ch 1, sc in next 10 sts, inc in next st, rep around. Join. (36 sc)
Fasten off, leaving a 6-inch tail. Weave in end securely.
🖤 JACK-O’-LANTERN FACE
The face is created using black felt pieces that are glued or sewn onto the slipper front.
📐 CUTTING THE FELT PIECES
You’ll need for EACH slipper:
- 2 triangle eyes
- 1 triangle nose
- 1 smile with teeth
TEMPLATE GUIDE:
EYES (Cut 2 per slipper):
Triangle with point facing DOWN:
- Base (top edge): 1.5 inches wide
- Height: 1.75 inches tall
- Sides: Slightly curved inward for more natural look
To cut: Draw triangle on felt, cut carefully with sharp scissors. Make both eyes identical.
NOSE (Cut 1 per slipper):
Smaller triangle with point facing DOWN:
- Base (top edge): 1 inch wide
- Height: 1.25 inches tall
- Sides: Straight edges
MOUTH (Cut 1 per slipper):
You have two options:
Option A – Connected Smile:
- Draw a curved smile shape approximately 3-3.5 inches wide and 1 inch tall at center
- Along the TOP edge, cut 5-7 zigzag triangular “teeth” pointing upward
- Keep bottom edge smoothly curved like a smile
- Each tooth should be about 0.25-0.4 inches tall
Option B – Individual Teeth (easier):
- Cut 6-8 small rectangles, each about 0.4 inches wide by 0.6 inches tall
- Arrange these in a curved smile formation when attaching
- This allows you to adjust spacing and curve more easily
📍 FACE PLACEMENT GUIDE
Before attaching, plan your placement:
- Try on the slipper to identify the natural front center (where your toes point)
- Mark the center line with a pin or chalk
- Position pieces:
- Eyes: Place about 2-2.5 inches apart (center to center), roughly 1.5 inches below the ankle cuff. Should be on the instep area where face would naturally show.
- Nose: Center it between and slightly below the eyes (about 0.75 inches below the bottom points of eye triangles)
- Mouth: Place about 0.5 inches below the nose, curving in a smile. Center horizontally.
- Pin everything in place and try on slipper. Adjust if needed before permanent attachment.
- Take a photo of your placement to reference for the second slipper!
🎨 ATTACHING THE FACE
Method 1: Fabric Glue (Easiest)
- Apply a thin, even layer of fabric glue to the back of felt piece
- Don’t use too much or it will seep through the puff stitches
- Press firmly onto slipper in marked position
- Hold in place for 30-45 seconds
- Place something heavy (book) on top and let dry for 24 hours
- Pros: Clean look, no visible stitching
- Cons: Less durable for heavy wear
Method 2: Hand Sewing (Most Durable)
- Thread a sharp needle with black thread (doubled for strength)
- Use small whip stitches or blanket stitches around the edge of each felt piece
- Stitch through the felt and catch the puff stitches beneath
- Keep stitches small and close together (about ⅛ inch apart)
- Knot securely on the inside of slipper
- Pros: Very secure, washable
- Cons: Stitches may be slightly visible up close
Method 3: Combination (Recommended)
- Use a small amount of fabric glue to hold pieces in place temporarily
- Once glue is dry, add a few tack stitches at key points (corners of triangles, ends of smile) for extra security
- Pros: Best of both worlds – clean look with added durability
🎀 FINISHING TOUCHES
1. Weave in Ends
Make sure all yarn tails are securely woven in on the wrong side (inside) of slippers.
2. Check Face Symmetry
Place both slippers side by side. Faces should be positioned identically. Make adjustments if needed.
3. Block (Optional)
Chenille yarn typically doesn’t need blocking, but you can lightly steam if needed:
- Hold steamer 6 inches away
- Don’t press directly on felt pieces
- Let cool completely
4. Add Non-Slip Sole
CRITICAL FOR SAFETY! Choose one method:
Option A – Puffy Paint:
- Turn slipper over
- Draw lines, dots, or zigzags across the sole with puffy fabric paint
- Let dry completely (24 hours)
Option B – Non-Slip Spray:
- Use fabric non-slip spray (available at craft stores)
- Apply 2-3 coats to sole
- Dry between coats
Option C – Grip Soles:
- Purchase adhesive non-slip sole grips
- Cut to size and stick to bottom of slippers
💡 TIPS FOR SUCCESS
Working with Chenille Yarn:
- This yarn can split easily – work slowly
- Don’t pull stitches too tight or texture will be lost
- If yarn starts to fray, trim the damaged section
- Keep consistent tension for even puff stitches
Achieving Photo-Accurate Texture:
- Don’t skip the puff stitches! Regular stitches will NOT create the bumpy texture
- Pull up loops to a uniform height (about ½ inch)
- The ch-1 at the end of each puff is crucial for definition
- If puffs look flat, you’re pulling the closing stitch too tight
Face Application:
- Less is more with glue – excess will show through
- For felt, use STIFF/FIRM felt, not flimsy craft felt
- Make a paper template first to test placement
- Complete one slipper fully before starting the second, so you can reference it
Fit Adjustments:
- Too tight? Add the optional Round 20 to the ankle
- Too loose? Work Rounds 18-19 more tightly
- Too short? Add 1-2 more rounds before toe shaping
- Too long? Start with ch 12 instead of ch 14 for sole
📏 SIZING ADJUSTMENTS
Child Size (US 12-2):
- Foundation: Ch 10 (instead of 14)
- Rnd 2 increases: 2 sc in next 3 sts (instead of 5), 2 sc in next 2 sts (instead of 4) = 32 sts
- Work only 5-6 rounds of puff stitch body (instead of 8)
- Adjust face pieces proportionally (reduce by 25%)
Large Adult (US 10-12):
- Foundation: Ch 16 (instead of 14)
- Rnd 2 increases: 2 sc in next 6 sts (toe), 2 sc in next 5 sts (heel) = 56 sts
- Work 9-10 rounds of puff stitch body (instead of 8)
- Toe decreases: Start with 9 decreases, then 7, then 5
🎨 CUSTOMIZATION IDEAS
Green Pumpkin Stem:
After completing ankle cuff, switch to green yarn:
- Rnd 20: With green, BLO sc around
- Rnds 21-22: BLO sc around (creates ribbed effect)
- Creates a “stem” look at the top!
Different Expressions:
- Angry: Angled eyebrows above eyes, downturned frown
- Surprised: Round eyes (circles instead of triangles), “O” shaped mouth
- Winking: One regular eye, one smaller or closed eye
- Silly: Offset eyes, wavy mouth, crooked nose
Glow-in-the-Dark:
- Use glow-in-the-dark fabric paint to outline felt pieces
- Or purchase glow-in-the-dark felt for the face
Alternative Colors:
- White/ghost version with black face
- Purple/orange witch theme
- Green/Frankenstein’s monster
🧼 CARE INSTRUCTIONS
Hand Wash:
- Fill basin with cool water and gentle detergent
- Gently squeeze (don’t wring)
- Rinse thoroughly
- Press out excess water with towel
- Reshape and lay flat to dry
- DO NOT machine wash or dry
Storage:
- Stuff with tissue paper to maintain shape
- Store in breathable bag or box
- Keep away from moisture
Felt Pieces:
- If glued, avoid getting wet
- If sewn, can handle gentle washing
- May need re-gluing after multiple washes
⚠️ IMPORTANT NOTES
- Yarn Usage: Puff stitches use approximately 30-40% more yarn than standard stitches. Make sure you have enough!
- Gauge Matters: Too loose and slippers won’t hold shape; too tight and they won’t fit. Aim for dense but not stiff fabric.
- Chenille Quirks: This yarn can be frustrating but the final result is worth it. Take breaks if it starts fraying.
- Safety First: ALWAYS add non-slip treatment to soles. Chenille yarn is slippery on hard floors!
- Not for Outdoor Use: These are indoor house slippers only.
- Felt Quality: Use stiff craft felt or wool blend felt. Thin, flimsy felt will curl and look cheap.
🎃 FINAL THOUGHTS
These Pumpkin Jack-o’-Lantern Slippers are a labor of love that result in an absolutely adorable, cozy, and festive pair of house shoes. The puff stitch technique creates that signature bumpy texture that makes them look just like little pumpkins on your feet!
Perfect for:
- Halloween season wear
- Gifts for pumpkin lovers
- Costume accessories
- Photo props
- Keeping feet cozy all autumn long
Estimated Time: 8-12 hours total for both slippers (depending on experience level)
Skill Building: This pattern teaches puff stitch mastery, 3D shaping, and appliqué techniques.
Happy Crocheting! May your slippers be puffy, your pumpkins be perfect, and your Halloween be cozy! 🎃🧡👻