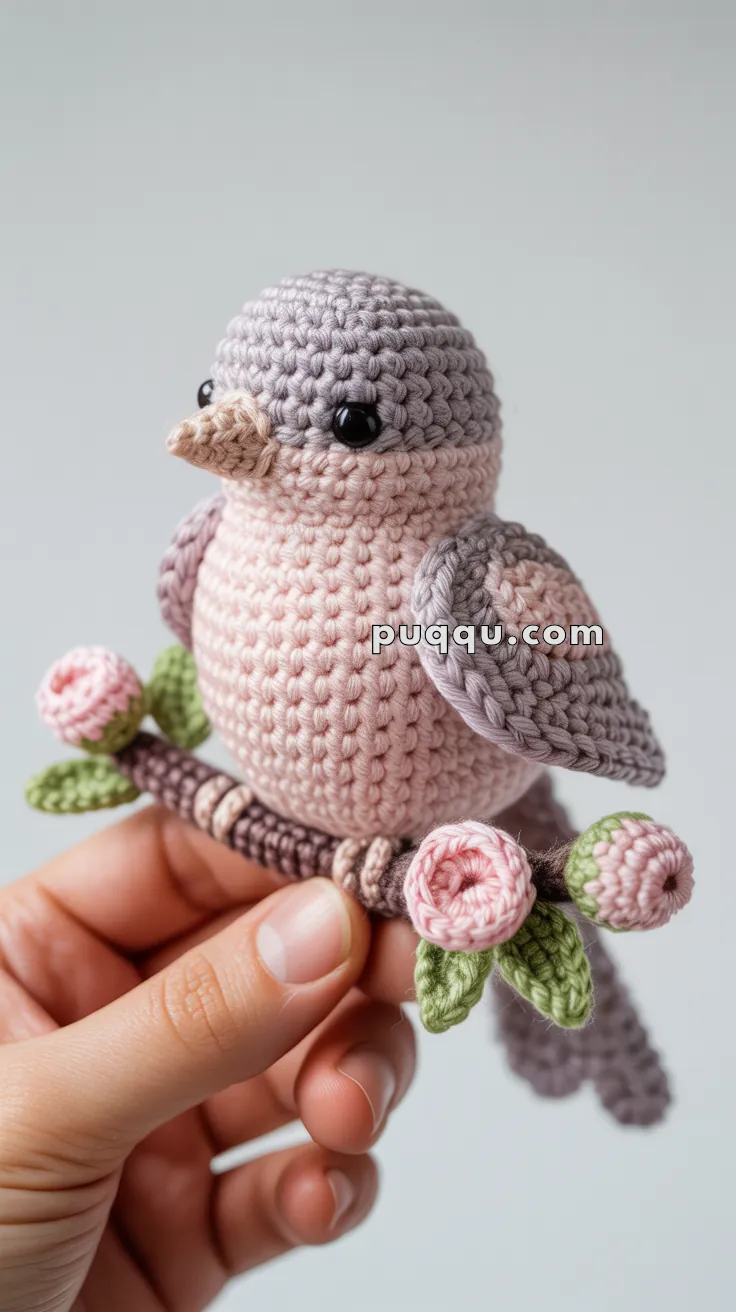
Welcome the gentle beauty of spring with the Sweet Spring Bird on a Blossom Branch, a charming crochet project that’s full of seasonal delight! 🐦🌸🧶 Perched gracefully on a blooming branch, this little bird features soft pastel feathers, a cheerful expression, and delicate blossoms that capture the freshness of the season. Whether you’re decorating for Easter, gifting a handmade treasure, or simply celebrating the arrival of warmer days, this pattern brings a breath of springtime joy to any space.
Perfect for crocheters who love nature-inspired designs and whimsical details, this pattern invites you to play with color, texture, and floral accents. Customize your bird with different hues, add extra blossoms, or stitch up a whole flock for a blooming display. The Sweet Spring Bird on a Blossom Branch is a lovely way to stitch up renewal, warmth, and a sprinkle of handmade happiness—one loop at a time! 🧵💐
🐦 Sweet Spring Bird on a Blossom Branch Crochet Pattern
Spring brings new life and color, and this sweet crochet bird perfectly captures that joyful feeling! 🩷 Perched gently on a branch with tiny blossoms, this adorable amigurumi bird makes a lovely handmade decoration for your home. Its charming design features soft pastel tones, delicate wings, and a graceful pose that instantly brightens any space.
Whether you’re a crochet enthusiast looking for your next relaxing project or a beginner eager to improve your skills, this pattern offers just the right mix of simplicity and creativity. You’ll practice shaping, color changes, and small details while creating a truly unique piece. Let’s dive in and bring your spring bird to life! 🌸
✨ Skill Level
Intermediate – involves shaping, color changes, surface edging, and assembling small decorative elements.
📏 Finished Size
Approximately 4–5 inches (10–12 cm) tall when made with DK weight cotton yarn and a 2.75 mm hook.
🧶 Materials Needed
Yarn (DK weight cotton):
• Light pink: 25 g (body + wing patch)
• Pale lavender/gray: 22 g (head top, wings, tail)
• Beige/tan: 3 g (beak)
• Brown/dark gray: 15 g (branch + perch attachment wraps)
• Cream: 2 g (branch accent wraps)
• Green: 5 g (leaves)
• Light pink (flowers): 5 g (rosette buds)
Other supplies:
• Crochet hook: 2.75 mm (C)
• Black safety eyes: 6 mm
• Fiberfill stuffing
• Yarn needle
• Stitch marker
• Scissors
📖 Abbreviations
ch – chain
sc – single crochet
inc – increase (2 sc in one stitch)
dec – invisible decrease
sl st – slip stitch
BLO – back loop only
FO – fasten off
rnd – round
🐦 Body (Light Pink)
Rnd 1: 6 sc in magic ring (6)
Rnd 2: inc in each st around (12)
Rnd 3: (1 sc, inc) × 6 (18)
Rnd 4: (2 sc, inc) × 6 (24)
Rnd 5: (3 sc, inc) × 6 (30)
Rnd 6: (4 sc, inc) × 6 (36)
Rnd 7: sc in each st around (36)
Rnd 8: BLO sc in each st around (forms a subtle collar ridge) (36)
Rnd 9–10: sc in each st around (36)
Rnd 11: (4 sc, dec) × 6 (30)
Rnd 12: (3 sc, dec) × 6 (24)
Rnd 13: (2 sc, dec) × 6 (18)
Begin stuffing firmly and continue as you close.
Rnd 14: (1 sc, dec) × 6 (12)
Rnd 15: dec around (6)
FO, weave through remaining sts and pull tight to close.
🪶 Head Cap (Pale Lavender/Gray)
Rnd 1: 6 sc in magic ring (6)
Rnd 2: inc in each st around (12)
Rnd 3: (1 sc, inc) × 6 (18)
Rnd 4: (2 sc, inc) × 6 (24)
Rnd 5–6: sc in each st around (24)
Insert safety eyes between Rnds 5 and 6, 6–7 sts apart.
Rnd 7: (2 sc, dec) × 6 (18)
Rnd 8: (1 sc, dec) × 6 (12)
Lightly stuff the cap.
Rnd 9: dec around (6)
FO and close opening. Center the cap on the body and sew around the BLO ridge from Body Rnd 8 for a smooth, seamless join.
🕊️ Beak (Beige/Tan)
Rnd 1: 4 sc in magic ring (4)
Rnd 2: (1 sc, inc) × 2 (6)
Rnd 3–4: sc in each st around (6)
FO with a long tail. Stuff very lightly and sew horizontally, centered just below the eyes.
Optional eyelids: Using lavender yarn, embroider a tiny slanting stitch at the top outer edge of each eye.
🪽 Two-Tone Wings (Make 2)
Outer Wing – Lavender (oval with raised corded edge):
Rnd 1: 6 sc in magic ring (6)
Rnd 2: (1 sc, inc) × 3 (9)
Rnd 3: (2 sc, inc) × 3 (12)
Rnd 4: sc in each st around (12)
Rnd 5: (3 sc, inc) × 3 (15)
Rnd 6: sc in each st around (15)
FO. Flatten to an oval. Using the same lavender yarn, work a surface sl st neatly around the perimeter to create the thick braided border visible on the wing.
Inner Patch – Light Pink (small oval):
Rnd 1: 6 sc in magic ring (6)
Rnd 2: (2 sc, inc) × 2 (8)
Rnd 3: sc in each st around (8)
FO. Sew the pink patch slightly forward on the outer wing. Sew each finished wing to the bird where the pink body meets the lavender head, angled slightly downward and back.
🪶 Tail Feather (Lavender, flat wedge)
Make 2; sew back-to-back for a sturdy, slightly thick tail as in the photo.
Row 1: ch 3, sc in 2nd ch from hook, sc in next (2)
Row 2: ch 1, inc, sc in next (3)
Row 3: ch 1, inc, sc in next 2 (4)
Row 4: ch 1, inc, sc in next 3 (5)
Row 5: ch 1, inc, sc in next 4 (6)
Row 6: ch 1, inc, sc in next 5 (7)
Row 7: ch 1, inc, sc in next 6 (8)
Row 8–9: ch 1, sc across (8)
FO. Make a second piece and place wrong sides together; sc around both layers to join. Sew to the back of the body so the tail angles slightly upward.
🌿 Branch (Brown/Dark Gray – lightly stuffed)
Rnd 1: 6 sc in magic ring (6)
Rnd 2–20: sc in each st around (6)
Stuff lightly as you go and shape into a gentle curve.
Small side twigs (make 2):
Twig A – ch 6, sc in 2nd ch from hook and across (5), FO.
Twig B – ch 5, sc in 2nd ch from hook and across (4), FO.
Sew twigs to the main branch near the ends.
Branch accent wraps: With cream yarn, wrap around the branch 3–4 times near the bird’s perch area and secure on the underside.
🍃 Leaves (Make 4–6 – Green)
Ch 7, starting in 2nd ch from hook: sl st, sc, hdc, dc, hdc, sc.
Ch 1, rotate to work along the opposite side of the chain: sc, hdc, dc, hdc, sc, sl st to first st.
FO, leaving tails for sewing. Pinch the base slightly when stitching to give a natural curve.
🌸 Rosette Flower Buds (Make 2–3 – Light Pink)
Ch 30.
Row 1: starting in 3rd ch from hook, work 3 dc in the same ch, then skip 1 ch, 3 dc in next ch; repeat to end.
FO with a long tail. Roll the strip from one end to form a tight rosette bud and stitch through the base to secure.
🪶 Perched Attachment (Brown)
Place the bird on the branch so the lower body rests naturally on it. Thread a long strand of brown yarn on a needle and stitch through the underside of the body and around the branch several times until secure. Hide knots under the branch. This recreates the clean perched look with no visible legs.
💕 Assembly
- Sew the head cap to the body by stitching into the BLO ridge from Body Rnd 8 for a neat join.
- Sew the beak centered under the eyes on the color boundary.
- Attach wings where the pink body meets the lavender head, angled slightly downward and back.
- Sew the tail to the rear, angled gently upward.
- Secure the bird to the branch using the perched attachment method.
- Sew leaves in pairs near the twig ends.
- Add the rosette buds near the leaves.
- Wrap cream accents on the branch if you haven’t already.
- Weave in all ends and shape.
🌷 Tips & Variations
• Try mint, soft yellow, or lilac for a cheerful flock.
• A dab of blush or pink yarn can add soft cheeks.
• Perch multiple birds on a longer branch for a spring vignette.
✨ Finishing Touches & Display Ideas
After finishing your beautiful spring bird, take a moment to shape the wings and tail gently for a natural look. Because it’s light and soft, you can place it on a shelf, hang it on a branch display, or include it in a handmade wreath. Furthermore, the design’s balanced proportions make it perfect for photo props, baby rooms, or Easter decor.
To personalize your creation, try using soft blush or pastel yarns for the body, or add tiny ribbon bows for a playful touch. Most importantly, enjoy the process—each stitch contributes to a little piece of art made entirely by hand. 🌷
💫 Final Thoughts
Your sweet spring bird is ready to brighten any shelf or nursery! The soft colors, two-tone wings, curled flower buds, and cream-wrapped branch mirror the charming details of the inspiration. Enjoy making a whole flock for seasonal decor or thoughtful gifts. With each stitch, you’ll feel the calm joy of creating something delicate and meaningful. Happy crocheting! 🌸🧶