Step into the enchanting world of Arendelle with this Amigurumi Frozen Trio crochet pattern! Inspired by the beloved characters from Disney’s Frozen, this delightful set brings Elsa, Anna, and Olaf to life in adorable amigurumi form. With their signature outfits, expressive details, and charming personalities, these crochet creations capture the magic and warmth of the beloved film in every stitch. Whether you’re crafting for Frozen fans, adding a whimsical touch to your handmade collection, or simply enjoy making character-inspired amigurumi designs, this trio is sure to bring smiles and spark imagination! ❄️✨
Designed for customization, this pattern allows you to experiment with different colors, embroidered details, or even tiny accessories like Elsa’s snowflakes, Anna’s cape, or Olaf’s carrot nose for extra charm. Craft a classic Frozen Trio with their iconic looks, create a pastel version for a dreamy aesthetic, or even stitch up a full set of Frozen-inspired amigurumi for a magical display! Whether gifted as a cherished keepsake, displayed as a playful accent, or made simply for the joy of crafting, this Amigurumi Frozen Trio is a fun and creative project—perfect for bringing a touch of handmade winter wonder to every stitch! 🧶💖
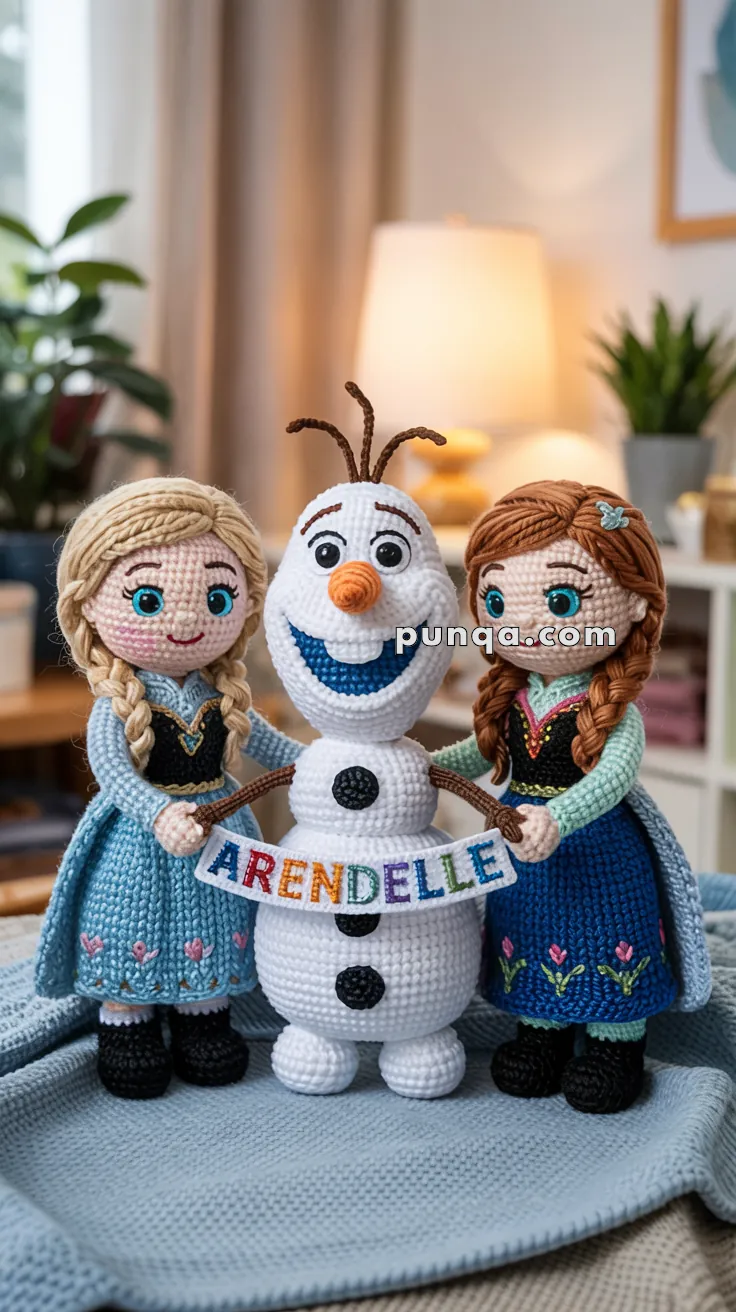
❄️ Amigurumi Frozen Set: Anna, Elsa & Olaf Crochet Pattern
Recreate the magic of Arendelle with this stunning Frozen trio! This comprehensive pattern includes every detail: elaborate dresses with embroidery, thick braided hair, expressive faces, and Olaf’s cheerful personality complete with the Arendelle banner.
✨ Skill Level
Advanced Intermediate – Includes complex dress construction, detailed embroidery, hair braiding techniques, and layered assembly.
📏 Finished Size
- Anna & Elsa: ~9 inches / 23 cm tall
- Olaf: ~9 inches / 23 cm tall (when assembled with all three snowballs)
Using DK weight yarn and 2.5 mm hook
Note: All three characters appear approximately the same height when displayed together.
🧶 Materials Needed
Yarn Requirements (DK Weight)
For Elsa:
- Light beige/peach (skin) – 50g
- Blonde/golden blonde (hair) – 80g
- Light ice blue (dress & cape) – 70g
- White with sparkle or light sparkle blue (dress overlay) – 30g
- Black (boots) – 15g
- White (eyes) – 5g
- Small amounts: Black, pink, silver/light blue (details)
For Anna:
- Light beige/peach (skin) – 50g
- Medium/dark brown (hair) – 70g
- White (hair streak) – 10g
- Teal/mint green (bodice) – 25g
- Black (vest) – 20g
- Royal blue (skirt) – 60g
- Magenta/deep pink (cape) – 50g
- Small amounts: Yellow/gold, pink, green, purple (embroidery)
For Olaf:
- White (body) – 80g
- Orange (nose) – 5g
- Brown (twigs/arms/hair) – 10g
- Black (buttons, pupils) – 5g
- Light blue (mouth embroidery) – small amount
For Banner:
- White or cream – 15g
- Small amounts: Red, blue, yellow, green, purple (letters)
Other Supplies
- Crochet hook: 2.5 mm (main), 2.0 mm (fine details)
- Safety eyes: 10-12 mm for Anna/Elsa, 8-10 mm for Olaf
- Embroidery floss in various colors
- Stitch markers
- Polyfill stuffing
- Yarn needle
- Wire (20-26 gauge) for hair braids and Olaf’s arms
- Fabric stiffener (optional for dresses)
- Small beads or sequins (optional for Elsa’s sparkle)
- Sewing thread (matching colors)
- Pins for positioning
🧵 Abbreviations (US Terms)
- MR – Magic Ring
- sc – Single Crochet
- hdc – Half Double Crochet
- dc – Double Crochet
- inc – Increase (2 sc in one stitch)
- dec – Invisible Decrease
- sl st – Slip Stitch
- ch – Chain
- BLO/FLO – Back/Front Loop Only
- FO – Fasten Off
- sk – Skip
👑 ELSA PATTERN
Head (Skin Tone)
- MR, 6 sc (6)
- inc ×6 (12)
- (1 sc, inc) ×6 (18)
- (2 sc, inc) ×6 (24)
- (3 sc, inc) ×6 (30)
- (4 sc, inc) ×6 (36) 7-13. sc around (36) [7 rounds]
- (4 sc, dec) ×6 (30)
- (3 sc, dec) ×6 (24)
Insert 10-12mm safety eyes between Rounds 11-12, approximately 8 stitches apart.
- (2 sc, dec) ×6 (18)
- (1 sc, dec) ×6 (12)
Stuff head firmly.
- dec ×6 (6)
FO and close opening.
Face Details
Eyebrows (Black embroidery):
- Backstitch curved brows above eyes
- Make them arched and feminine
- Each about 5-6 stitches long
Eyelashes (Black embroidery):
- Add 3-4 small radiating stitches at outer corners of eyes
Nose (Skin tone embroidery):
- Small vertical stitch between eyes (Round 12)
- Or tiny triangle shape
Mouth (Pink/red embroidery):
- Gentle curved smile
- Closed mouth, about 4 stitches wide
Cheeks (Pink embroidery or blush):
- Small circular blush marks below and to sides of eyes
Neck & Body Base (Skin Tone)
Neck:
- Starting at base of head: MR, 6 sc (6)
- inc ×6 (12) 3-5. sc around (12) [3 rounds]
Body foundation (will be covered by dress):
- (1 sc, inc) ×6 (18)
- (2 sc, inc) ×6 (24) 8-15. sc around (24) [8 rounds]
- (2 sc, dec) ×6 (18)
- (1 sc, dec) ×6 (12)
Stuff body.
- dec ×6 (6)
FO and close.
Arms (Make 2) – Skin Tone Only
Hands (Skin tone):
- MR, 6 sc (6)
- (1 sc, inc) ×3 (9) 3-4. sc around (9)
Add thumb:
- Ch 3, sl st in 2nd ch from hook, sl st back to hand
Arms (continue in skin tone throughout):
5-14. sc around (9) [10 rounds in skin tone]
FO with long tail. Stuff lightly, keeping flexible.
Note: Arms will be covered by cape, so they remain entirely skin tone – no sleeves needed!
Sew arms to body at shoulder level (around Round 6-7 of body).
Legs & Boots (Make 2)
Boots (Black):
- MR, 6 sc (6)
- inc ×6 (12)
- BLO – sc around (12) (creates sole fold) 4-6. sc around (12)
Ankle shaping: 7. 4 sc, dec ×2, 4 sc (10) 8-9. sc around (10)
Switch to skin tone (legs will be covered by dress):
10-16. sc around (10) [7 rounds]
FO first leg. Make second leg but don’t FO.
Join legs:
- Ch 2, connect to first leg
- Continue in rounds around both legs and chain (24 sts total)
Lower body (will be covered by skirt):
1-6. sc around (24)
Stuff legs and lower body.
Attach to main body piece at Round 18.
Dress – Bodice (Light Ice Blue)
The bodice wraps around the body and creates the fitted top.
Bodice panel:
- Ch 26
- Rows 1-8: sc across (25), ch 1, turn [8 rows]
- FO with long tail
Embroidery on bodice:
- Use silver or light blue embroidery floss
- Create diagonal crossed lines across bodice front
- Add small snowflake or crystal details
- French knots for sparkle points
Wrap bodice around body (Rounds 6-13) and sew back seam.
Dress – Skirt (Light Ice Blue)
Foundation: Working around body at Round 14 (where bodice ends) Join yarn and work in BLO for defined waistline.
Skirt rounds:
- BLO – sc around (24)
- (3 sc, inc) ×6 (30)
- sc around (30)
- (4 sc, inc) ×6 (36)
- sc around (36)
- (5 sc, inc) ×6 (42)
- sc around (42)
- (6 sc, inc) ×6 (48)
- sc around (48)
- (7 sc, inc) ×6 (54) 11-14. sc around (54) [4 rounds]
- (8 sc, inc) ×6 (60) 16-18. sc around (60) [3 rounds]
FO.
This creates a fuller, more bell-shaped skirt as seen in the photo.
Skirt embroidery:
- Add snowflake patterns around hem using embroidery floss (not yarn)
- Use white, silver, or sparkly embroidery floss
- Create 6-8 small, delicate snowflakes evenly spaced
- Add tiny dots and star bursts between snowflakes
- Keep snowflakes small and intricate for refined look
Snowflake embroidery pattern:
- Center: French knot
- 6 straight stitches radiating out
- Small lines between each main ray
Cape/Shawl (Light Ice Blue)
This is a large shawl that drapes over both shoulders and covers the arms!
Cape foundation:
- Ch 35
Rows 1-16:
- Row 1: sc across (34), ch 1, turn
- Row 2: inc, 32 sc, inc (36), ch 1, turn
- Row 3: sc across (36), ch 1, turn
- Row 4: inc, 34 sc, inc (38), ch 1, turn
- Rows 5-16: Continue adding 2 inc every other row until Row 16 (50 sts)
Collar:
- Row 17: Work along top edge: (hdc, ch 2, hdc) in each st for decorative collar
FO.
Assembly:
- Position cape across both shoulders like a shawl
- The cape should drape down over both arms
- Secure at front of shoulders with small stitches
- Let cape flow naturally down the back and sides
- Arms should be barely visible beneath the cape
Dress – Sparkle Overlay (Optional but Recommended)
This adds the ethereal, icy shimmer seen in the photo
Overlay layer:
- Using white sparkle yarn or very light blue with metallic thread
- Work same pattern as skirt but start at Round 5 (over the bodice bottom)
- Work only in front loops or with looser tension for drape
- Can be slightly shorter than main skirt
Alternative method:
- Add sparkle by sewing small clear beads or sequins to dress
- Concentrate sparkle on bodice and upper skirt area
- Use invisible thread for sewing
This creates the shimmering, magical effect on Elsa’s dress.
Hair (Blonde)
This is key to Elsa’s signature look!
Hair cap base:
- MR, 6 sc (6)
- inc ×6 (12)
- (1 sc, inc) ×6 (18)
- (2 sc, inc) ×6 (24)
- (3 sc, inc) ×6 (30)
- (4 sc, inc) ×6 (36) 7-10. sc around (36)
FO with long tail. Sew to head.
Side swept front section:
- Make 8-10 strands: Ch 15-18, starting in 2nd ch from hook, sl st or sc back
- Attach across forehead from right side, sweeping to left
- Layer strands for fullness
- Leave loose and flowing
Main braid strands (Make 40-50 strands for thick braid):
For each strand:
- Ch 40-50 (for long braid)
- Starting in 2nd ch from hook: sl st back (creates smooth strand)
- FO with tail
Creating the thick braid:
- Gather 40-50 strands together
- Divide into 3 equal sections
- Insert wire through center for poseable braid
- Braid tightly, keeping even tension
- Secure end with matching yarn wrapped tightly
- Attach braid base to back/side of head
- Position braid over shoulder
Hair accessory (silver/light blue):
- Small crocheted snowflake or flower
- Or: Purchase small silver/blue decorative clip
- Attach to side of head where hair sweeps back
🌹 ANNA PATTERN
Head (Skin Tone)
Follow same pattern as Elsa’s head (Rounds 1-18).
Insert 10-12mm safety eyes between Rounds 11-12, approximately 8 stitches apart.
Face Details
Same as Elsa, but:
- Make freckles optional (light brown dots across nose and cheeks)
- Slightly wider smile
- More pronounced cheek blush
Neck & Body Base (Skin Tone)
Follow same pattern as Elsa (Rounds 1-18).
Arms (Make 2)
Follow same pattern as Elsa through hand and arm.
Sleeve color: Teal/mint green (matching bodice)
For Anna’s arms:
- Rounds 1-12: Skin tone
- Rounds 13-14: Switch to teal/mint green (2 rounds)
FO with long tail. Stuff lightly.
Legs & Boots (Make 2)
Follow same boot pattern as Elsa.
Boot details:
- Add brown laces: embroider criss-cross pattern up front of boot
- Small bow at top
Dress – Black Vest
Vest front panels (Make 2):
- Ch 8
- Row 1: sc in 2nd ch from hook, sc across (7), ch 1, turn
- Rows 2-10: sc across (7), ch 1, turn
Shape neckline:
- Rows 11-12: dec at inner edge
FO.
Gold trim embroidery:
- Outline entire vest edges with gold/yellow embroidery floss
- Add decorative scrollwork or leaf patterns
- Create vertical gold lines down center front
Attach vest panels to front of bodice (will layer over bodice).
Dress – Bodice (Teal/Mint Green)
Same construction as Elsa’s bodice.
- Ch 26, work 8 rows of sc (25 sts wide)
Embroidery:
- Gold/yellow decorative trim along top and bottom edges
- Small floral motifs in corners
Wrap around body and sew back seam. Layer black vest over bodice front.
Dress – Skirt (Royal Blue)
Follow same construction as Elsa’s skirt:
- BLO – sc around (24)
- (3 sc, inc) ×6 (30)
- sc around (30)
- (4 sc, inc) ×6 (36)
- sc around (36)
- (5 sc, inc) ×6 (42)
- sc around (42)
- (6 sc, inc) ×6 (48)
- sc around (48)
- (7 sc, inc) ×6 (54) 11-14. sc around (54) [4 rounds]
- (8 sc, inc) ×6 (60) 16-18. sc around (60) [3 rounds]
FO.
Hem embroidery (crucial for Anna’s look):
Use embroidery floss (not yarn) for delicate, refined details
Floral pattern (repeat 6-8 times around hem):
- Pink tulips: 3-4 small straight stitches in fan shape
- Green stems: single thin vertical stitch
- Green leaves: 2 tiny stitches at base
- Purple flowers: 3-4 small stitches in cluster
- Yellow accents: Tiny French knots scattered between flowers
Important tips:
- Keep flowers SMALL and delicate (about 1/2 inch each)
- Use 2-3 strands of embroidery floss, not full 6 strands
- Create a continuous but light floral band about 1 inch from hem
- Space flowers evenly with small gaps between
- This should look intricate but not overwhelming
Cape (Magenta/Deep Pink)
Larger cape than Elsa’s:
- Ch 30
Rows 1-15:
- Follow increasing pattern like Elsa’s cape
- End with approximately 40-44 sts wide
Collar:
- Row 16: (hdc, ch 2, hdc) in each st for chunky decorative collar
Decorative edge:
- Add border: sc around entire cape edge
- Add gold/yellow trim embroidery or surface crochet around edges
Attach cape to back shoulders with fabric gathering at neck.
Hair (Brown with White Streak)
Hair cap base: Follow same pattern as Elsa (Rounds 1-10, ending with 36 sts).
Center part preparation:
- Mark center line from front to back of head
Main hair strands (Make 60-70 for fuller hair):
For each strand:
- Ch 45-55
- Starting in 2nd ch from hook: sl st back
- FO with tail
White streak strands (Make 8-10):
- Ch 45-55 in white yarn
- Same construction as brown strands
Creating two braids:
Divide all strands in half at center part line
Left side:
- Include 4-5 white streak strands in front section
- Gather 30-35 total strands
- Braid into thick plait
- Secure end
- Attach to left side of head, drape over shoulder
Right side:
- Include 4-5 white streak strands in front section
- Gather 30-35 total strands
- Braid into thick plait
- Secure end
- Attach to right side of head, drape over shoulder
Bangs/front wisps:
- Make 6-8 shorter strands: Ch 12-15
- Attach across forehead in center-parted style
⛄ OLAF PATTERN
Body – Bottom Snowball (White)
- MR, 6 sc (6)
- inc ×6 (12)
- (1 sc, inc) ×6 (18)
- (2 sc, inc) ×6 (24)
- (3 sc, inc) ×6 (30)
- (4 sc, inc) ×6 (36) 7-10. sc around (36) [4 rounds]
- (4 sc, dec) ×6 (30)
- (3 sc, dec) ×6 (24)
- (2 sc, dec) ×6 (18)
Stuff very firmly.
- (1 sc, dec) ×6 (12)
- dec ×6 (6)
FO and close.
Body – Middle Snowball (White)
- MR, 6 sc (6)
- inc ×6 (12)
- (1 sc, inc) ×6 (18)
- (2 sc, inc) ×6 (24)
- (3 sc, inc) ×6 (30) 6-9. sc around (30) [4 rounds]
- (3 sc, dec) ×6 (24)
- (2 sc, dec) ×6 (18)
- (1 sc, dec) ×6 (12)
Stuff very firmly.
- dec ×6 (6)
FO and close.
Head – Top Snowball (White)
- MR, 6 sc (6)
- inc ×6 (12)
- (1 sc, inc) ×6 (18)
- (2 sc, inc) ×6 (24) 5-8. sc around (24) [4 rounds]
- (2 sc, dec) ×6 (18)
- (1 sc, dec) ×6 (12)
Do not stuff yet – add face first.
Face Details (Before Closing Head)
Eyes (Make 2 white ovals):
- Ch 6
- Starting in 2nd ch from hook: 4 sc, 3 sc in last ch
- Working on opposite side: 3 sc, 2 sc in last (12)
- inc, 3 sc, inc ×3, 3 sc, inc ×2 (18)
FO with long tail.
Pupils:
- Use 6mm black safety eyes or felt circles
- Center on white oval
- Attach white ovals to head (Rounds 5-6), about 5-6 sts apart
Eyebrows (Brown embroidery):
- Short diagonal lines above each eye
- Slightly concerned/friendly expression
Mouth (Light blue embroidery):
- Use light blue embroidery floss
- Backstitch a wide smile shape below eyes
- Smile should be approximately 8-10 stitches wide
- Create curve from round 6 to round 8
- Make the smile WIDE for Olaf’s signature happy expression
Teeth (White embroidery):
- Use white embroidery floss
- Create 2-3 small rectangular shapes with satin stitch
- Position at top of smile line
- Should peek out slightly
Optional tongue:
- Small pink embroidered oval inside lower mouth area
Nose (Orange – Carrot)
- Ch 2, 3 sc in 2nd ch from hook (3)
- inc ×3 (6)
- sc around (6)
- sc around (6)
- (1 sc, dec) ×2 (4) 6-7. sc around (4) [2 rounds]
- dec ×2 (2)
FO. Stuff lightly.
Sew nose centered between eyes, pointing slightly upward.
Now stuff head firmly and close.
- dec ×6 (6)
FO and close.
Buttons (Black – Make 3)
- MR, 6 sc (6)
- sc around (6)
FO with long tail.
Stuff very lightly to create slight dome.
Sew buttons vertically down middle snowball, evenly spaced.
Arms/Sticks (Brown – Make 2)
Main branch:
- Ch 18
- Starting in 2nd ch from hook: sl st 17 back (creates firm stick)
Branch fingers (Make 3-4 per arm):
- At different points along main branch:
- Ch 5-7, sl st back to main branch
- Space fingers along last 6-8 stitches of branch
Insert thin wire through arm for poseable branches.
Attach arms to sides of middle snowball (approximately at Round 4-5 of middle section).
Hair Twigs (Brown – Make 3)
For each twig:
- Ch 12-15
- Starting in 2nd ch from hook: sl st back
- FO with tail
Attach to top of head in splayed arrangement (like hairs sticking up).
Feet (White – Make 2)
- MR, 6 sc (6)
- inc ×6 (12)
- sc around (12)
- (1 sc, dec) ×4 (8)
FO with long tail. Stuff lightly.
Sew feet to bottom of bottom snowball, positioned slightly forward.
Assembly
- Stack snowballs: Bottom (largest) → Middle → Head (smallest)
- Sew securely between each section
- Attach arms to middle section at sides
- Position twig hair at top
- Add buttons to middle section
- Attach banner (see below) between Olaf’s stick arms
🏰 ARENDELLE BANNER
Banner fabric (White/cream):
- Ch 35
- Rows 1-8: sc across (34), ch 1, turn
- FO
Letters (Surface embroidery or chain stitch):
Spell out “ARENDELLE” across banner in colorful letters:
- A – Red
- R – Blue
- E – Yellow
- N – Green
- D – Purple
- E – Red
- L – Blue
- L – Yellow
- E – Green
Letter method:
- Use chain stitch or surface crochet to form bold block letters
- Each letter approximately 1 inch tall
- Space evenly across banner
- Use embroidery floss for crisp, clean letters
Decorative border:
- Add colorful French knots or small flowers around edges
- Or leave plain for clean look
Attach banner:
- Sew or tie top corners to Olaf’s stick arms
- Banner should drape naturally between arms
- Position Olaf between Anna and Elsa for display
🎭 Final Assembly & Display
Positioning
- Elsa – Left side, braid draped over right shoulder
- Olaf – Center, holding banner
- Anna – Right side, braids draped over both shoulders
Stability Tips
- Add weight to feet if needed (small beads sewn into soles)
- Characters can hold hands or Olaf’s arms
- Display on flat surface
Final Details
- Brush and separate yarn in hair for natural look
- Shape dresses with fabric stiffener if desired
- Position capes to drape naturally
- Arrange banner so letters are clearly visible
- Adjust character poses for personality
💡 Pro Tips for Success
Hair is Everything
- Don’t skimp on number of strands
- Use wire inside braids for shaping
- Make braids THICK – 40+ strands each for Elsa, 60-70 total for Anna
- The fuller the hair, the better the final look
Dress Embroidery Matters
- Take time with floral/snowflake details
- Use embroidery floss (not yarn) for finer, crisper lines
- Gold trim makes Anna’s vest pop
- Snowflakes on Elsa’s skirt add magic
Facial Expressions
- Larger eyes (10-12mm) = more expressive characters
- Eye placement affects personality
- Smile shapes matter – practice on paper first
Elsa’s Cape is Key
- Must be large enough to drape over shoulders AND arms
- Should flow naturally down the sides
- This is what makes Elsa’s silhouette distinctive
Olaf’s Proportions
- Bottom should be noticeably larger than middle and head
- Mouth needs to be WIDE smile (embroidered, not crocheted piece)
- Twig arms need multiple finger branches for character
Color Accuracy
- Elsa: Light ice blue/turquoise (not dark blue)
- Anna: Distinct teal bodice vs. royal blue skirt
- Use sparkly/metallic yarn for Elsa if possible
- Colors should be vibrant and true to characters
Stuffing Technique
- Firm stuffing = better shape retention
- Don’t understuff dresses – they need body to drape well
- Snowballs should be VERY firm for stability
Banner Success
- Colorful letters are essential
- Make letters bold and clear using embroidery floss
- Position carefully between characters for best display
📐 Troubleshooting
Hair Braids Won’t Stay
- Solution: Use wire inside braids
- Add extra securing stitches at base
- Make sure strands are long enough (40-50 chains minimum)
- Braid tighter than you think necessary
Dresses Don’t Drape Well
- Solution: Use lighter weight yarn for skirts if needed
- Add more increase rounds for fuller skirts
- Consider fabric stiffener spray
- Make sure stuffing isn’t too tight in body
Characters Won’t Stand
- Solution: Add weight to feet (small beads or washers)
- Ensure stuffing is very firm throughout
- Create wider foot base by adding extra round to feet
- Position legs slightly apart for stability
Olaf Looks Too Thin
- Solution: Increase stitch counts by 6 on each ball section
- Stuff VERY firmly – really pack it in
- Make sure proportions are correct (bottom is largest)
- Check that you’re using DK weight yarn, not lighter
Embroidery Looks Messy
- Solution: Use embroidery floss instead of yarn
- Practice stitches on swatch first
- Use smaller embroidery needle for finer detail
- Work slowly and keep tension consistent
Elsa’s Cape Won’t Stay in Place
- Solution: Secure at multiple points on shoulders
- Use matching thread (not yarn) for invisible stitches
- Drape before securing to get natural fall
- Consider small snap closures at front
🎁 Display & Care
Display: On shelf, in shadow box, or under glass dome
Cleaning: Gentle spot clean only with damp cloth
Storage: Keep away from direct sunlight to prevent fading
Longevity: Safety eyes are more durable than glued felt
These Frozen friends will bring the magic of Arendelle to life! Perfect for display, gifting, or inspiring endless snowy adventures! ❄️👸⛄
May your stitches be as perfect as Elsa’s ice castle! 💙