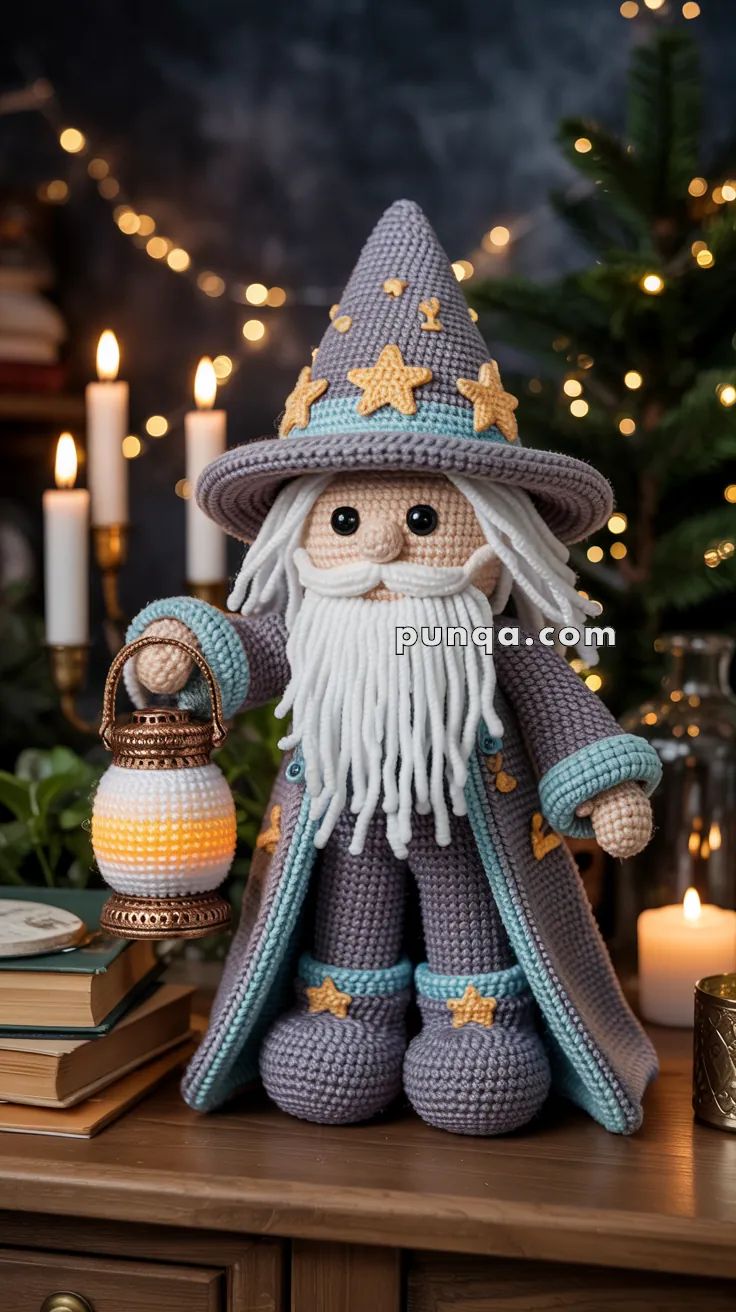
Illuminate your imagination with this Amigurumi Wizard With Lantern crochet pattern! With his flowing robes, wise expression, and glowing lantern in hand, this magical figure is ready to guide you through enchanted forests and mystical realms—all in soft, squishy stitches. Whether you’re crafting a fantasy-themed gift, adding to your magical amigurumi lineup, or simply love stitching up characters full of charm and mystery, this wizard is sure to cast a spell on your crochet hook. 🧙🧶✨
Designed for detail and storytelling, this pattern invites you to play with rich yarn tones, expressive features, and whimsical extras like a pointed hat, staff, or even a tiny spellbook. Customize his lantern with a touch of sparkle or add stars to his cloak for extra enchantment. Whether perched on a shelf, gifted to a fellow fantasy fan, or guarding your craft corner, this Wizard With Lantern Amigurumi is a joyful and satisfying project—perfect for stitching up a little handmade magic, one loop at a time! 💖🌟🕯️
🔮 Amigurumi Wizard With Lantern Crochet Pattern
Bring a spark of magic to your handmade collection with this whimsical amigurumi wizard! Complete with a starry cloak, flowing beard, lantern-holding hand, and pointed hat, this doll makes a charming centerpiece for your fantasy-themed decor or a magical gift.
✨ Skill Level
Intermediate–Advanced
Techniques included:
- Garment layering
- Shaping
- Decorative appliqués
- Beard attachment
- Structured hat construction
- Open robe assembly
- Sleeve shaping
- Accessory making
📏 Finished Size
Approximately 11–13 inches (28–33 cm) tall including hat.
🧶 Materials
Use DK cotton yarn for best stitch definition.
Yarn Colors
- Lavender gray
- Pale aqua
- Beige skin tone
- White
- Gold/yellow
- Bronze/copper
- Warm yellow
- Warm orange
Supplies
- 2.5–3 mm crochet hook
- 8 mm safety eyes
- Polyester stuffing
- Yarn needle
- Stitch markers
- Floral wire (optional)
- LED tea light (optional)
🧵 Yarn Amounts
Main Colors
- Lavender gray: 160–180 g
- Pale aqua: 40–50 g
- White: 55–65 g
- Skin tone: 35–40 g
- Gold/yellow: 10–15 g
- Bronze/copper: 15 g
- Warm yellow/orange: 10–15 g
🔤 Abbreviations (US Terms)
- MR – Magic Ring
- sc – Single Crochet
- inc – Increase
- dec – Invisible Decrease
- sl st – Slip Stitch
- ch – Chain
- BLO – Back Loop Only
- FO – Fasten Off
👢 Boots & Legs (Make 2)
The boots should look very rounded and oversized compared to the narrow legs.
Using lavender gray yarn:
Round 1
6 sc in MR (6)
Round 2
inc around (12)
Round 3
(1 sc, inc) ×6 (18)
Round 4
(2 sc, inc) ×6 (24)
Round 5
(3 sc, inc) ×6 (30)
Round 6
(4 sc, inc) ×6 (36)
Rounds 7–10
sc around (36)
Round 11
(4 sc, dec) ×6 (30)
Round 12
(3 sc, dec) ×6 (24)
Stuff boots very firmly.
Rounds 13–18
sc around (24)
FO first leg only.
Make second leg but do not FO.
🧙 Lower Body
Joining Legs
Ch 4 and join both legs.
Round 19
sc around both legs and chains (52)
Rounds 20–26
sc around (52)
Stuff lower body firmly.
The lower body should remain cylindrical beneath the robe.
✨ Waist Shaping
Round 27
(11 sc, dec) ×4 (48)
Round 28
sc around (48)
Round 29
(6 sc, dec) ×6 (42)
Rounds 30–31
sc around (42)
✨ Upper Torso
Round 32
(5 sc, dec) ×6 (36)
Rounds 33–35
sc around (36)
Round 36
(4 sc, dec) ×6 (30)
Rounds 37–38
sc around (30)
Stuff firmly.
✨ Narrow Neck
The neck is noticeably thinner than the head.
Round 39
(3 sc, dec) ×6 (24)
Round 40
(2 sc, dec) ×6 (18)
Rounds 41–43
sc around (18)
Stuff neck area very firmly.
FO leaving long tail.
👨🦳 Head
Using skin-tone yarn:
Round 1
6 sc in MR (6)
Round 2
inc around (12)
Round 3
(1 sc, inc) ×6 (18)
Round 4
(2 sc, inc) ×6 (24)
Round 5
(3 sc, inc) ×6 (30)
Round 6
(4 sc, inc) ×6 (36)
Round 7
(5 sc, inc) ×6 (42)
Round 8
(6 sc, inc) ×6 (48)
Rounds 9–16
sc around (48)
Insert safety eyes between Rounds 11–12 with 8 stitches between them.
Round 17
(6 sc, dec) ×6 (42)
Round 18
(5 sc, dec) ×6 (36)
Stuff firmly.
Round 19
(4 sc, dec) ×6 (30)
Round 20
(3 sc, dec) ×6 (24)
Round 21
(2 sc, dec) ×6 (18)
Round 22
(1 sc, dec) ×6 (12)
Round 23
dec around (6)
FO and close.
👃 Nose
Using skin-tone yarn:
Round 1
6 sc in MR
Rounds 2–4
sc around (6)
FO.
Stuff lightly.
Sew centered below eyes.
The nose should protrude noticeably.
🤍 Hair
Cut multiple strands of white yarn approximately 13–15 cm long.
Attach densely around:
- Back of head
- Sides of head
The hair should fall outward beneath the hat brim.
Trim slightly unevenly.
🧔 Flowing Beard
Cut 45–55 strands of white yarn approximately 16–18 cm long.
Attach beneath nose and across lower face using lark’s head knots.
The beard should:
- Begin high beneath the mustache
- Flow almost to the boots
- Remain slightly separated into strands
- Look soft and wispy rather than stiff
Trim into a tapered shape.
✨ Mustache (Make 2)
Using white yarn:
Ch 11.
Row 1
sc in second chain from hook and across (10)
FO.
Curve upward strongly and sew beneath nose.
The mustache should extend outward beyond the beard edges.
✋ Hands (Make 2)
Using skin-tone yarn:
Round 1
6 sc in MR
Rounds 2–6
sc around (6)
Stuff lightly.
FO.
🧥 Sleeves (Make 2)
The sleeves are long, thick, and slightly oversized with large folded cuffs.
Start with lavender gray yarn.
Round 1
6 sc in MR
Round 2
inc around (12)
Round 3
(1 sc, inc) ×6 (18)
Rounds 4–12
sc around (18)
The sleeve should remain thick and roomy.
Switch to pale aqua yarn.
Rounds 13–16
sc around (18)
Fold cuff outward slightly during assembly for the thick cuffed appearance.
Lightly stuff upper sleeve only.
Flatten top edge and FO.
🪄 Arm Assembly
Insert hands into sleeve openings and sew securely.
Attach sleeves angled slightly downward.
One arm should extend outward naturally to hold the lantern.
🕯️ Lantern
Lantern Body
Using white yarn:
Round 1
6 sc in MR
Round 2
inc around (12)
Round 3
(1 sc, inc) ×6 (18)
Round 4
(2 sc, inc) ×6 (24)
Color transition:
white → warm yellow → orange
Rounds 5–9
sc around (24)
Round 10
(2 sc, dec) ×6 (18)
Round 11
(1 sc, dec) ×6 (12)
FO.
Stuff lightly.
The lantern should appear rounded and slightly bulbous.
✨ Lantern Frame
Using bronze/copper yarn:
Create:
- Decorative top cap
- Bottom rim
- Curved hanging handle
Sew onto lantern body.
Optional:
Insert tiny LED light inside.
🧥 Open Front Robe
The robe hangs fully open in front and reaches almost to the floor.
Using lavender gray yarn:
Ch 46.
Row 1
sc across (45)
Rows 2–56
sc across
The robe should drape softly rather than stand stiffly.
✨ Robe Trim
Using pale aqua yarn:
Work 2 rounds evenly around:
- Front edges
- Hemline
- Neckline
The trim should appear thick and decorative.
⭐ Decorative Stars
Make 10–14 stars using gold yarn.
Star Pattern
In MR:
Repeat 5 times:
(ch 2, sl st in second ch from hook)
FO.
Sew stars onto:
- Hat
- Robe hem
- Boots
🎩 Wizard Hat
The hat is extra tall with a very wide brim that curves gently downward.
Cone
Using lavender gray yarn:
Round 1
4 sc in MR
Round 2
inc around (8)
Continue increasing evenly every second round until reaching 66 stitches.
Rounds 20–34
sc around (66)
The cone should remain tall and elegant.
✨ Wide Brim
Round 35
BLO inc around (132)
Rounds 36–41
sc around (132)
The brim should:
- Be dramatically wide
- Curve downward softly
- Extend well beyond the face
✨ Hat Trim
Using pale aqua yarn:
Work 2 rounds around base of cone.
🌙 Hat Decorations
Add:
- Gold stars
- Tiny embroidered moons
- Decorative dots
Scatter decorations unevenly around the cone.
🪡 Assembly
🪡 Sew head securely onto neck
🪡 Attach sleeves to shoulders
🪡 Sew robe around neck and sides
🪡 Add hair around sides and back
🪡 Attach beard beneath mustache
🪡 Sew hat securely onto head
🪡 Place lantern into one hand and secure handle
✨ Finishing Touches
✨ Shape hat brim gently downward
✨ Keep robe naturally open in front
✨ Trim beard into soft flowing strands
✨ Position lantern arm slightly outward
✨ Lightly steam robe and hat if needed
✨ Add soft blush to cheeks for warmth
Your magical crochet wizard is now complete! 🌟
With his towering celestial hat, flowing beard, oversized boots, glowing lantern, and elegant layered robe, this whimsical amigurumi wizard becomes a stunning fantasy centerpiece full of cozy enchanted charm.