Float into a world of whimsy and wonder with this enchanting Amigurumi Mary Poppins crochet pattern! Inspired by the practically perfect nanny herself, this delightful doll comes complete with her iconic hat, parrot umbrella, and magical carpet bag. Whether you’re crafting for a fan of the classic story, adding to a literary-themed collection, or simply indulging in a charming project, Mary Poppins brings elegance, imagination, and a touch of magic to every stitch. 🧶☂️👜
Designed for detail and personality, this pattern invites you to explore expressive features, vintage-style accessories, and playful extras like a tiny scarf or embroidered buttons. Customize her outfit with classic navy and pops of red, or add your own flair to reflect your favorite version of the character. Whether perched on a shelf, nestled in a gift basket, or starring in a handmade tribute to timeless tales, this Mary Poppins Amigurumi is a joyful and satisfying project—perfect for stitching up a little handmade enchantment, one loop at a time! 💖✨🎶
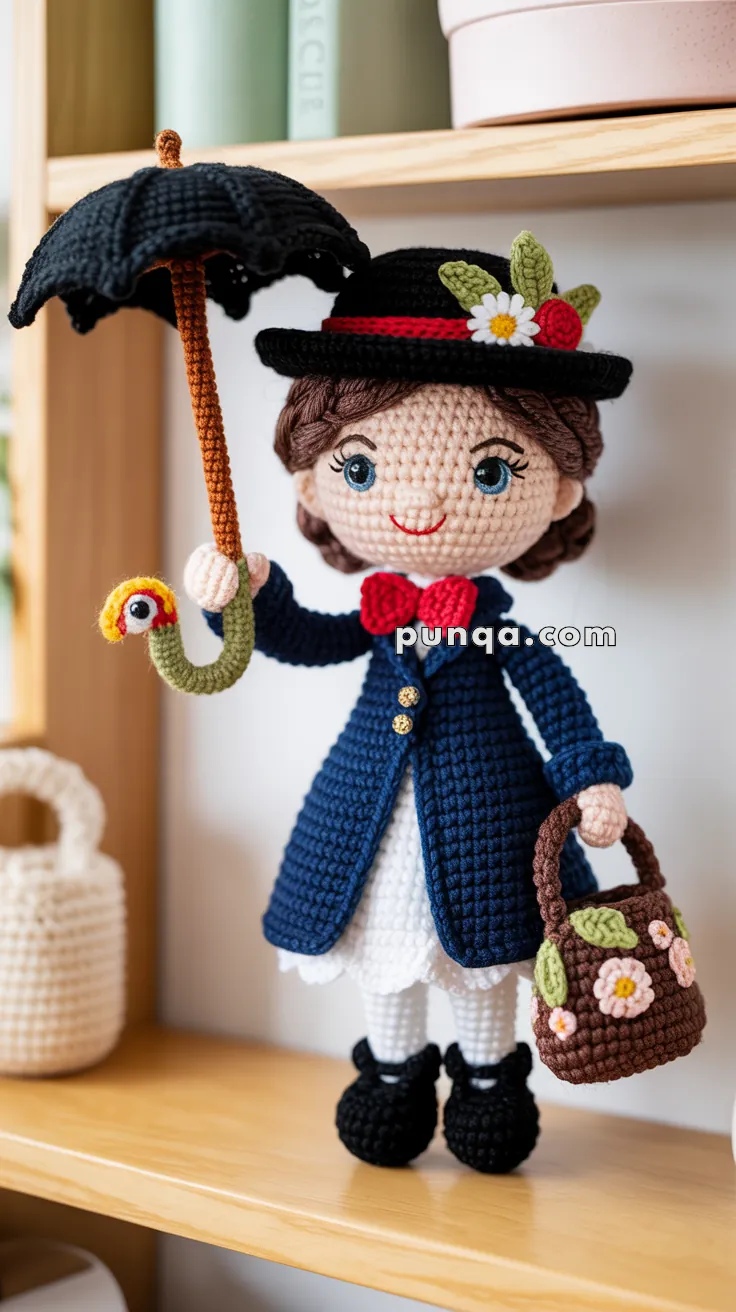
☂️ Amigurumi Mary Poppins-Inspired Doll Crochet Pattern
Bring a little magic to your crochet collection with this Mary Poppins-inspired amigurumi doll! ✨
From her navy blue coat and red bow to her black flower-trimmed hat, parrot-handled umbrella, and floral handbag, every detail is practically perfect in every way.
✨ Skill Level
Intermediate to Advanced
This pattern includes garment layering, structured accessories, sculpted hair construction, appliqués, and wire-supported elements.
📏 Finished Size
Approximately 26–28 cm (10–11 inches) tall
Using DK weight yarn and a 2.25–2.5 mm hook.
🧶 Materials
Yarn (DK weight):
- Skin tone – head, ears, nose, hands, legs
- Medium brown – hair
- Navy blue – coat
- White – dress and scalloped hem
- Black – hat, shoes, umbrella canopy
- Red – bow tie, hat band, berry accent
- Green – leaves and parrot body
- Yellow – coat buttons, daisy center, parrot beak
- Pink – handbag flowers
- Brown – handbag and umbrella shaft
- Cream – umbrella grip
Notions:
- 8 mm blue safety eyes
- Fiberfill stuffing
- Tapestry needle
- Stitch markers
- Black and red embroidery thread
- Thin craft wire (18–20 cm for umbrella support)
- Optional blush
🧵 Abbreviations (US Terms)
MR – magic ring
sc – single crochet
inc – increase
dec – invisible decrease
ch – chain
sl st – slip stitch
hdc – half double crochet
dc – double crochet
FLO – front loop only
BLO – back loop only
👩 Head
With skin tone:
R1: MR 6 (6)
R2: inc ×6 (12)
R3: (1 sc, inc) ×6 (18)
R4: (2 sc, inc) ×6 (24)
R5: (3 sc, inc) ×6 (30)
R6: (4 sc, inc) ×6 (36)
R7: (5 sc, inc) ×6 (42)
R8–16: sc around (42)
Insert eyes between R11–12, 7 stitches apart.
R17: (5 sc, dec) ×6 (36)
R18: (4 sc, dec) ×6 (30)
R19: (3 sc, dec) ×6 (24)
R20: (2 sc, dec) ×6 (18) – stuff firmly
R21: (1 sc, dec) ×6 (12)
R22: dec ×6 (6)
FO and close.
Face Embroidery
- 3 delicate eyelashes per eye
- Slightly arched brows
- Tiny vertical stitch for nose
- Small curved red smile
👂 Ears (Make 2)
MR 6
Flatten lightly and sew just below eye line, slightly toward the back of the head.
💇 Hair (Structured Crown with Defined Side Rolls)
The hairstyle is smooth at the top with low, rounded side coils positioned neatly behind the ears.
Hair Cap
With medium brown:
R1: MR 6
R2: inc ×6 (12)
R3: (1 sc, inc) ×6 (18)
R4: (2 sc, inc) ×6 (24)
R5: (3 sc, inc) ×6 (30)
R6: (4 sc, inc) ×6 (36)
R7: (5 sc, inc) ×6 (42)
R8–12: sc around (42)
FO leaving long tail.
Sew cap securely, aligning lower edge just above eyebrow level and covering back of head fully.
Sculpted Side Rolls (Make 2)
R1: MR 6
R2: inc ×6 (12)
R3–4: sc around (12)
R5: (1 sc, dec) ×6 (6)
Lightly stuff.
Flatten slightly and sew low behind each ear so the rolls sit snug against the head.
Crown Definition (Important Detail)
To recreate the smooth parted look:
- With matching brown yarn, embroider a subtle center part from forehead to crown.
- Add short angled surface stitches sweeping backward from the part on each side.
- Gently tension stitches so they lie flat and smooth — avoid bulky strands.
This creates a clean, polished hairstyle rather than loose hanging strands.
🦵 Legs (Make 2)
With skin tone:
R1: MR 6
R2: (1 sc, inc) ×3 (9)
R3–12: sc around (9)
FO first leg only.
🧍 Body
Join legs with ch 3.
Work around both legs and chains (24 sts total).
R13–16: sc around (24)
Stuff lower body firmly.
👗 Dress (White)
R17–20: sc around (24)
Scalloped Hem
Attach white yarn to FLO of final dress round:
(sl st, ch 2, 3 dc in same st, sl st in next st) repeat around.
FO.
🧥 Navy Coat (Open Front Look)
Attach navy in BLO of dress round.
R21–26: sc around (24)
R27: (6 sc, dec) ×3 (21)
R28: (5 sc, dec) ×3 (18)
R29: (4 sc, dec) ×3 (15)
R30: sc around (15)
Stuff torso firmly and FO.
Coat Skirt Flare
Attach navy to FLO of R21:
R1: (3 sc, inc) ×6 (30)
R2: (4 sc, inc) ×6 (36)
R3: (5 sc, inc) ×6 (42)
FO.
Coat Edging
Surface crochet down the center front in navy to create clean open-coat edges.
Yellow Buttons (Make 2)
MR 6 with yellow.
FO and sew vertically along coat front.
💪 Arms (Make 2)
Skin tone:
R1: MR 6
R2–4: sc around (6)
Change to navy:
R5–16: sc around (6)
Lightly stuff and sew at shoulder line angled slightly downward.
👞 Shoes (Make 2)
With black:
R1: MR 6
R2: inc ×6 (12)
R3: (1 sc, inc) ×6 (18)
R4–5: sc around (18)
R6: dec ×9 (9)
R7: sc around (9)
Lightly stuff and sew to legs.
Add ankle strap: ch 8, sew across front.
🎀 Bow Tie
Ch 12, join to ring.
Work 2 rounds of sc (12).
Pinch center and wrap yarn tightly.
Sew at neckline.
🎩 Hat
With black:
R1: MR 6
R2: inc ×6 (12)
R3: (1 sc, inc) ×6 (18)
R4: (2 sc, inc) ×6 (24)
R5: (3 sc, inc) ×6 (30)
R6: (4 sc, inc) ×6 (36)
R7–10: sc around (36)
Brim:
R11 (BLO): (5 sc, inc) ×6 (42)
R12: (6 sc, inc) ×6 (48)
R13: sc around (48)
FO.
Add narrow red band around crown base.
Hat Embellishments
White Daisy:
Create 6 small petals around MR, add yellow center.
Red Berry Accent:
MR 6, 1 round sc.
Leaves (Make 3):
Ch 6, sl st, sc, hdc, dc, hdc, sl st.
Cluster embellishments on one side of hat.
💼 Handbag
With brown:
R1: MR 6
R2: inc ×6 (12)
R3: (1 sc, inc) ×6 (18)
R4–10: sc around (18)
FO.
Handle: ch 28, sc back along chain, sew to sides.
Decorate with small pink flowers and green leaves.
☂️ Umbrella
Canopy
With black:
R1: MR 6
R2: inc ×6 (12)
R3: (1 sc, inc) ×6 (18)
R4: (2 sc, inc) ×6 (24)
R5: (3 sc, inc) ×6 (30)
R6: (4 sc, inc) ×6 (36)
R7–9: sc around (36)
Scalloped edge:
(sl st, ch 2, 3 dc, ch 2, sl st in same st, skip 2 sts) repeat around.
Shaft
Insert wire and crochet:
MR 6
Sc around for 24 rounds.
Parrot Handle
With green:
R1: MR 6
R2: inc ×6 (12)
R3–4: sc around (12)
Lightly stuff.
Beak: ch 3, sc in 2nd ch, sl st.
Embroider eye detail.
Attach securely to curved handle end.
🪡 Final Assembly
- Attach head securely to body
- Position hair rolls symmetrically
- Tilt hat slightly
- Place umbrella in right hand
- Attach handbag to left arm
✨ Finishing Touches
Shape coat flare evenly.
Adjust umbrella wire for graceful curve.
Lightly steam garments if needed.
Add a touch of blush to cheeks.
Your refined storybook nanny doll is complete — polished, poised, and ready for charming adventures. ☂️✨


Muchas gracias
Intentaré hacerla
Ya he apuntado el patrón👍🥰
Magnifique à faire je vais essayer
Muchas gracias, tengo la intención de hacerla está hermosa, no tengo experiencia, soy novata pero me gusta tener, gracias
Espectacular, muchas gracias