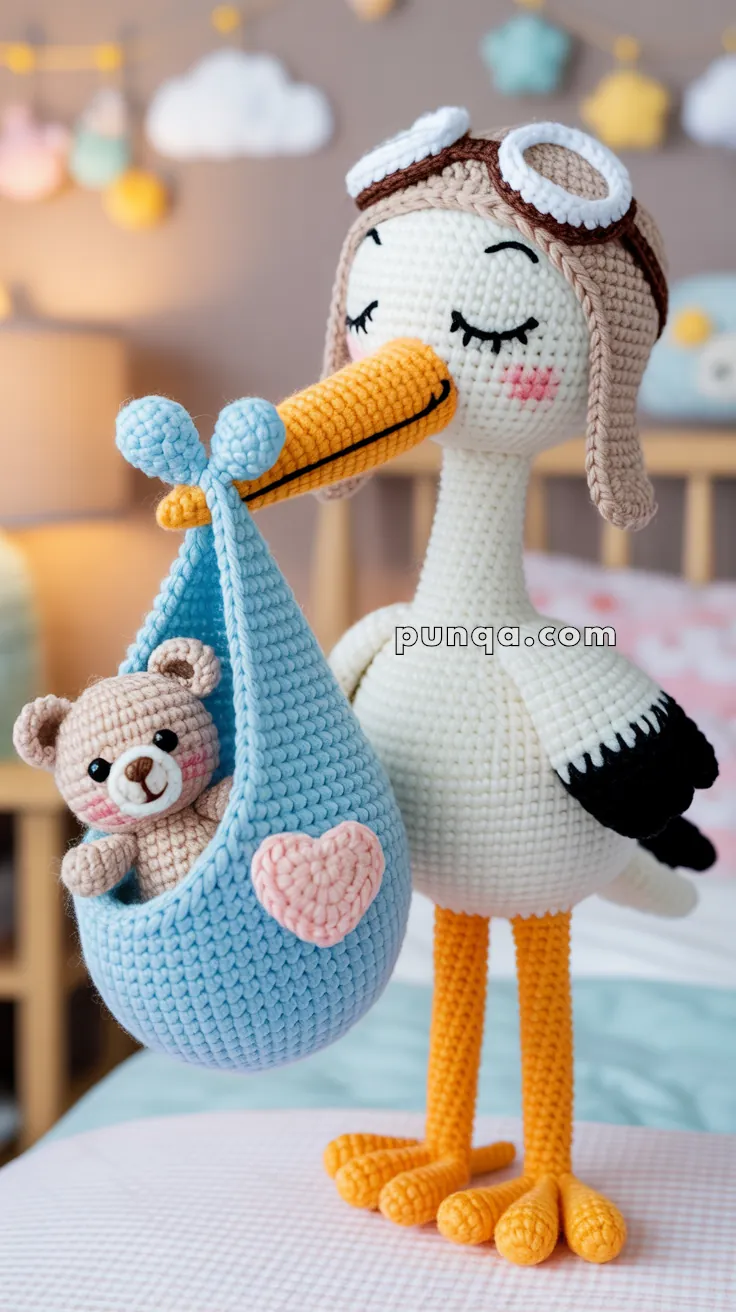
Celebrate new beginnings with this heartwarming Amigurumi Stork Delivering Baby Teddy Bear crochet pattern! With its long legs, gentle wings, and a cozy little bundle tucked in its beak, this charming stork is ready to deliver smiles and snuggles. Whether you’re crafting a baby shower gift, nursery décor, or a keepsake to mark a special arrival, this sweet duo brings a touch of magic and tenderness to every stitch. 🧶🍼🐦
Designed for storytelling and sentiment, this pattern invites you to explore soft textures, expressive shaping, and delightful extras like a tiny teddy bear, pastel baby sack, or even a stitched-on name tag. Customize the colors to match a nursery theme or add embroidered details for a personal touch. Whether perched on a shelf, nestled in a gift basket, or starring in a handmade welcome scene, this Stork Delivering Baby Teddy Bear Amigurumi is a joyful and satisfying project—perfect for stitching up a little handmade love, one loop at a time! 💖✨🎀
🧶 Amigurumi Stork Delivering Baby Teddy Bear Crochet Pattern
Bring joy to any nursery with this heartwarming crochet duo – a gentle stork delivering a teddy bear bundled in a baby-blue sling. With expressive sleepy eyes, rosy cheeks, aviator goggles, and poseable toes, this amigurumi creation makes a memorable baby shower gift or nursery décor centerpiece! 🎀
✨ Skill Level
Intermediate — shaping, assembly, and multi-piece sewing.
📏 Finished Size
Approx. 32–36 cm (12.5–14 in) tall
🧶 Materials
DK cotton yarn:
- Cream/white — head, neck, body
- Orange — beak, legs, feet
- Black — wing tips, eyelashes
- Tan — aviator hat
- Brown — goggle strap
- White — goggle rims
- Silver/gray — lenses
- Baby blue — sling
- Pink — cheeks & heart
- Beige — teddy
- Dark brown — teddy details
Other:
- 6 mm safety eyes (teddy)
- Fiberfill stuffing
- 2.5–3.0 mm hook
- Yarn needle
- Optional: thin wire for legs
🧵 Abbreviations (US Terms)
MR = magic ring
sc = single crochet
inc = increase
dec = invisible decrease
sl st = slip stitch
FO = fasten off
🪶 Head (Cream)
R1: MR 6
R2: inc ×6 (12)
R3: (sc, inc) ×6 (18)
R4: (2 sc, inc) ×6 (24)
R5: (3 sc, inc) ×6 (30)
R6: (4 sc, inc) ×6 (36)
R7: (5 sc, inc) ×6 (42)
R8–14: sc around (42)
R15: (5 sc, dec) ×6 (36)
R16: (4 sc, dec) ×6 (30)
Stuff firmly.
R17: (3 sc, dec) ×6 (24)
R18: (2 sc, dec) ×6 (18)
Continue into neck.
🦢 Neck
R19–26: sc around (18)
Stuff evenly but keep neck firm and straight.
🫶 Body
R27: (2 sc, inc) ×6 (24)
R28: (3 sc, inc) ×6 (30)
R29: (4 sc, inc) ×6 (36)
R30: (5 sc, inc) ×6 (42)
R31–40: sc around (42)
Stuff very firmly to support sling.
R41: (5 sc, dec) ×6 (36)
R42: (4 sc, dec) ×6 (30)
R43: (3 sc, dec) ×6 (24)
R44: (2 sc, dec) ×6 (18)
R45: (sc, dec) ×6 (12)
R46: dec ×6 (6)
FO.
🦆 Beak (Orange)
R1: MR 6
R2: inc ×6 (12)
R3–12: sc around (12)
Lightly stuff. Embroider a curved black smile underneath. Sew straight and horizontal.
🪽 Wings (Make 2)
Cream:
R1: MR 6
R2: inc ×6 (12)
R3: (sc, inc) ×6 (18)
R4–7: sc around
Switch to black:
R8–11: sc around
Flatten and sew to upper sides of body.
🦵 Legs & Feet (Make 2)
Toes (3 per foot)
Each toe: MR 6, sc 5 rounds.
Join toes:
Work 18 sc around joined toes.
R2: 18 sc
R3: (sc, dec) ×6 (12)
Leg
R4–30: sc around (12)
Stuff firmly. Insert wire if desired. Sew to body.
🧢 Aviator Hat (Tan)
Cap
R1: MR 6
R2: inc ×6 (12)
R3: (sc, inc) ×6 (18)
R4: (2 sc, inc) ×6 (24)
R5: (3 sc, inc) ×6 (30)
R6: (4 sc, inc) ×6 (36)
R7–9: sc around (36)
FO.
Ear Flaps (Make 2)
Ch 7
Row 1: sc 6
Row 2: dec, 2 sc, dec (4)
Row 3: sc 4
Row 4: dec ×2 (2)
FO with long tail.
Sew flaps to both sides of cap so they hang beside the head.
🥽 Goggles
White rim: MR 6 → 12 → 18
Lens: MR 6 → 12
Sew lens inside rim. Make 2.
Strap: ch 35–40. Sew goggles across forehead and attach strap around hat.
Sew hat onto head.
😴 Face Details
Embroider closed eyes with curved lashes. Add pink blush.
🧸 Teddy Bear
Head
MR 6 → 12 → 18 → 24
R5–7: sc around
Insert eyes
Dec to close
Embroider nose and smile.
Body
MR 6 → 12 → 18
R4–6: sc around
Dec to close
Add tiny arms, legs, ears.
🩵 Sling
Pouch
Work oval base to 40 sts.
R4–14: sc around (40)
Straps
Ch 65–75 (make 2)
Sew straps to pouch rim.
💗 Heart
Crochet small heart and sew to pouch front.
🧩 Final Assembly
Place teddy inside sling and stuff lightly. Sew sling to chest. Bring straps up and secure to beak. Attach hat last. Adjust legs so stork stands balanced.
🌟 Finished Stork
The finished piece should show:
- Tall stable legs
- Long smooth neck
- Straight cylindrical beak
- Rounded body
- Hat with real ear flaps
- Deep sling holding teddy
🌟 Final Thoughts
And just like that, your gentle stork and its precious little teddy bundle are ready to take flight into a nursery or someone’s heart. This project is a beautiful reminder of how crochet can turn simple yarn into something deeply meaningful — a handmade keepsake filled with warmth, care, and personality.
Take your time shaping and assembling the pieces, because those small finishing touches are what bring the stork to life. Whether you’re gifting it for a baby shower, decorating a nursery, or adding it to your amigurumi collection, this sweet scene is sure to spark smiles for years to come.
Happy crocheting, and may your stitches always be smooth and joyful. 🧶💕