Celebrate the countdown to Christmas in the most festive way with the Amigurumi Santa Advent Calendar, a crochet project that’s as joyful as it is eye-catching! 🎅🧶 This large, plush Santa features a sculpted face, a curved hat, layered fluffy beard, and soft side hair, all brought together in a bell-shaped body that’s brimming with holiday charm. With 24 neatly stitched pockets, he’s ready to hold tiny surprises and treats, making each day of December feel extra magical.
Perfect as a centerpiece for your holiday décor, this Santa Advent Calendar is both practical and whimsical. Whether displayed in the living room, gifted to loved ones, or treasured as a handmade heirloom, the Amigurumi Santa Advent Calendar is a delightful way to crochet tradition, coziness, and a sprinkle of handmade magic—one loop at a time! 🎄✨🧵
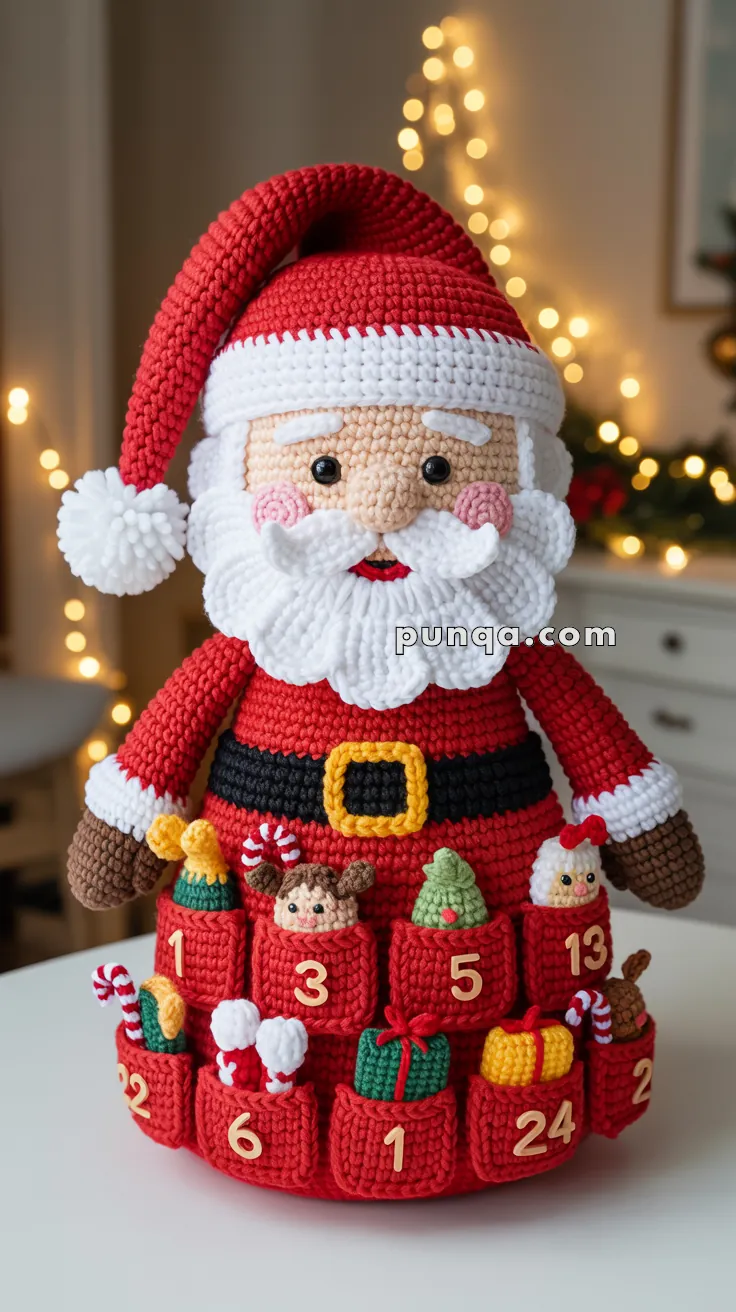
🎅 Amigurumi Santa Advent Calendar Crochet Pattern
Turn the Christmas countdown into a treasured handmade tradition with this joyful Santa Advent Calendar. ❤️🎄
This freestanding design features a softly sculpted Santa with a large friendly face, rosy cheeks, layered white beard, curled hat, rounded mittens, broad black belt, and twenty-four numbered pockets arranged around his flared red coat. Each pocket can hold a tiny crochet surprise, sweet treat, written message, or festive activity for the days leading up to Christmas.
The included miniature patterns create a playful assortment of candy canes, wrapped presents, trees, stockings, animals, and tiny holiday characters. Display the finished calendar on a table, dresser, mantel, or child’s bedroom shelf and refill it year after year. ✨
✨ Skill Level
Advanced
This project includes:
- 🎅 Large-scale amigurumi shaping
- 🧔 Layered beard and mustache construction
- 🎩 Long curved hat shaping
- 🧤 Separate cuffs and mittens
- 🖤 Belt and dimensional buckle
- 🧵 Twenty-four functional pockets
- 🔢 Number embroidery or appliqués
- 🎁 Multiple miniature crochet accessories
- 🪡 Detailed assembly and structural finishing
📏 Finished Size
Using super-bulky chenille yarn with a 6 mm hook for Santa and DK yarn with a 3 mm hook for the small details:
- Total height including hat: approximately 58–65 cm (23–25½ in)
- Body height without hat: approximately 43–47 cm (17–18½ in)
- Base width: approximately 35–39 cm (13¾–15¼ in)
- Individual pockets: approximately 6 × 6.5 cm (2⅜ × 2½ in)
Finished size will vary with yarn, hook size, tension, stuffing, and pocket placement.
🧶 Yarn Requirements
Main Santa — Super-Bulky Chenille Yarn
❤️ Red — 600–700 g
🤍 White — 280–340 g
🧡 Skin Tone — 110–130 g
🖤 Black — 100–120 g
🤎 Medium Brown — 60–75 g
💛 Golden Yellow — 35–45 g
🩷 Dusty Pink — 15–20 g
Polyester fiberfill — approximately 650–850 g
Pockets and Miniatures — DK or Light Worsted Yarn
❤️ Red — 100–120 g
🤍 White or Cream — 35–45 g
💚 Medium Green — 35–45 g
💛 Golden Yellow — 30–40 g
🤎 Brown — 25–35 g
🩷 Pink — 10 g
💙 Turquoise or Teal — 15–20 g
🖤 Black — 10 g
Small amounts of beige, orange, and additional festive colors may be used for miniature characters.
🧵 Materials
- 6 mm crochet hook for the main Santa
- 3 mm crochet hook for pockets and miniatures
- Two 14 mm black safety eyes
- Polyester fiberfill
- Tapestry needles in two sizes
- Stitch markers
- Pins for positioning
- Scissors
- Optional plastic pellets for base stability
- Two cardboard, foam-board, or plastic-canvas circles for the base
- Optional white pom-pom maker
- Black embroidery thread
- Optional fabric glue for securing number appliqués
- Optional small removable treats or activity cards
Safety eyes and small detachable miniatures are not appropriate for children under three years old. Embroider the eyes and supervise play when necessary.
🔤 Abbreviations — US Terms
MR — Magic Ring
sc — Single Crochet
inc — Increase: 2 sc in the same stitch
dec — Invisible Decrease
sl st — Slip Stitch
ch — Chain
hdc — Half Double Crochet
dc — Double Crochet
tr — Treble Crochet
BLO — Back Loop Only
FLO — Front Loop Only
FO — Fasten Off
Work in continuous rounds unless instructed otherwise.
🎅 Santa’s Head
The head is broad and rounded, with enough height for the eyes, cheeks, nose, eyebrows, side hair, and layered beard.
Using skin-tone yarn:
R1
MR 6.
(6)
R2
inc ×6.
(12)
R3
(1 sc, inc) ×6.
(18)
R4
(2 sc, inc) ×6.
(24)
R5
(3 sc, inc) ×6.
(30)
R6
(4 sc, inc) ×6.
(36)
R7
(5 sc, inc) ×6.
(42)
R8
(6 sc, inc) ×6.
(48)
R9
(7 sc, inc) ×6.
(54)
R10–20
sc around.
(54)
Insert the safety eyes between Rounds 13 and 14, leaving approximately 8 stitches between them.
R21
(7 sc, dec) ×6.
(48)
R22
(6 sc, dec) ×6.
(42)
R23
(5 sc, dec) ×6.
(36)
Begin stuffing firmly.
R24
(4 sc, dec) ×6.
(30)
R25
(3 sc, dec) ×6.
(24)
Continue stuffing, keeping the cheeks full and the forehead smooth.
R26
(2 sc, dec) ×6.
(18)
R27
(1 sc, dec) ×6.
(12)
R28
dec ×6.
(6)
FO and close.
Gently shape the front of the head so the lower face remains full beneath the eyes.
👃 Rounded Nose
Using skin-tone yarn:
R1
MR 6.
(6)
R2
inc ×6.
(12)
R3–4
sc around.
(12)
R5
dec ×6.
(6)
Lightly stuff.
FO, leaving a long sewing tail.
Sew the nose centered between and slightly below the eyes. It should project softly without looking pointed.
🩷 Rosy Cheeks — Make 2
Using dusty-pink yarn:
R1
MR 6.
(6)
R2
inc ×6.
(12)
FO.
Flatten each circle and sew one beneath each eye, level with the lower edge of the nose.
🤍 Eyebrows — Make 2
Using white yarn:
Ch 7.
Starting in the second chain, work 6 sc.
FO.
Curve each strip gently and sew above the eyes. Angle the outer ends slightly upward.
🤍 Side Hair — Make 2
Using white yarn:
R1
MR 6.
R2
inc ×6.
(12)
R3
(1 sc, inc) ×6.
(18)
R4–5
sc around.
(18)
Do not stuff.
Flatten and sew one piece to each side of the head beneath the hat brim.
👄 Mouth
Using black embroidery thread, stitch a tiny curved mouth beneath the mustache opening.
Add a short red stitch directly below it to create the visible lower lip.
🧔 Layered Beard
The beard is made from several overlapping pieces to create a full scalloped shape around the face and chest.
Lower Beard Base
Using white yarn:
R1
MR 8.
(8)
R2
inc ×8.
(16)
R3
(1 sc, inc) ×8.
(24)
R4
(2 sc, inc) ×8.
(32)
R5
(3 sc, inc) ×8.
(40)
R6–7
sc around.
(40)
Flatten the circle slightly.
Along approximately two-thirds of the final round, work the scalloped edge:
(sl st, 5 dc in next stitch, sl st in next stitch); repeat evenly.
FO, leaving a long tail.
Position the beard under the mouth so its longest scallops cover the upper chest.
Upper Beard Layer
Using white yarn:
R1
MR 6.
R2
inc ×6.
(12)
R3
(1 sc, inc) ×6.
(18)
R4
(2 sc, inc) ×6.
(24)
Flatten.
Work across the lower half:
(sl st, 4 dc in next stitch, sl st in next stitch); repeat.
FO.
Sew this layer over the upper portion of the lower beard, directly beneath the cheeks.
Side Beard Curls — Make 2
Using white yarn:
Ch 8.
Starting in the second chain, work 2 hdc in each chain.
The strip will curl naturally.
FO.
Sew one curl beside each cheek, blending it into the beard.
🤍 Mustache — Make 2
Using white yarn:
Row 1
Ch 9.
Starting in the second chain:
sl st, sc, hdc, 2 dc, hdc, sc, sl st.
FO.
Make two matching pieces.
Sew them beneath the nose with their wider ends meeting at the center. Curve the pointed tips upward and outward.
🎩 Long Curved Santa Hat
The hat has a fitted red crown, a broad white brim, a long drooping tail, and a large white pom-pom.
Begin at the top of the rounded crown using red yarn:
R1
MR 6.
R2
inc ×6.
(12)
R3
(1 sc, inc) ×6.
(18)
R4
(2 sc, inc) ×6.
(24)
R5
(3 sc, inc) ×6.
(30)
R6
(4 sc, inc) ×6.
(36)
R7
(5 sc, inc) ×6.
(42)
R8
(6 sc, inc) ×6.
(48)
R9–14
sc around.
(48)
The first portion forms the fitted crown.
R15
(6 sc, dec) ×6.
(42)
R16–19
sc around.
(42)
R20
(5 sc, dec) ×6.
(36)
R21–24
sc around.
(36)
R25
(4 sc, dec) ×6.
(30)
R26–30
sc around.
(30)
R31
(3 sc, dec) ×6.
(24)
R32–37
sc around.
(24)
R38
(2 sc, dec) ×6.
(18)
R39–45
sc around.
(18)
R46
(1 sc, dec) ×6.
(12)
R47–54
sc around.
(12)
R55
dec ×6.
(6)
R56–60
sc around.
(6)
FO.
Lightly stuff only the crown and the first section of the tail. Leave the remaining length flexible.
Bend the tail forward and down toward one side. Tack it to the crown with several hidden stitches so it holds a deep curved shape.
🤍 Hat Brim
Using white yarn:
Ch enough stitches to wrap around the hat opening, approximately 50–54 chains.
Join carefully without twisting.
R1–5
sc around.
FO.
Wrap the brim around the lower edge of the hat and sew securely. The brim should cover the top of the eyebrows slightly without hiding the eyes.
⚪ Hat Pom-Pom
Make a dense white yarn pom-pom approximately 8–10 cm (3–4 in) across.
Trim it evenly and sew it firmly to the narrow hat tip.
Alternatively, crochet a stuffed pom-pom:
R1
MR 6.
R2
inc ×6.
(12)
R3
(1 sc, inc) ×6.
(18)
R4–6
sc around.
(18)
R7
(1 sc, dec) ×6.
(12)
Stuff firmly.
R8
dec ×6.
(6)
FO and attach.
🎅 Flared Advent Body
The body forms Santa’s coat and the structural base for all twenty-four pockets.
Using red yarn:
R1
MR 6.
R2
inc ×6.
(12)
R3
(1 sc, inc) ×6.
(18)
R4
(2 sc, inc) ×6.
(24)
R5
(3 sc, inc) ×6.
(30)
R6
(4 sc, inc) ×6.
(36)
R7
(5 sc, inc) ×6.
(42)
R8
(6 sc, inc) ×6.
(48)
R9
(7 sc, inc) ×6.
(54)
R10
(8 sc, inc) ×6.
(60)
R11
(9 sc, inc) ×6.
(66)
R12
(10 sc, inc) ×6.
(72)
R13–22
sc around.
(72)
R23
(11 sc, inc) ×6.
(78)
R24–31
sc around.
(78)
R32
(12 sc, inc) ×6.
(84)
R33–42
sc around.
(84)
R43
(13 sc, inc) ×6.
(90)
R44–52
sc around.
(90)
Do not close the lower edge yet.
Cut two firm circles to fit the base. Place one circle inside, add a layer of stuffing or pellets, then place the second circle above it. Continue stuffing the body firmly, keeping the sides smooth and the base flat.
Base Closure
Using red yarn, crochet a separate circle:
R1
MR 6.
R2
inc ×6.
(12)
Continue increasing by 6 stitches per round until the circle reaches 90 stitches or fits the body opening.
Sew or crochet the base circle to the lower body edge.
🖤 Belt
Using black yarn:
Ch enough stitches to wrap around the upper-middle body, approximately 76–82 chains.
Join without twisting.
Work 5 rounds of sc.
FO.
Position the belt around the body above the top pocket row and sew it securely.
💛 Belt Buckle
Using golden-yellow yarn:
Ch 18 and join into a ring.
Work 2 rounds of sc around the ring.
Shape it into a rounded rectangle approximately 8 × 6 cm (3 × 2⅜ in).
Sew it over the center front of the belt.
Leave the black center visible.
💪 Arms — Make 2
Using red yarn:
R1
MR 6.
R2
inc ×6.
(12)
R3
(1 sc, inc) ×6.
(18)
R4–17
sc around.
(18)
Switch to white.
R18–21
sc around.
(18)
Switch to brown.
R22–27
sc around.
(18)
R28
(1 sc, dec) ×6.
(12)
Stuff the mitten and lower arm firmly. Keep the shoulder end more lightly stuffed.
R29
dec ×6.
(6)
FO.
Sew the arms high on the sides of the body, angled downward and slightly forward.
🧤 Mitten Thumb — Make 2
Using brown yarn:
R1
MR 5.
R2–4
sc around.
(5)
FO.
Sew one thumb to the inner side of each mitten.
🎁 Functional Advent Pockets — Make 24
The pockets are worked in DK red yarn with a smaller hook so they remain neat and functional.
Using red yarn and a 3 mm hook:
Row 1
Ch 13.
Starting in the second chain, sc across.
(12)
Rows 2–9
Ch 1, turn, sc across.
(12)
FO, leaving a long sewing tail.
Optional: work one row of reverse sc or regular sc across the upper edge for extra firmness.
Sew each pocket to the body along the two sides and lower edge. Leave the top edge open.
📍 Pocket Arrangement
Arrange the pockets in three staggered rows around the lower coat:
- Top row: 8 pockets
- Middle row: 8 pockets
- Bottom row: 8 pockets
Begin with the center-front pockets and work toward the sides and back.
Leave enough space between pockets for the numbers and miniature items to remain visible.
The pockets should begin just below the belt and continue almost to the base.
🔢 Numbers 1–24
Use cream, pale-yellow, or light wooden-colored yarn.
The easiest method is to embroider each number directly onto a pocket using chain stitch or backstitch.
For thicker raised numbers:
- Crochet a chain long enough to form the desired digit.
- Sew the chain to the pocket in the correct shape.
- Use small hidden stitches at every bend.
Distribute the numbers randomly or sequentially. Keep each number centered on the lower half of its pocket.
🎄 Miniature Pocket Surprises
The following tiny patterns are designed for DK yarn and a 2.5–3 mm hook. Stuff only when indicated.
🍬 Striped Candy Cane
Using red and white yarn:
Ch 18 in red.
FO.
Ch 18 in white.
Twist the two chains together and stitch them at several points.
Curve the top into a hook and tack it in place.
Make several in different sizes for multiple pockets.
🎁 Tiny Wrapped Present
Using green, yellow, red, or turquoise yarn:
R1
MR 6.
R2
inc ×6.
(12)
R3–7
sc around.
(12)
Lightly stuff.
R8
dec ×6.
(6)
FO.
Using a contrasting color, embroider one vertical and one horizontal ribbon around the box.
Mini Bow
Ch 8, join into a loop, and wrap the center tightly with yarn.
Sew to the top.
🎄 Tiny Christmas Tree
Using green yarn:
R1
MR 6.
R2
(1 sc, inc) ×3.
(9)
R3
sc around.
(9)
R4
(2 sc, inc) ×3.
(12)
R5
sc around.
(12)
R6
(3 sc, inc) ×3.
(15)
R7
sc around.
(15)
R8
(4 sc, inc) ×3.
(18)
FO.
Lightly stuff.
Add a red or yellow French-knot ornament and a tiny red stitch at the base.
🧦 Mini Stocking
Using red yarn:
R1
MR 6.
R2
inc ×6.
(12)
R3–6
sc around.
(12)
To shape the heel:
Sc 5, turn.
Work 3 short rows across these 5 stitches.
Resume working around all 12 stitches.
R7–11
sc around.
Switch to white.
R12–13
sc around.
FO.
Add a tiny hanging loop with 5 chains.
🐻 Tiny Teddy Head
Using beige or brown yarn:
Head
R1
MR 6.
R2
inc ×6.
(12)
R3
(1 sc, inc) ×6.
(18)
R4–6
sc around.
(18)
R7
(1 sc, dec) ×6.
(12)
Lightly stuff.
R8
dec ×6.
(6)
FO.
Ears — Make 2
MR 5, join with sl st, and FO.
Sew to the head.
Embroider black eyes and a tiny pink or brown nose.
🦌 Tiny Reindeer Head
Using brown yarn:
Work the Tiny Teddy Head pattern.
Antlers
Using dark brown yarn:
Ch 6.
Sl st in the second chain and next stitch, ch 3, sl st back, then sl st to the base.
Make two and sew to the head.
Add a red nose and black eyes.
🐥 Tiny Chick
Using pale-yellow yarn:
R1
MR 6.
R2
inc ×6.
(12)
R3–5
sc around.
(12)
R6
dec ×6.
(6)
Lightly stuff and close.
Embroider black eyes and an orange beak.
Add a tiny red comb with three short chain loops.
🧑 Tiny Elf Head
Using skin-tone yarn:
Work the Tiny Teddy Head pattern.
Hat
Using green yarn:
R1
MR 5.
R2–5
sc around.
(5)
R6
(1 sc, inc) ×2, sc.
(7)
R7
sc around.
FO.
Sew the hat to the head and add a red pom-pom stitch.
Embroider black eyes and pink cheeks.
🎅 Tiny Santa Head
Using skin-tone yarn:
Work the Tiny Teddy Head pattern.
Add:
- A small white beard made from three chain loops
- A red triangular hat
- A white French-knot pom-pom
- Black embroidered eyes
- A pink nose
🥁 Tiny Drum
Using red yarn:
R1
MR 6.
R2
inc ×6.
(12)
R3–7
sc around.
(12)
R8
dec ×6.
(6)
Lightly stuff and close.
Embroider crossed yellow lines on the sides and white lines around the top and bottom.
🧤 Tiny Mitten
Using white or red yarn:
R1
MR 6.
R2–5
sc around.
(6)
Thumb
Ch 3, sl st back to the mitten.
R6
sc around.
FO.
Add a contrasting cuff with surface stitches.
🎀 Tiny Bow
Using red yarn:
Ch 10 and join into a loop.
Work 14 sc into the loop.
FO.
Wrap the center several times and knot securely.
Add two short chain tails if desired.
🟡 Mini Ornament Ball
Using yellow, red, or green yarn:
R1
MR 6.
R2
inc ×6.
(12)
R3–4
sc around.
R5
dec ×6.
(6)
Stuff lightly and close.
Add a 4-chain hanging loop.
🍪 Tiny Cookie
Using golden-brown yarn:
R1
MR 6.
R2
inc ×6.
(12)
R3
(1 sc, inc) ×6.
(18)
FO.
Embroider small dark-brown chocolate chips or white icing stitches.
🏠 Tiny Gingerbread House
House Base
Using brown yarn:
Ch 7.
Work 5 rows of 6 sc.
FO.
Make a second matching panel.
Sew the sides and lower edge together, lightly stuffing before closing.
Roof
Using red or white yarn:
Ch 8.
Work 3 rows of sc.
Fold over the top and sew in place.
Add white icing stitches and a tiny red door.
🧸 Tiny Rabbit Head
Using brown or cream yarn:
Work the Tiny Teddy Head pattern.
Ears — Make 2
Ch 6.
Starting in the second chain, sl st, sc, 2 hdc, sc.
FO.
Sew upright.
Embroider black eyes and a pink nose.
🧩 Suggested Pocket Fill Set
For a balanced assortment, make:
- 4 candy canes
- 4 wrapped gifts
- 3 trees
- 2 stockings
- 2 teddy heads
- 2 reindeer heads
- 1 chick
- 1 elf
- 1 tiny Santa
- 1 drum
- 1 mitten
- 1 ornament
- 1 gingerbread house
These pieces can be mixed with chocolates, activity cards, or handwritten notes.
🪡 Final Assembly
Attach the Head
Center the head on the narrow top of the body.
Add extra stuffing between the two pieces if needed.
Sew firmly around the opening.
Add the Hat
Place the fitted crown over the upper head.
The white brim should sit just above the eyebrows.
Sew the brim and crown to the head at several points.
Add the Beard and Mustache
Sew the lower beard first.
Layer the upper beard over it.
Add the side curls, then attach the two mustache pieces beneath the nose.
Attach the Arms
Position the arms high on the body, angled slightly forward.
Sew securely around the shoulder openings.
Add the Belt and Buckle
Wrap the belt around the upper body and sew it flat.
Center the buckle at the front.
Attach the Pockets
Pin every pocket before sewing.
Check that all rows are level and evenly spaced.
Sew along each side and lower edge only.
Add the Numbers
Attach or embroider numbers after all pockets have been sewn in place.
✨ Final Shaping and Stability
- Keep the base completely flat.
- Add pellets low in the body if extra stability is required.
- Shape the cheeks and nose gently with your fingers.
- Fluff and layer the beard scallops.
- Curve the mustache tips upward.
- Bend the hat deeply forward and to one side.
- Keep each pocket open and easy to fill.
- Confirm that the belt and pocket rows remain level.
- Distribute miniatures evenly so Santa does not become front-heavy.
🎁 Advent Calendar Ideas
Fill each pocket with:
- A tiny crochet decoration
- A wrapped sweet
- A holiday activity
- A kind deed prompt
- A Christmas joke
- A clue for a treasure hunt
- A small ornament
- A family memory or photograph
Remove the pocket item each day and hang it on a miniature tree, arrange it beside Santa, or use it to decorate a holiday play scene.
🧼 Care Instructions
Spot clean with a damp cloth.
Allow the calendar to air dry completely.
Do not machine wash when cardboard, plastic canvas, pellets, safety eyes, or detachable miniatures are used.
Store the calendar upright in a breathable box and avoid crushing the hat, beard, or pockets.
🎄 Final Thoughts
Your Santa Advent Calendar is ready to begin a new Christmas tradition. 🎅❤️
With his friendly rounded face, rosy cheeks, sweeping white beard, long curved hat, broad belt, soft mittens, and twenty-four pockets filled with tiny handmade surprises, this festive Santa turns every December morning into a moment of anticipation.
Refill the pockets with treats, notes, ornaments, or crochet miniatures each year and let this joyful handmade piece become part of your family’s holiday memories.
Happy Crocheting and Merry Christmas! 🧶🎁🎄