Bring the adorable charm of a Red Panda to life with this Amigurumi Red Panda crochet pattern! 🦊✨ With its fluffy tail, expressive eyes, and playful stance, this design captures the essence of this beloved creature in yarn form. Whether you’re crafting for a nature-inspired décor piece, a heartfelt gift, or simply love red panda-themed amigurumi, this FREE pattern is a fantastic addition to your collection.
Designed for intermediate crocheters, this pattern allows for customization in fur textures, facial details, and even tiny accessories like embroidered markings or a miniature bamboo setting to enhance its personality. Choose classic rusty reds and creams for a realistic look or experiment with whimsical hues for a unique twist! Whether displayed as part of a woodland setup or gifted to a fellow crochet enthusiast, this amigurumi red panda is sure to impress.
Grab your hook, select your favorite yarn, and let’s bring this charming little climber to life—one stitch at a time! 🧶✨
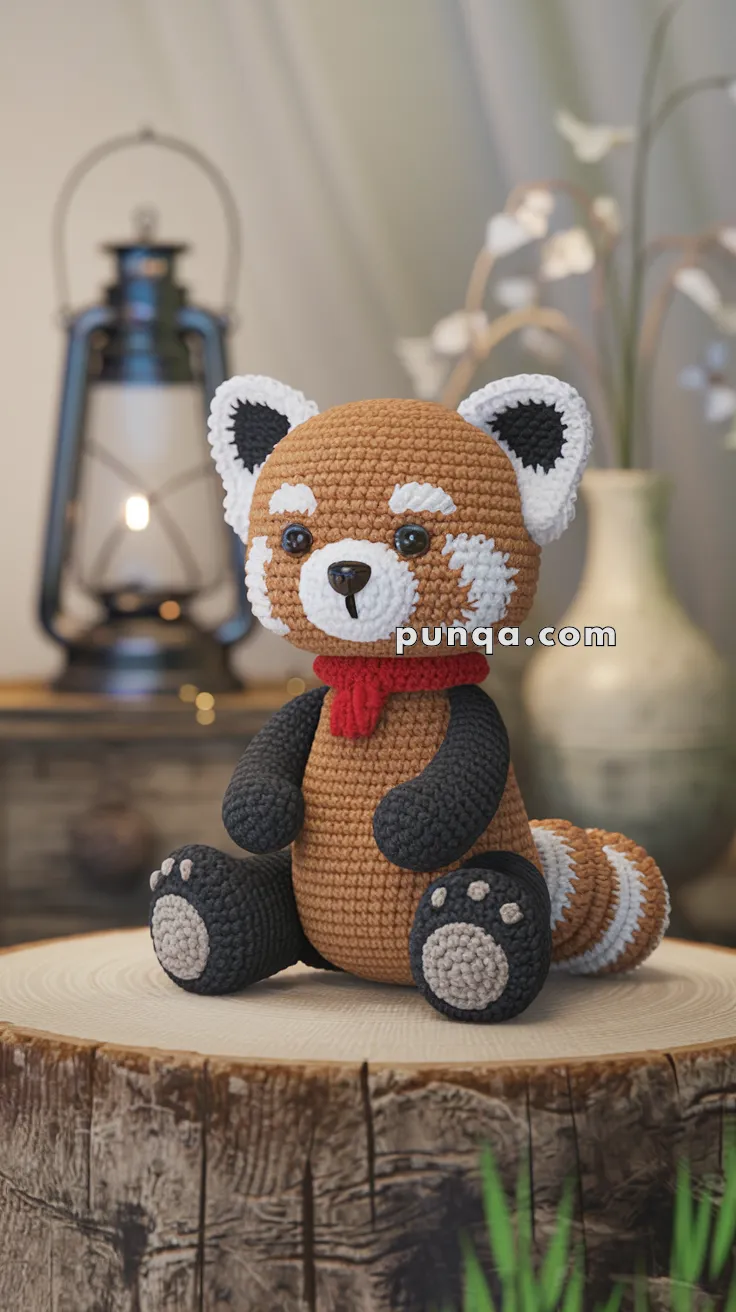
🐾 Amigurumi Red Panda Crochet Pattern
This charming red panda makes a cozy woodland companion with its soft striped tail, expressive face, and cuddly design. Great as a gift or a nature-themed nursery piece, this red panda is a must-make for animal lovers!
✨ Skill Level
Intermediate
Techniques included:
- color changes
- facial appliqué
- sculpted assembly
- layered ear construction
- tail striping
- embroidery details
📏 Finished Size
Approx. 26–30 cm (10–12 inches) tall while seated
Using worsted-weight yarn and a 3.0–3.25 mm crochet hook.
🧶 Yarn Requirements
Rusty Orange Yarn
Approx. 90–100 g
Used for:
- head
- body
- tail sections
Black or Charcoal Yarn
Approx. 70 g
Used for:
- arms
- legs
- ear centers
- tail base
- nose embroidery
White Yarn
Approx. 45–50 g
Used for:
- muzzle
- cheeks
- eyebrows
- ear borders
- tail rings
Light Gray Yarn
Approx. 10–12 g
Used for:
- paw pads
Red Yarn
Approx. 8–10 g
Used for:
- scarf
🪡 Supplies
- 3.0–3.25 mm crochet hook
- 10–12 mm safety eyes
- Black safety nose or black yarn
- Polyester stuffing
- Yarn needle
- Stitch markers
- Scissors
🔤 Abbreviations (US Terms)
- MR – magic ring
- sc – single crochet
- inc – increase
- dec – invisible decrease
- sl st – slip stitch
- ch – chain
- FO – fasten off
Work in continuous rounds unless noted.
🧸 Head
The head is large and rounded with slightly wider cheeks and a flatter lower face.
With Rusty Orange Yarn
R1
MR 6 sc (6)
R2
inc x6 (12)
R3
(sc, inc) x6 (18)
R4
(2 sc, inc) x6 (24)
R5
(3 sc, inc) x6 (30)
R6
(4 sc, inc) x6 (36)
R7
(5 sc, inc) x6 (42)
R8
(6 sc, inc) x6 (48)
R9–18
sc around (48)
Insert safety eyes between Rounds 11–12 with 8 stitches between them.
The eyes should sit slightly low and close to the muzzle.
Shape Head
R19
(6 sc, dec) x6 (42)
R20
(5 sc, dec) x6 (36)
R21
(4 sc, dec) x6 (30)
Stuff very firmly and shape cheeks outward.
R22
(3 sc, dec) x6 (24)
R23
(2 sc, dec) x6 (18)
R24
(sc, dec) x6 (12)
R25
dec x6 (6)
FO and close.
🐽 Muzzle
The muzzle is compact and softly protruding.
With White Yarn
R1
MR 6
R2
inc x6 (12)
R3
(sc, inc) x6 (18)
R4
(2 sc, inc) x6 (24)
R5–6
sc around (24)
Lightly stuff center only.
FO leaving long tail.
Sew low between the eyes.
👃 Nose
With Black Yarn
R1
MR 6
R2
inc x6 (12)
R3
sc around (12)
FO.
Flatten into a rounded triangle.
Attach centered on muzzle.
Embroider a short vertical mouth line beneath the nose.
🤍 Face Markings
The face markings curve upward toward the eyes and ears.
Cheek Patches (Make 2)
With White Yarn
R1
MR 6
R2
(sc, inc) x3 (9)
R3
(2 sc, inc) x3 (12)
R4–5
sc around (12)
FO.
Flatten into rounded ovals.
Attach diagonally beside muzzle so the upper edges point toward the eyes.
Eyebrow Patches (Make 2)
With White Yarn
Ch 6
Starting in 2nd chain from hook:
sl st, sc, hdc, sc, sl st
FO leaving tail.
Attach above eyes with a gentle upward angle.
👂 Oversized Rounded Ears (Make 2)
The ears are large, rounded, and thickly bordered in white with a recessed dark center.
This layered construction creates the correct plush look.
Inner Ear Center — Black
R1
MR 6
R2
inc x6 (12)
R3
(sc, inc) x6 (18)
R4
(2 sc, inc) x6 (24)
FO.
Outer Ear Border — White
R1
MR 6
R2
inc x6 (12)
R3
(sc, inc) x6 (18)
R4
(2 sc, inc) x6 (24)
R5
(3 sc, inc) x6 (30)
R6
(4 sc, inc) x6 (36)
FO.
Place black ear centered inside white ear.
Sew only around the lower inner edge so the white border remains thick and highly visible around the top and sides.
Fold the bottom slightly before attaching.
Attach ears high on head angled outward slightly.
The ears should appear oversized and rounded rather than pointed.
🧍 Body
The body is tall, smooth, and slightly pear-shaped.
With Rusty Orange Yarn
R1
MR 6
R2
inc x6 (12)
R3
(sc, inc) x6 (18)
R4
(2 sc, inc) x6 (24)
R5
(3 sc, inc) x6 (30)
R6
(4 sc, inc) x6 (36)
R7
(5 sc, inc) x6 (42)
R8–18
sc around (42)
R19
(5 sc, dec) x6 (36)
R20
(4 sc, dec) x6 (30)
Stuff firmly.
R21
(3 sc, dec) x6 (24)
R22
(2 sc, dec) x6 (18)
FO leaving long tail.
The lower body should remain rounded and stable.
🖤 Arms (Make 2)
The arms are long, curved, and floppy.
With Black Yarn
R1
MR 6
R2
inc x6 (12)
R3
(sc, inc) x6 (18)
R4–18
sc around (18)
Stuff lightly near paws only.
Flatten top before sewing.
Curve arms inward naturally.
🦶 Legs (Make 2)
The legs are chunky with large rounded feet.
With Black Yarn
R1
MR 6
R2
inc x6 (12)
R3
(sc, inc) x6 (18)
R4
(2 sc, inc) x6 (24)
R5–7
sc around (24)
R8
(2 sc, dec) x6 (18)
R9–12
sc around (18)
Stuff firmly.
Flatten bottoms slightly.
FO leaving long tail.
🐾 Paw Pads
Large Center Pad (Make 2)
With Light Gray Yarn
R1
MR 6
R2
inc x6 (12)
R3
(sc, inc) x6 (18)
R4
sc around (18)
FO.
Toe Pads (Make 6)
With Light Gray Yarn
MR 5
FO.
Attach 3 small pads above each large paw pad.
🌀 Tail
The tail is thick, plush, and softly curved around the body.
Start With Rusty Orange Yarn
R1
MR 6
R2
inc x6 (12)
R3
(sc, inc) x6 (18)
R4
(2 sc, inc) x6 (24)
R5–7
sc around (24)
Stripe Sequence
R8–10
White
R11–13
Rusty Orange
R14–16
White
R17–19
Rusty Orange
R20–22
White
R23–25
Rusty Orange
Stuff lightly throughout.
FO leaving long tail.
Curve tail naturally while sewing behind body.
🧣 Scarf
With Red Yarn
Ch 46
Row 1
sc across
Row 2
ch 1, turn, sc across
FO.
Wrap around neck and knot gently in front.
Leave short fringe ends.
🪡 Assembly
Step 1
Attach muzzle low on face.
Step 2
Attach cheek patches diagonally beside muzzle.
Step 3
Attach nose centered on muzzle.
Step 4
Attach eyebrow patches above eyes.
Step 5
Attach ears high on head angled outward slightly.
The lower ear edges should sit close to the top curve of the head.
Step 6
Sew head securely to body.
Step 7
Attach arms high on sides and curve inward.
Step 8
Attach legs wide apart for seated posture.
Step 9
Attach tail low on back and curve around side.
Step 10
Wrap scarf around neck and knot loosely.
✨ Final Shaping Tips
- Keep ears oversized and rounded
- Shape cheeks outward softly
- Curve arms inward naturally
- Flatten paw bottoms slightly
- Keep tail thick and plush
- Position eyes low for sweet expression
- Angle ears outward slightly
🌲 Finished Woodland Red Panda
Your finished red panda features oversized white-bordered ears, expressive cheek markings, chunky black paws, a fluffy striped tail, and a cozy scarf wrapped around its neck. The balanced shaping and layered facial details create an adorable woodland companion full of warmth and personality. 🦝🍂🧶