Hey there! If you’ve ever dabbled in the delightful world of crocheting, you’ve probably heard of amigurumi—a charming Japanese art form that involves creating small, cuddly creatures or dolls out of yarn. One of the most heartwarming projects you can embark on is crafting an amigurumi Jesus. Not only does this project allow you to flex your creative muscles, but it also carries a meaningful touch that adds a special dimension to your craft. 🌟 Whether you’re crafting it as a gift or a personal keepsake, an amigurumi Jesus holds a unique charm that resonates with many on a spiritual level.
Creating an amigurumi Jesus involves a harmonious blend of following a pattern and adding your own flair. First, you’ll need to gather your materials—soft yarn, a crochet hook, some stuffing, and safety eyes are just the basics. The real magic happens when you start working your crochet stitches, transforming simple loops into a lovable figure. 🧶 As you stitch each part, from the gentle face to the iconic robe, you can’t help but feel a sense of joy and anticipation. Seeing your creation come together piece by piece is nothing short of delightful. Add some finishing touches like a serene smile or a little halo, and voilà—your amigurumi Jesus is ready to spread joy! 😊
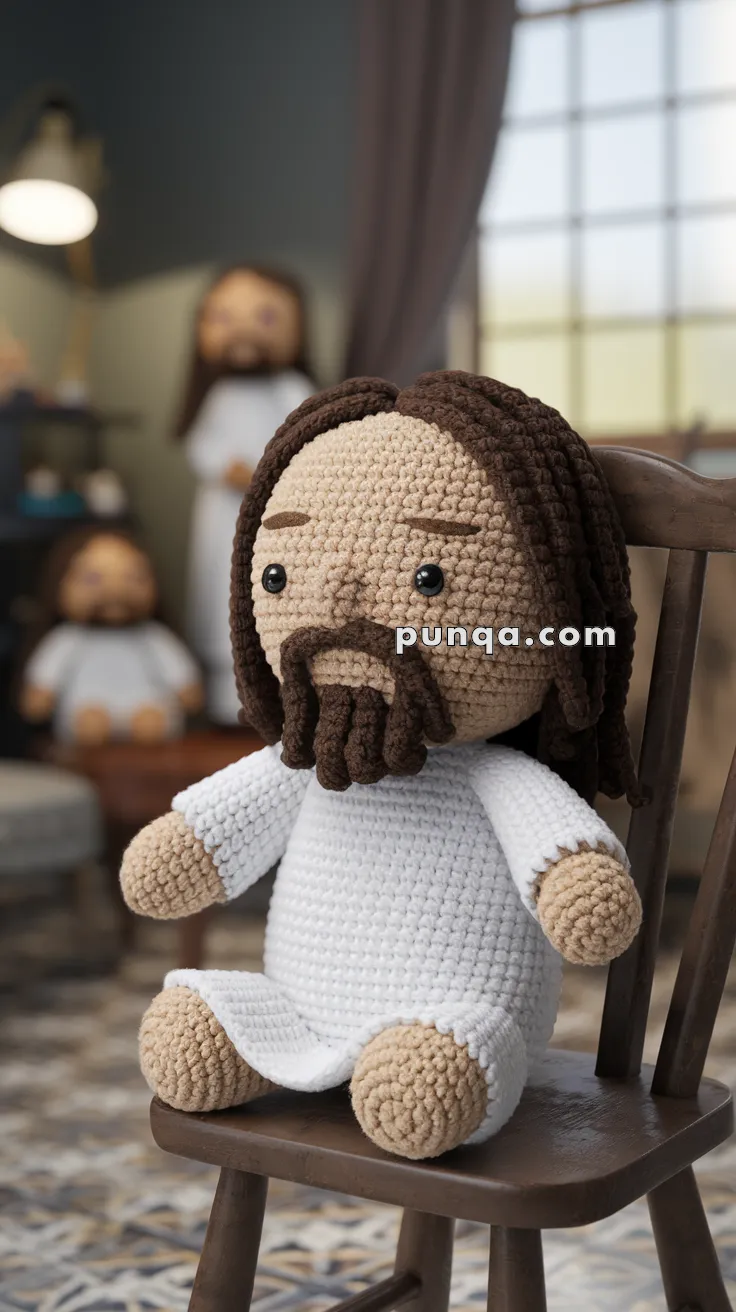
✨ Amigurumi Jesus Doll Crochet Pattern ✨
This peaceful and simple figure of Jesus is perfect as a nativity addition, teaching toy, or spiritual keepsake.
✨ Skill Level
Beginner → Intermediate
Simple shaping, basic color changes, crochet cords for hair and beard, and easy assembly.
📏 Finished Size
Approx. 23–26 cm (9–10 inches) tall using worsted weight yarn and a 3.0 mm hook.
🧶 Materials
Yarn (Worsted Weight):
-
Skin tone (beige) — head, hands, feet, nose
-
Brown — hair, beard, moustache, eyebrows
-
White — robe
Supplies:
-
3.0 mm crochet hook
-
10–12 mm safety eyes
-
Polyester fiberfill
-
Yarn needle
-
Stitch marker
-
Scissors
🧵 Abbreviations (US Terms)
MR – Magic Ring
sc – Single crochet
inc – Increase (2 sc in same stitch)
dec – Invisible decrease
ch – Chain
sl st – Slip stitch
FO – Fasten off
Head (Skin Tone)
R1: MR 6
R2: inc ×6 → 12
R3: (sc, inc) ×6 → 18
R4: (2 sc, inc) ×6 → 24
R5: (3 sc, inc) ×6 → 30
R6: (4 sc, inc) ×6 → 36
R7–R14: sc around (36)
Insert safety eyes between R10–11, spaced 7–8 stitches apart.
R15: (4 sc, dec) ×6 → 30
R16: (3 sc, dec) ×6 → 24
Stuff firmly.
R17: (2 sc, dec) ×6 → 18
R18: (sc, dec) ×6 → 12
R19: dec ×6 → 6
Fasten off and close.
Nose (Skin Tone)
R1: MR 4
R2: (sc, inc) ×2 → 6
R3: sc around (6)
Lightly stuff and flatten slightly.
Sew centered between the eyes around R12–13.
This creates a soft, subtle nose that blends naturally into the face.
Hair — Rope Strand Style (Brown)
The hair is made from thick crochet cords, not fringe.
Make 18–22 hair strands.
Each strand:
Ch 26
Sc in 2nd ch from hook and across (25)
FO
Attach strands evenly around the crown and back of the head, leaving the face open.
Arrange into a middle part:
-
8–10 strands at the back
-
4–5 strands on each side
Trim ends so hair reaches chest level.
Beard — Rope Style (Brown)
Make 9 beard cords.
Each cord:
Ch 14
Sc in 2nd ch from hook and across (13)
FO
Fold each cord in half and sew under the chin so loops hang downward.
Moustache (Brown)
Make 2 short cords.
Each:
Ch 8
Sc in 2nd ch from hook and across (7)
Sew above beard, angled slightly outward.
Body / Robe (White)
Short, wide, and rounded — just like the photo.
R1: MR 6
R2: inc ×6 → 12
R3: (sc, inc) ×6 → 18
R4: (2 sc, inc) ×6 → 24
R5: (3 sc, inc) ×6 → 30
R6–R16: sc around (30)
Stuff firmly.
R17: (3 sc, dec) ×6 → 24
R18: (2 sc, dec) ×6 → 18
R19: (sc, dec) ×6 → 12
R20: dec ×6 → 6
Fasten off and close.
The robe has a straight hem and simple cylindrical shape.
Arms (Make 2)
Start with skin tone.
R1: MR 6
R2: inc ×6 → 12
R3–R6: sc around (12)
Change to white.
R7–R12: sc around (12)
Lightly stuff hands only.
Flatten top and leave long tail for sewing.
Legs & Feet (Make 2)
Short and chunky for seated posture.
Start with skin tone.
R1: MR 6
R2: inc ×6 → 12
R3–R6: sc around (12)
Change to white.
R7–R9: sc around (12)
Stuff firmly.
Flatten slightly.
Leave long tail for sewing.
Eyebrows (Brown)
Embroider short straight bars above eyes:
5–6 stitches each, slightly angled.
Assembly
-
Sew nose between the eyes
-
Attach hair strands and arrange center part
-
Sew beard cords under chin
-
Attach moustache cords
-
Sew head to body
-
Attach arms slightly forward
-
Attach legs to front bottom of robe for seated pose
Gently shape the robe so it sits naturally.
🌿 Final Touch
Your Amigurumi Jesus doll is now complete — peaceful, gentle, and full of warmth. With his soft round face, subtle nose, flowing rope-style hair, full beard, and simple white robe, he reflects the comforting presence shown in the photo.
Perfect for nativity displays, prayer spaces, children’s rooms, or as a meaningful handmade gift, this little figure is stitched with care and heart.
A quiet reminder of love, kindness, and hope — all wrapped in yarn. 🤍✝️