Summon a touch of mischievous charm with this Amigurumi Demon crochet pattern! 🔥✨ With its playful horns, tiny wings, and impish grin, this design brings a delightful mix of spooky and cute to your handmade creations. Whether you’re crafting for Halloween décor, a fantasy-inspired setup, or simply love character-driven amigurumi, this FREE pattern is a fantastic addition to your collection.
Designed for intermediate crocheters, this pattern allows for customization in horn shapes, wing details, and even tiny accessories like a miniature pitchfork or glowing eyes to enhance its devilish personality. Choose fiery reds and blacks for a classic demon look or experiment with pastel hues for a whimsical twist! Whether displayed as part of a spooky setup or gifted to a fellow crochet enthusiast, this amigurumi demon is sure to enchant. Grab your hook, select your favorite yarn, and let’s bring this mischievous little creature to life—one stitch at a time! 🧶✨
😈 Amigurumi Demon Crochet Pattern
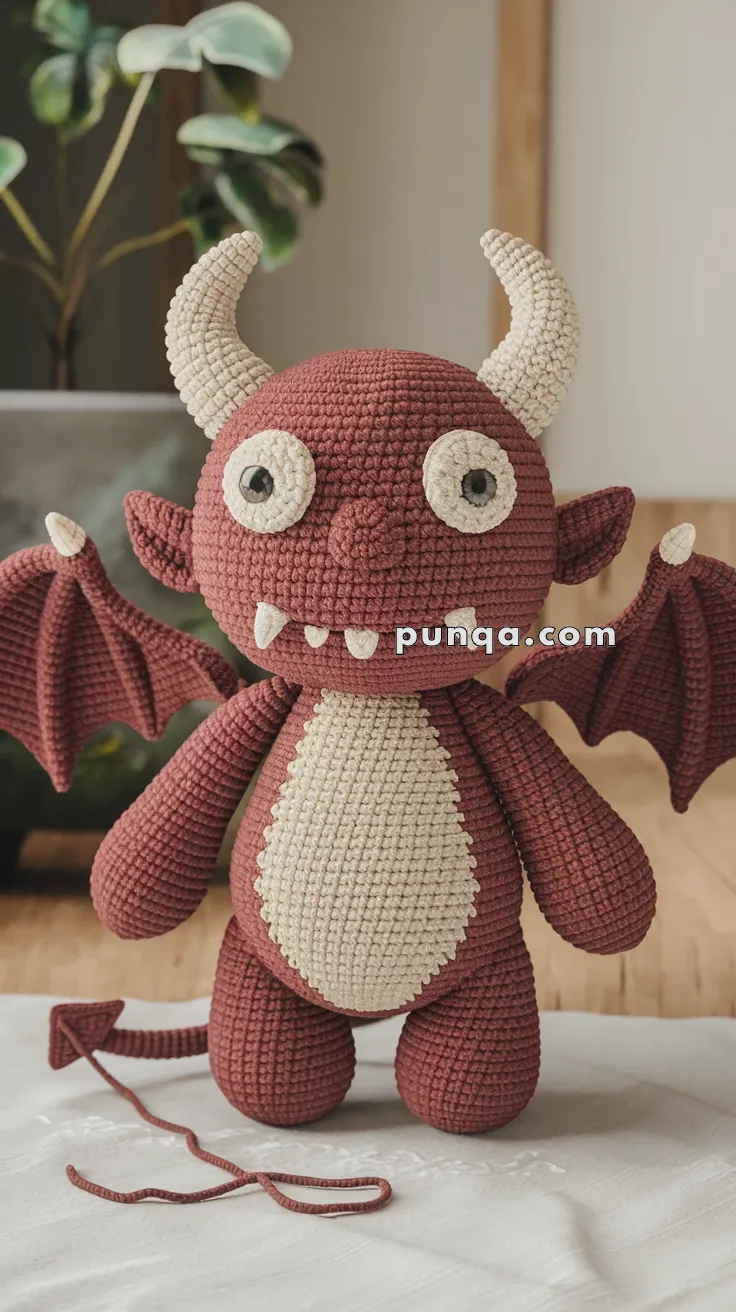
This adorable little demon is designed to match the reference photo precisely — from his chunky curved horns and wide bat wings to his round belly patch, big stitched eyes, and tiny fang teeth. His proportions are soft and rounded, with a slightly oversized head, short legs, plump arms, and a thin pointed tail.
The finished demon stands upright with wings spread and a friendly mischievous grin, making him perfect for fantasy décor, Halloween gifts, or creature collections.
Let’s crochet your own cuddly demon step by step! 🧶🔥
✨ Skill Level
Intermediate – includes shaping, appliqué belly patch, wings, horns, and facial assembly.
📏 Finished Size
Approx. 28–30 cm (11–12 inches) tall using worsted-weight yarn and a 3–3.5 mm hook.
🧶 Materials
Yarn (worsted weight):
-
Dark brick red / rust red – body, head, arms, legs, wings, tail
-
Cream / beige – belly patch, horns, eyes, teeth
-
Black – pupils and mouth embroidery
Other supplies:
-
Crochet hook 3.0–3.5 mm
-
12 mm safety eyes or crochet eyes
-
Fiberfill stuffing
-
Tapestry needle
-
Stitch marker
-
Scissors
🧵 Abbreviations (US Terms)
MR – Magic Ring
sc – Single crochet
inc – Increase (2 sc in one stitch)
dec – Decrease (sc2tog)
sl st – Slip stitch
ch – Chain
FO – Fasten off
🔴 Head (Dark Red)
R1: MR 6 (6)
R2: inc x6 (12)
R3: (sc, inc) x6 (18)
R4: (2 sc, inc) x6 (24)
R5: (3 sc, inc) x6 (30)
R6: (4 sc, inc) x6 (36)
R7: (5 sc, inc) x6 (42)
R8–15: sc around (42)
Insert eyes between R10–11, about 10 sts apart.
R16: (5 sc, dec) x6 (36)
R17: (4 sc, dec) x6 (30)
R18: (3 sc, dec) x6 (24)
R19: (2 sc, dec) x6 (18)
R20: (sc, dec) x6 (12)
Stuff firmly
R21: dec x6 (6)
FO and close.
👀 Eye Whites (Make 2 – Cream)
R1: MR 6 (6)
R2: inc x6 (12)
FO.
Attach black pupils or embroider centers.
Sew onto face slightly wide apart for the cute surprised look in the photo.
👃 Nose (Dark Red – small bump)
R1: MR 6 (6)
R2: sc around (6)
FO.
Sew centered between eyes.
🦷 Teeth (Make 4 – Cream)
Each tooth:
Ch 2
3 sc in 2nd ch from hook
FO.
Sew evenly along the lower mouth line (photo shows four small triangle teeth).
Embroider curved smile with black yarn.
👂 Ears (Make 2 – Dark Red)
R1: MR 6 (6)
R2: (sc, inc) x3 (9)
R3: (2 sc, inc) x3 (12)
R4: sc around (12)
FO, flatten slightly and sew to sides of head below horns.
🦄 Horns (Make 2 – Cream)
Horns are thick, curved, and ridged in the photo (no wire required).
R1: MR 4 (4)
R2: (sc, inc) x2 (6)
R3–4: sc around (6)
R5: (2 sc, inc) x2 (8)
R6–8: sc around (8)
R9: (3 sc, inc) x2 (10)
R10–12: sc around (10)
Stuff lightly only at base. Do not overstuff.
Curve gently by shaping with fingers.
Sew on top of head angled outward.
⚠️ Wire is NOT required — shaping is achieved with stuffing and stitch tension.
🧍 Body (Dark Red)
R1: MR 6 (6)
R2: inc x6 (12)
R3: (sc, inc) x6 (18)
R4: (2 sc, inc) x6 (24)
R5: (3 sc, inc) x6 (30)
R6–12: sc around (30)
R13: (3 sc, dec) x6 (24)
R14: (2 sc, dec) x6 (18)
Stuff
R15: (sc, dec) x6 (12)
R16: dec x6 (6)
FO.
🤍 Belly Patch (Cream)
Oval shape like photo.
R1: MR 6 (6)
R2: inc x6 (12)
R3: (sc, inc) x6 (18)
R4: (2 sc, inc) x6 (24)
R5: (3 sc, inc) x6 (30)
FO.
Sew vertically to front of body.
💪 Arms (Make 2 – Dark Red)
R1: MR 6 (6)
R2: inc x6 (12)
R3–7: sc around (12)
R8: (2 sc, dec) x3 (9)
R9–11: sc around (9)
Stuff lightly.
FO.
🦵 Legs (Make 2 – Dark Red)
R1: MR 6 (6)
R2: inc x6 (12)
R3–7: sc around (12)
Stuff lightly.
FO.
🦇 Wings (Make 2 – Dark Red)
Each wing is folded bat-style with pointed tips.
Ch 9
Row 1: sc in 2nd ch, sc 7 (8)
Row 2: ch1, dec, sc 4, dec (6)
Row 3: ch1, dec, sc 2, dec (4)
Row 4: ch1, sc 4
FO.
Fold and lightly shape with fingers.
Sew behind arms, angled outward.
🐍 Tail (Dark Red)
R1: MR 6 (6)
R2–15: sc around (6)
Arrow tip:
Ch 6
Sl st back along chain
FO.
Sew to lower back of body.
🪡 Assembly
-
Sew head to body.
-
Attach belly patch.
-
Add eyes, nose, mouth, and teeth.
-
Sew ears and horns.
-
Attach arms and legs.
-
Sew wings to upper back.
-
Attach tail.
-
Shape wings and horns gently by hand.
🌟 Final Look & Tips
-
Keep stuffing firm but flexible for rounded shape.
-
Angle horns outward like in the photo.
-
Wings should sit slightly behind arms.
-
Belly patch should be tall oval shape.
-
Teeth should be evenly spaced (4 total).
🎉 Finished Demon
Your amigurumi demon is now complete — cute, mischievous, and full of personality! With his wide eyes, tiny horns, bat wings, and little tail, he’s more friendly than frightening and perfect for fantasy lovers of all ages.
Display him on your shelf, gift him to a spooky-cute fan, or make a whole demon family in different colors!
Happy crocheting! 🧶😈✨