Creating an amigurumi cat fridge magnet is like bringing a little bit of magic into our everyday spaces. These adorable crochet creations have a way of brightening up even the dullest of kitchen corners, adding a touch of whimsy and charm. The process itself is a delightful journey from a simple skein of yarn to a personality-filled feline friend. I find myself continually amazed at how a few stitches can transform yarn into something so endearing and personal. Plus, who doesn’t love having a cute, handcrafted guardian watching over the fridge?
With each stitch, I get to play creator in the most delightful way. The process usually starts with picking out the perfect yarn in just the right shades to capture a cat’s quirky essence. Then comes the rhythm of crocheting—hook in hand, creating loops and patterns that slowly morph into the familiar shapes of a cat’s head or paws. The real fun often lies in adding those final touches: a cheeky face, a swirly tail, and of course, the all-important magnet on the back. The end result is not just a fridge magnet; it’s a pocket-sized piece of art that adds a sprinkle of happiness to everyday life. 🐱✂️
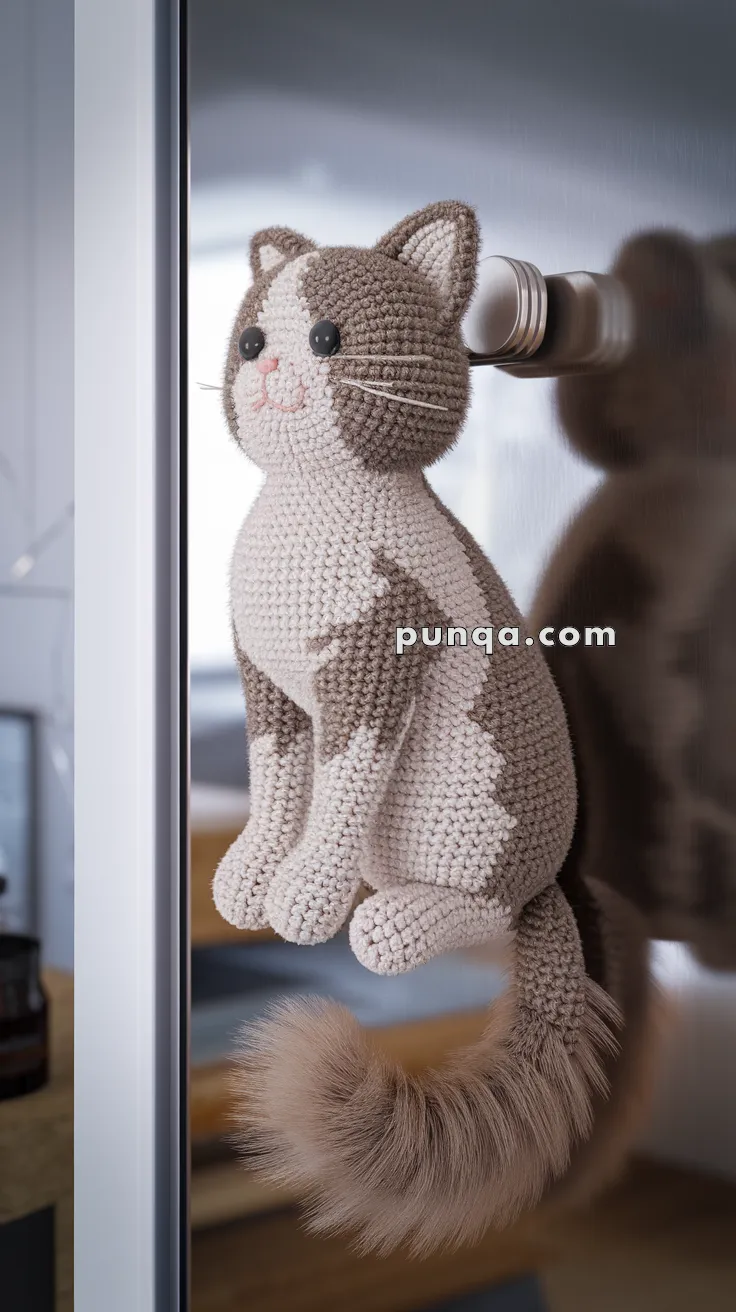
🐾 Amigurumi Cat Fridge Magnet Pattern
This cuddly and realistic amigurumi cat magnet is perfect for perching on your fridge or office whiteboard. With its sweet face, soft curves, and fluffy tail, this feline friend brings charm and coziness to any space.
✨ Skill Level
Intermediate
Includes shaping, color changes, assembly, and surface details
📏 Finished Size
Approx. 15–17 cm (6–6.7 inches) tall
🧶 Materials & Yarn Amount
- Cream / light beige yarn (main): 100 g
- Brown / taupe yarn (patches, ears): 40–50 g
- Pink yarn (nose): small amount
- Black embroidery thread (mouth): small amount
- White/clear thread (whiskers): small amount
Other:
- 2.5–3.0 mm hook
- 8–10 mm safety eyes
- Polyester stuffing (~120 g)
- 2–3 small flat magnets
- Yarn needle, stitch marker
- Faux fur or brushed yarn (tail): 15–20 g
🧵 Abbreviations (US Terms)
MR – magic ring
sc – single crochet
inc – increase
dec – invisible decrease
sl st – slip stitch
ch – chain
FO – fasten off
🐱 Head (Rounded, Proportional)
With cream:
Rnd 1: MR 6 (6)
Rnd 2: inc ×6 (12)
Rnd 3: (1 sc, inc) ×6 (18)
Rnd 4: (2 sc, inc) ×6 (24)
Rnd 5: (3 sc, inc) ×6 (30)
Rnd 6: (4 sc, inc) ×6 (36)
Rnd 7–12: sc around (36)
👉 Introduce brown patch gradually across one side of the face while maintaining stitch count
Insert safety eyes between Rnds 9–10, spaced 6–7 sts apart
Rnd 13: (4 sc, dec) ×6 (30)
Rnd 14: (3 sc, dec) ×6 (24)
Rnd 15: (2 sc, dec) ×6 (18)
Stuff firmly, shaping slightly flatter at the front
Rnd 16: (1 sc, dec) ×6 (12)
Rnd 17: dec ×6 (6)
FO and close
🐾 Body (Compact Sitting Shape)
With cream:
Rnd 1: MR 6 (6)
Rnd 2: inc ×6 (12)
Rnd 3: (1 sc, inc) ×6 (18)
Rnd 4: (2 sc, inc) ×6 (24)
Rnd 5: (3 sc, inc) ×6 (30)
Rnd 6–9: sc around (30)
👉 Add brown patch shaping across one side and lower body
Rnd 10: (3 sc, dec) ×6 (24)
Rnd 11: (2 sc, dec) ×6 (18)
Insert magnet at the back (keep placement centered)
Stuff firmly but keep the back slightly flatter
Rnd 12: (1 sc, dec) ×6 (12)
Rnd 13: dec ×6 (6)
FO and close
🐾 Front Legs (Long, Straight – Make 2)
With cream:
Rnd 1: MR 6 (6)
Rnd 2: (1 sc, inc) ×3 (9)
Rnd 3–11: sc around (9)
Lightly stuff lower half only
Flatten top slightly
FO
👉 Final count remains 9 sts throughout length
🐾 Back Legs (Rounded Base – Make 2)
With cream:
Rnd 1: MR 6 (6)
Rnd 2: inc ×6 (12)
Rnd 3: sc around (12)
Rnd 4: (1 sc, dec) ×4 (8)
Lightly stuff and flatten
FO
👉 Compact and rounded for seated posture
🐱 Ears (Triangular, Structured – Make 2)
With brown:
Rnd 1: MR 4 (4)
Rnd 2: (sc, inc) ×2 (6)
Rnd 3: (2 sc, inc) ×2 (8)
Rnd 4: sc around (8)
FO
Embroider inner ear detail with cream yarn
Flatten gently and sew high on head
🐱 Tail (Structured Base + Fluffy Tip)
Base (with brown or cream):
Ch 19
Row 1: sc in 2nd ch, sc across (18)
Row 2: ch 1, turn, sc across (18)
Lightly roll or fold to create thickness
Sew securely to lower back
Fluffy Tip:
Attach faux fur yarn at the end and work short strands or loops
Brush gently to create volume
👉 Tail should curve naturally downward
🐱 Face Details
- Embroider a small pink triangle nose
- Add a soft curved mouth with black thread
- Slightly shape cheeks by tightening stitches gently from inside
🐱 Whiskers
Using thin white or clear thread:
- Insert needle through muzzle and pull through
- Leave equal lengths on both sides
- Repeat 2–3 strands per side
Trim evenly
🧲 Magnet Placement
- Insert one flat magnet inside the back of the body
- Optional: add a second magnet behind the head
Secure with stitching or a small amount of glue
🧵 Assembly
- Sew head firmly to body with slight forward tilt
- Attach front legs vertically under chest
- Position back legs outward for seated balance
- Attach ears symmetrically
- Sew tail low at the back with a gentle curve
✨ Finishing Touches
- Smooth stuffing for even shape
- Adjust posture so the cat sits upright
- Shape tail and whiskers for natural flow
- Keep proportions balanced for a clean silhouette
💖 Final Thoughts
This design brings together soft shaping, subtle color transitions, and thoughtful proportions to create a calm and lifelike crochet cat. From the gentle facial expression to the fluffy tail and seated pose, every detail adds warmth and character—perfect for a charming handmade accent. 🐾🧶✨