Amigurumi Strawberry Shortcake Doll – FREE Crochet Pattern

Amigurumi Strawberry Shortcake Doll – FREE Crochet Pattern
Spread the love

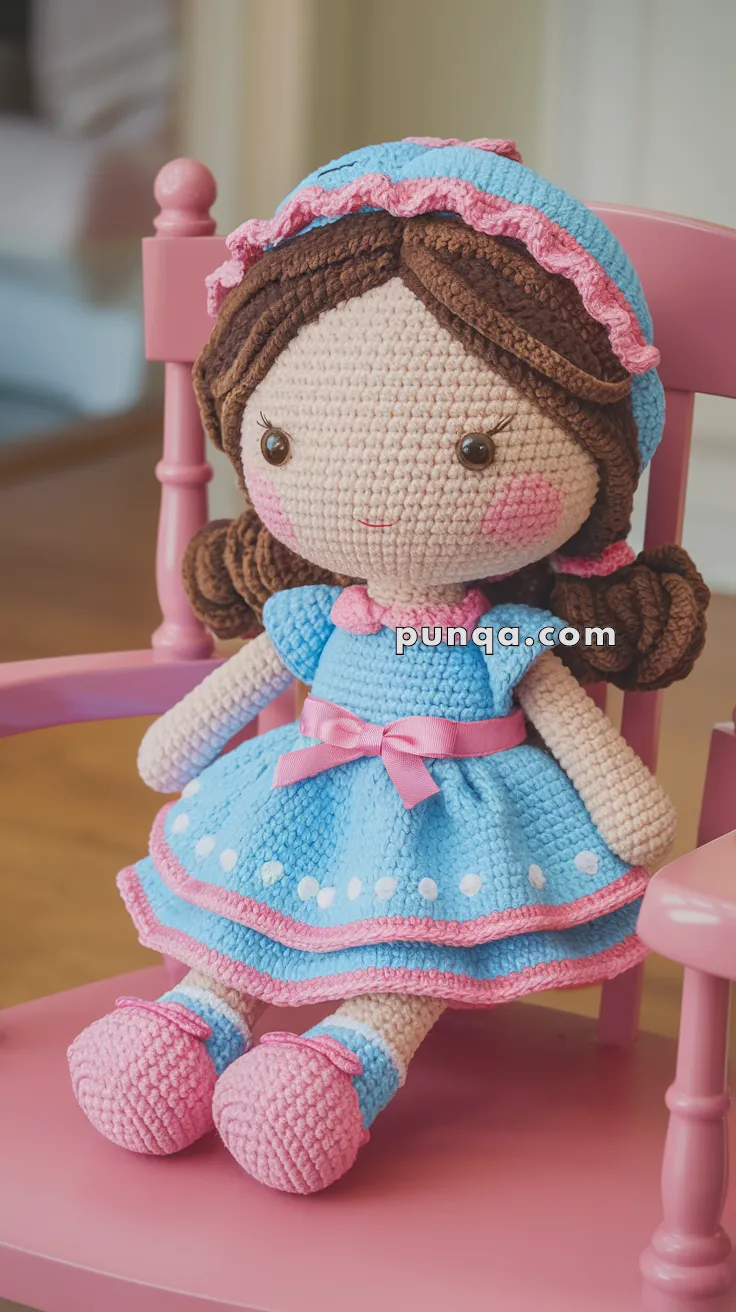
Step into a world of sweetness with this Amigurumi Strawberry Shortcake Doll crochet pattern! 🍓✨ With her signature hat, charming dress, and delightful details, this design brings the beloved character to life in yarn form. Whether you’re crafting for a nostalgic gift, a themed décor piece, or simply love character-inspired amigurumi, this FREE pattern is a fantastic addition to your collection.

Designed for intermediate crocheters, this pattern allows for customization in outfit details, facial features, and even tiny accessories like a miniature strawberry or a playful bow to enhance Strawberry Shortcake’s personality. Choose classic pinks and reds for an authentic look or experiment with pastel hues for a whimsical twist! Whether displayed alongside her berry-loving friends or gifted to a fellow crochet enthusiast, this amigurumi Strawberry Shortcake Doll is sure to bring smiles. Grab your hook, select your favorite yarn, and let’s bring this sweet character to life—one stitch at a time! 🧶✨

Realistic crochet image for Amigurumi Strawberry Shortcake Doll - FREE Crochet Pattern

Copyright & Pattern Usage Policy

🍓 Amigurumi Strawberry Shortcake Doll Crochet Pattern

This charming Strawberry Shortcake-inspired doll is designed with delicate textures, layered clothing, soft colors, and beautifully detailed styling. With her looped brown hair, layered blue-and-pink dress, double-ruffled bonnet, and sweet Mary-Jane shoes, she brings nostalgia and handmade warmth to any collection.


✨ Skill Level

Intermediate — Includes shaping, looped hair techniques, layered garments, and part assembly.


📏 Finished Size

30 cm (12 in) tall when using DK/worsted yarn with a 3.0–3.5 mm hook.


🧶 Materials

  • Light beige yarn — skin

  • Dark brown yarn — hair

  • Sky blue yarn — dress + bonnet

  • Pink yarn — skirt trim, sleeves, shoes, ruffles, bow

  • White yarn — dress dots, collar, socks

  • 10–12 mm safety eyes

  • Black embroidery thread — lashes & smile

  • Pink blush or fabric paint — cheeks

  • Ribbon (optional for waist)

  • Tapestry needle

  • 3.0–3.5 mm crochet hook

  • Polyfill stuffing


🪡 Abbreviations (US Terms)

MR — Magic Ring
sc — Single Crochet
inc — Increase
dec — Decrease
sl st — Slip Stitch
ch — Chain
hdc — Half Double Crochet
dc — Double Crochet
FO — Fasten Off


👧 Head

Light beige yarn.

  1. MR, 6 sc [6]

  2. inc ×6 [12]

  3. (1 sc, inc) ×6 [18]

  4. (2 sc, inc) ×6 [24]

  5. (3 sc, inc) ×6 [30]

  6. (4 sc, inc) ×6 [36]

  7. (5 sc, inc) ×6 [42]
    8–18. sc around [42]

  8. (5 sc, dec) ×6 [36]

  9. (4 sc, dec) ×6 [30]

  10. (3 sc, dec) ×6 [24]
    Insert safety eyes between rounds 12–13, approx. 7 stitches apart.

  11. (2 sc, dec) ×6 [18]

  12. (1 sc, dec) ×6 [12]

  13. dec ×6 [6]
    FO and close. Stuff firmly.

Add pink blush circles to the cheeks.


🧑‍🦰 Hair

1. Hair Cap

Dark brown yarn.

  1. MR, 6 sc [6]

  2. inc ×6 [12]

  3. (1 sc, inc) ×6 [18]

  4. (2 sc, inc) ×6 [24]

  5. (3 sc, inc) ×6 [30]

  6. (4 sc, inc) ×6 [36]

  7. (5 sc, inc) ×6 [42]
    8–15. sc around [42]
    FO with long tail. Sew securely to head.

2. Center Hair Part

With brown yarn:
Embroider a straight line from the forehead to the back center of the hair cap.

3. Side Hair Sections (Short Loops)

Make 30–40 loops per side.

Each loop:

  • ch 8–10

  • sl st to same stitch on cap

Work loops outward from the center part and down toward each ear area.
This creates the layered, textured sides seen in the photo.

4. Pigtail Coils (Make 2)

Dark brown yarn.

  1. ch 50–60

  2. Work into back bumps: sl st in each ch
    FO. Coil tightly into a rope spiral.
    Attach low on each side of the head, slightly behind the ear area.


👗 Body

Start with light beige.

  1. MR, 6 sc [6]

  2. inc ×6 [12]

  3. (1 sc, inc) ×6 [18]

  4. (2 sc, inc) ×6 [24]

  5. (3 sc, inc) ×6 [30]
    6–10. sc around [30]
    Switch to sky blue.
    11–20. sc around [30]

  6. (3 sc, dec) ×6 [24]

  7. (2 sc, dec) ×6 [18]

  8. (1 sc, dec) ×6 [12]

  9. dec ×6 [6]
    FO. Stuff and sew to head.


👚 Sleeves (Make 2)

Blue Puff Sleeve

  1. MR, 6 sc [6]

  2. inc ×6 [12]
    3–4. sc around [12]

Pink Ruffle Trim

Attach pink yarn.
Repeat around:

  • sl st, ch 2, hdc into same st, sl st into next st

FO and sew to the armhole area after arm attachment.


💪 Arms (Make 2)

Light beige yarn.

  1. MR, 6 sc [6]

  2. inc ×6 [12]
    3–18. sc around [12]

  3. (2 sc, dec) ×3 [9]
    FO. Stuff lightly, flatten top, and sew to the body at rounds 8–9, angled slightly forward and outward.


👟 Legs (Make 2)

Socks + Legs

Start with white.

  1. MR, 6 sc [6]

  2. inc ×6 [12]

  3. (1 sc, inc) ×6 [18]
    4–6. sc around [18]
    Switch to beige:
    7–20. sc around [18]
    FO, stuff, and attach.


🥿 Shoes (Pink Mary-Janes)

  1. MR, 6 sc [6]

  2. inc ×6 [12]

  3. (1 sc, inc) ×6 [18]

  4. BLO: sc around [18]
    5–7. sc around [18]

  5. (1 sc, dec) ×6 [12]

  6. dec ×6 [6]
    FO and sew to legs.

Shoe Bow (Make 2)

Pink yarn.

  • ch 6

  • sl st into first ch to form a ring

  • Wrap yarn center 3–4 times to form a bow
    Sew to the top of each shoe.


👗 Triple-Layer Dress Skirt

Layer 1: Bottom Blue Skirt

Attach blue to BLO of body round 9.

  1. sc around [24]

  2. (1 sc, inc) ×12 → 36

  3. (5 sc, inc) ×6 → 42

  4. (6 sc, inc) ×6 → 48
    5–6. hdc around [48]
    FO.

Layer 2: Middle Pink Ruffle

Attach pink to FLO of body round 10.
Repeat around:
sl st, ch 2, 2 dc in next st, ch 2, sl st in next 2 st

Creates soft scalloped ruffle.

Layer 3: Top Blue Skirt (with white dots)

Attach blue to round 11.

  1. sc around [24]

  2. (1 sc, inc) ×12 → 36

  3. (5 sc, inc) ×6 → 42
    4–5. hdc around [42]

Pink Hem:
R6: Attach pink, hdc around
FO.

White Dots

Using white yarn:

  • embroider small round dots
    OR

  • crochet tiny circles (MR, 5 sc) and sew on.


🎀 Collar

Pink yarn.
Attach at neckline:
(sl st, ch 2, sl st in next stitch) repeat around.
Creates the raised edge seen in the photo.


👒 Bonnet with Double Ruffle

Blue Base

  1. MR, 6 sc

  2. inc ×6 → 12

  3. (1 sc, inc) ×6 → 18

  4. (2 sc, inc) ×6 → 24

  5. (3 sc, inc) ×6 → 30

  6. (4 sc, inc) ×6 → 36

  7. (5 sc, inc) ×6 → 42

  8. (6 sc, inc) ×6 → 48
    9–12. sc around [48]

Inner Pink Ruffle

Attach pink.
Repeat around:
sl st, ch 2, 2 hdc in next stitch, sl st

Outer Pink Ruffle

Attach pink again to the front of previous round.
Repeat around:
sl st, ch 3, 3 dc in next stitch, ch 1, sl st

Bonnet Ties (Make 2)

Pink yarn.
ch 40–50
Attach one tie to each lower side of the bonnet.

Place bonnet so it sits back on the head, exposing the forehead and hairline.


✂️ Finishing Touches

  • Embroider lashes along upper lash line.

  • Stitch a small curved pink smile.

  • Add blush to cheeks.

  • Tie a pink ribbon around the waist if desired.

  • Weave in all ends neatly.


💖 Final Notes

Your handmade Strawberry Shortcake-style doll is now complete — a soft, nostalgic, beautifully textured keepsake full of personality and charm. With her layered skirt, sweet looped hair, double-ruffled bonnet, and precious shoes, she makes a thoughtful gift or a delightful centerpiece for any handmade collection.

Display her proudly, gift her with love, or let her brighten up a child’s room with her gentle, timeless sweetness. Happy crocheting! 🍓💗


Spread the love

Comments

No comments yet. Why don’t you start the discussion?

Leave a Reply

Your email address will not be published. Required fields are marked *