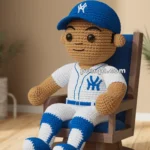
Step up to the plate with the Amigurumi Baseball Ball Doll, a crochet project that’s as sporty as it is adorable! ⚾🧶 This round little cutie is designed with a baseball-stitched torso, soft blue sleeves, perfectly matched blue shoes, and a classic curved cap featuring a white and red emblem. With his playful details and cheerful design, he’s the perfect handmade companion for baseball fans of all ages.
Whether displayed on a shelf, gifted to a sports enthusiast, or added to your collection of whimsical amigurumi creations, this doll is sure to bring smiles and team spirit wherever he goes. Fun to make and delightful to show off, the Amigurumi Baseball Ball Doll is a joyful way to crochet personality, playfulness, and a sprinkle of handmade magic—one loop at a time! 🧵✨⚾

⚾ Amigurumi Baseball Ball Doll – Crochet Pattern
Bring the charm of the ballpark into your crochet collection with this adorable Baseball Player Ball Doll! This round little cutie features a baseball-stitched torso, soft blue sleeves, perfectly matched blue shoes, and a classic curved baseball cap with a white/red emblem. Whether you’re creating a gift for a sports fan or a keepsake for kids, this doll is a total home run.
✨ Skill Level
Intermediate — includes color changes, shaping, and surface embroidery.
📏 Finished Size
Approximately 9 in (23 cm) using DK yarn and a 2.75 mm hook.
🧶 Materials
DK Weight Yarn
-
Tan – head, hands
-
White – torso front, leg fronts, hat emblem
-
Blue – sleeves, shoes, cap
-
Red – baseball seam embroidery, emblem letter
-
Black – optional nose dot or mouth embroidery
Other Supplies
-
2.75 mm crochet hook
-
10–12 mm safety eyes
-
Fiberfill stuffing
-
Yarn needle
-
Stitch marker
🔁 Abbreviations (US Terms)
MR – Magic Ring
sc – Single Crochet
inc – Increase (2 sc in same st)
dec – Decrease (sc2tog)
sl st – Slip Stitch
BLO – Back Loop Only
FO – Fasten Off
🧑 Head (Tan)
The head in the photo is round and proportionally large. Follow these rounds:
R1: MR, 6 sc
R2: inc ×6 (12)
R3: (1 sc, inc) ×6 (18)
R4: (2 sc, inc) ×6 (24)
R5: (3 sc, inc) ×6 (30)
R6: (4 sc, inc) ×6 (36)
R7: (5 sc, inc) ×6 (42)
R8–17: sc around (42) → tall, smooth shape
Insert eyes: Between Rounds 10–11, approx. 7–8 sts apart
R18: (5 sc, dec) ×6 (36)
R19: (4 sc, dec) ×6 (30)
R20: (3 sc, dec) ×6 (24)
R21: (2 sc, dec) ×6 (18)
Stuff firmly.
R22: (1 sc, dec) ×6 (12)
R23: dec ×6 (6) → close and FO.
🧢 Baseball Cap (Blue)
The cap in the image has:
✔ a deep curved brim
✔ a slightly low-sitting front
✔ a white patch with a red “C”
Cap Dome
R1: MR, 6 sc
R2: inc ×6 (12)
R3: (1 sc, inc) ×6 (18)
R4: (2 sc, inc) ×6 (24)
R5: (3 sc, inc) ×6 (30)
R6: (4 sc, inc) ×6 (36)
R7: (5 sc, inc) ×6 (42)
R8–12: sc around (42)
R13: BLO – sc around (42) (creates the inner fold that makes the cap sit naturally)
R14–15: sc around (42)
Do not close. FO, leaving a sewing tail.
Cap Brim (Blue)
Worked flat:
Join yarn to the BLO ridge at center front.
Row 1: sc 14 across, ch 1, turn
Row 2: dec, 10 sc, dec (12)
Row 3: dec, 8 sc, dec (10)
Row 4: sc across (10)
FO.
Sl st around the brim for clean shaping.
Cap Emblem Patch (White)
R1: MR, 6 sc
R2: (1 sc, inc) ×3 (9)
FO and shape into a slightly irregular circle — just like the photo.
Embroider a red “C” onto the patch.
Sew patch to the center front of the cap, slightly tilted upward.
Sew the cap onto the head, allowing the brim to angle downward.
🧍 Body (White Baseball Torso)
The body is a perfect sphere with vertical seam embroidery, not oval or tall.
R1: MR, 6 sc
R2: inc ×6 (12)
R3: (1 sc, inc) ×6 (18)
R4: (2 sc, inc) ×6 (24)
R5: (3 sc, inc) ×6 (30)
R6: (4 sc, inc) ×6 (36)
R7–16: sc around (36) → this creates the smooth round “baseball” shape
R17: (4 sc, dec) ×6 (30)
R18: (3 sc, dec) ×6 (24)
R19: (2 sc, dec) ×6 (18)
Stuff very firmly.
R20: (1 sc, dec) ×6 (12)
R21: dec ×6 (6)
FO.
Red Baseball Stitching (Surface Embroidery)
Using red yarn:
Work two mirrored arcs down each side of the torso, using V-shaped “baseball stitch” patterns — exactly as in the photo.
Spacing: approx. 0.5 cm between Vs.
👕 Arms (Make 2)
Arms match the doll exactly: tan hands, blue sleeves, no cuffs.
Hand (Tan)
R1: MR, 6 sc
R2: inc ×6 (12)
R3: (3 sc, dec) ×3 (9)
R4: sc around (9)
Sleeve (Blue)
R5–11: sc around (9)
FO, stuff lightly (not firm).
Flatten top and sew shut (4–5 sc width).
Sew to upper sides of the body.
👟 Legs (Make 2)
The legs are two-tone, with white front circles and blue backing, matching the baseball shoe detail.
Foot Front (White)
R1: MR, 6 sc
R2: inc ×6 (12)
R3: (1 sc, inc) ×6 (18)
FO.
Foot Back + Leg (Blue)
R1: MR, 6 sc
R2: inc ×6 (12)
R3: (1 sc, inc) ×6 (18)
R4–6: sc around (18)
Switch to tan for leg → BUT photo shows fully blue legs, so stay in blue.
R7–12: sc around (18)
R13: (1 sc, dec) ×6 (12)
Stuff firmly.
Flatten opening, sc across to close.
Sew white circle neatly onto the front of each foot — the foot discs MUST sit centered.
Attach both legs low on the body so the doll sits naturally like in the photo.
🧵 Assembly
-
Sew the head securely to the spherical torso.
-
Attach arms evenly at the shoulder line.
-
Sew legs to the bottom front so the doll sits upright.
-
Stitch the cap so the brim curves over the forehead.
-
Add optional tiny eyebrow embroidery: two small slanted stitches.
🎉 Your Baseball Buddy Is Ready!
This adorable Baseball Player Ball Doll brings the spirit of the game into your crochet world with perfectly stitched details and a classic sporty look. It makes a fantastic handmade gift for baseball lovers, kids, and team celebrations — or a charming display piece for your shelf.
Let the creative innings begin! ⚾💙