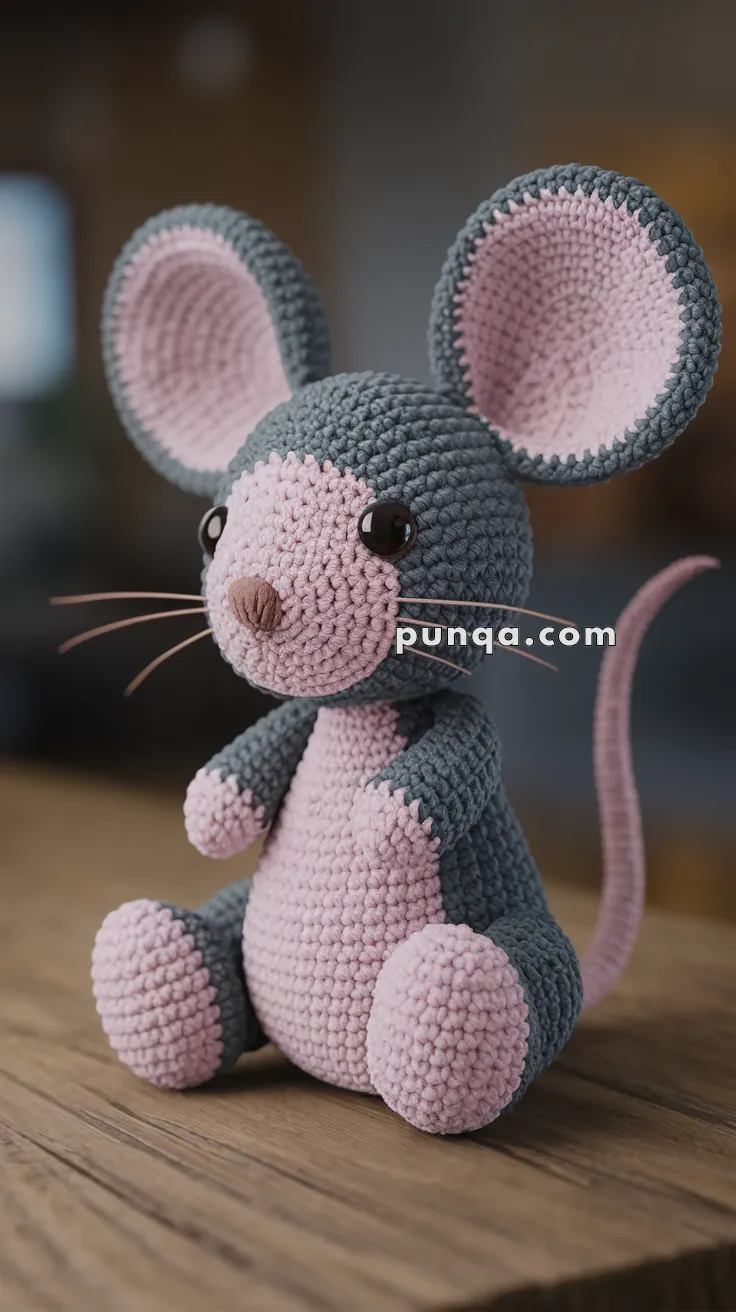
Say cheese for the Amigurumi Mouse With Big Ears, a tiny crochet cutie that’s bursting with charm and character! 🐭🧶 With oversized ears, a sweet stitched smile, and a playful little tail, this mouse is ready to scurry into your heart. Whether you’re crafting a whimsical toy, a desk buddy, or a storybook-inspired gift, this pint-sized pal brings joy and personality to every stitch.
Perfect for crocheters who love expressive features and quick, lovable projects, this pattern invites you to customize your mouse with fun colors, accessories like a bow or scarf, or even a tiny wedge of cheese. Make one or stitch up a whole family—each with its own flair! The Mouse With Big Ears is a delightful way to stitch up smiles, one adorable loop at a time. 🧵💕
🐭 Crochet Mouse with Big Ears Amigurumi Pattern
This sweet, chubby-cheeked mouse with oversized ears and a round pink belly is the perfect handmade companion. With its shiny eyes, long pink tail, and cuddly body, this mouse makes a wonderful gift, nursery decoration, or collectible piece for your amigurumi collection.
✨ Skill Level
Intermediate
Techniques included:
- shaping
- layered construction
- oval crochet
- sculpted assembly
- embroidery
- color transitions
📏 Finished Size
Approx. 24–26 cm (9.5–10 inches) tall seated
Using velvet chenille or plush DK yarn with a 3 mm hook.
🧶 Yarn Requirements
Slate Gray
Approx. 95 g
Used for:
- head
- body
- outer ears
- limbs
Soft Blush Pink
Approx. 65 g
Used for:
- muzzle
- belly
- paws
- inner ears
- tail
Taupe Brown
Small amount for nose
Dark Brown or Black
Small amount for whiskers and mouth
🧵 Supplies
- 3 mm crochet hook
- 12 mm safety eyes
- Polyester stuffing
- Yarn needle
- Stitch markers
- Thin nylon filament or embroidery thread for whiskers
🔤 Abbreviations (US Terms)
- MR – magic ring
- sc – single crochet
- inc – increase
- dec – invisible decrease
- sl st – slip stitch
- ch – chain
- FO – fasten off
🐭 Head
The head is large, smooth, and almost perfectly spherical with softly rounded cheeks.
Gray Yarn
R1: MR 6 (6)
R2: inc x6 (12)
R3: (sc, inc) x6 (18)
R4: (2 sc, inc) x6 (24)
R5: (3 sc, inc) x6 (30)
R6: (4 sc, inc) x6 (36)
R7: (5 sc, inc) x6 (42)
R8: (6 sc, inc) x6 (48)
R9: (7 sc, inc) x6 (54)
R10–R20: sc around (54)
Insert safety eyes between R14–15 with 8 stitches between them.
R21: (7 sc, dec) x6 (48)
R22: (6 sc, dec) x6 (42)
R23: (5 sc, dec) x6 (36)
Stuff very firmly and shape into a smooth sphere.
R24: (4 sc, dec) x6 (30)
R25: (3 sc, dec) x6 (24)
R26: (2 sc, dec) x6 (18)
R27: (sc, dec) x6 (12)
R28: dec x6 (6)
FO and close tightly.
🐽 Rounded Muzzle
The muzzle is large, protruding, and softly oval rather than flat.
Pink Yarn
R1: ch 7
Work around chain.
R2: inc in first st, 4 sc, 4 sc in final st, continue opposite side with 4 sc, inc (16)
R3: inc x2, 4 sc, inc x4, 4 sc, inc x2 (24)
R4: (3 sc, inc) repeat around (30)
R5–R8: sc around (30)
Stuff lightly.
FO leaving long tail.
Sew centered beneath eyes.
The muzzle should protrude noticeably from the face.
👃 Nose
Taupe Yarn
R1: MR 6
R2: sc around
FO.
Shape into a tiny oval triangle and sew to muzzle center.
Embroider a short vertical mouth line beneath nose.
✨ Whiskers
Using nylon thread or embroidery floss:
- insert 3 whiskers on each side
- angle slightly upward
- trim evenly
👂 Oversized Ears (Make 2)
The ears are extremely oversized, deeply curved, and cup forward.
Inner Ear (Pink)
R1: MR 6
R2: inc x6 (12)
R3: (sc, inc) x6 (18)
R4: (2 sc, inc) x6 (24)
R5: (3 sc, inc) x6 (30)
R6: (4 sc, inc) x6 (36)
R7: (5 sc, inc) x6 (42)
R8: (6 sc, inc) x6 (48)
FO.
Outer Ear (Gray)
Repeat R1–R8.
Do not FO on second piece.
Place pink circle on gray circle.
Sc through both layers around edge.
Leave lower edge open.
Pinch base deeply before sewing to create the strong cupped shape.
Attach high on head and angle outward slightly.
🩷 Body
The body is pear-shaped with a rounded lower half and slimmer upper torso.
Gray Yarn
R1: MR 6
R2: inc x6 (12)
R3: (sc, inc) x6 (18)
R4: (2 sc, inc) x6 (24)
R5: (3 sc, inc) x6 (30)
R6: (4 sc, inc) x6 (36)
R7: (5 sc, inc) x6 (42)
R8–R22: sc around (42)
R23: (5 sc, dec) x6 (36)
R24: (4 sc, dec) x6 (30)
Stuff firmly, especially at lower body for seated balance.
R25: (3 sc, dec) x6 (24)
R26: (2 sc, dec) x6 (18)
FO leaving long tail.
🩷 Belly Patch
The belly is tall, soft, and rounded with a gentle taper toward the neck.
Pink Yarn
R1: ch 8
Work around chain.
R2: inc, 5 sc, 4 sc in final chain, 5 sc opposite side, inc (18)
R3: inc x2, 5 sc, inc x4, 5 sc, inc x2 (26)
R4: sc around increasing evenly to 32
R5–R10: sc around
FO.
Flatten gently and sew centered to body.
💪 Arms (Make 2)
The arms are slim, short, and positioned low beside the belly.
Start with Pink
R1: MR 6
R2: inc x6 (12)
R3–R5: sc around
Switch to Gray.
R6–R14: sc around (12)
Stuff lightly only near shoulder.
Flatten top.
FO.
🦵 Legs (Make 2)
The feet are large and rounded with chunky plush proportions.
Pink Foot
R1: MR 6
R2: inc x6 (12)
R3: (sc, inc) x6 (18)
R4: (2 sc, inc) x6 (24)
R5: (3 sc, inc) x6 (30)
R6–R8: sc around (30)
Switch to Gray.
R9–R15: sc around (30)
R16: (3 sc, dec) x6 (24)
Stuff very firmly.
FO leaving long tail.
Attach low and wide for seated pose.
🐁 Tail
The tail is long, slim, and slightly curved upward.
Pink Yarn
R1: MR 5
R2–R45: sc around (5)
Do not stuff.
FO.
Shape gently while sewing to back.
🪡 Assembly
Step 1
Sew muzzle to lower face.
Step 2
Attach nose and whiskers.
Step 3
Sew ears high on head and pinch bases deeply.
Step 4
Attach head securely to body.
Step 5
Attach arms low beside belly.
Step 6
Attach large feet angled slightly outward.
Step 7
Sew tail to lower back.
✨ Finishing Details
- Shape ears into deep forward cups
- Keep feet heavily stuffed
- Position eyes low near muzzle
- Curve whiskers outward naturally
- Steam lightly if needed for shaping
- Brush plush yarn gently for velvet texture
💕 Final Thoughts
This oversized-eared mouse combines plush toy charm with elegant modern amigurumi styling. The huge cupped ears, rounded muzzle, chunky feet, soft pink tummy, and delicate whiskers create an irresistibly cuddly little companion perfect for woodland décor, nursery shelves, handmade gifts, or cozy crochet collections. 🐭✨



I love your patterns!