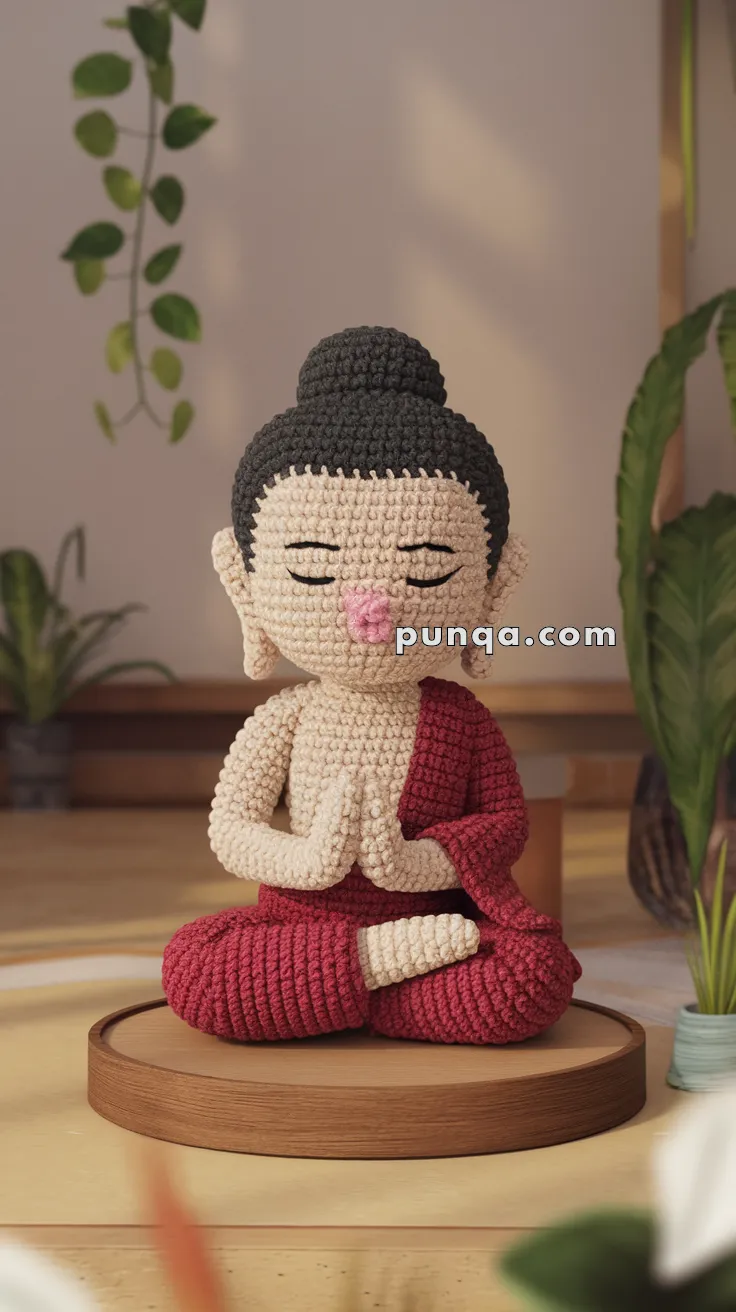
Bring a sense of serenity to your stitches with the Amigurumi Meditating Buddha, a peaceful crochet creation that radiates calm and mindfulness. 🧘🧶 Featuring a gentle facial expression, closed eyes, a cross-legged lotus pose, and a beautifully draped robe, this soft sculpture is perfect for adding a touch of tranquility to your meditation corner, yoga space, or as a heartfelt handmade gift for someone on a spiritual journey.
Ideal for crocheters who enjoy meaningful projects and soothing details, this pattern invites you to slow down and stitch with intention. Choose calming colors, add subtle embellishments, or pair it with other zen-inspired designs to create a harmonious display. The Amigurumi Meditating Buddha is a joyful way to stitch up balance, beauty, and a sprinkle of handmade mindfulness—one loop at a time. 🧵🌿✨
🧘 Amigurumi Meditating Buddha Crochet Pattern
Bring peace and mindfulness into your home with this serene Amigurumi Meditating Buddha. Featuring a calm facial expression, closed eyes, a cross-legged lotus pose, and a beautifully draped robe, this piece radiates balance and tranquility — perfect for a meditation corner, yoga space, or thoughtful handmade gift.
✨ Skill Level
Intermediate
You should be comfortable with:
-
Amigurumi shaping
-
Sewing multiple parts
-
Color changes
-
Embroidery details
📏 Finished Size
Approx. 16–18 cm (6–7 inches) tall
(using DK or worsted yarn and a 2.5–3.0 mm hook)
Proportions:
-
Large rounded head
-
Compact torso
-
Crossed seated legs
-
Visible top bun on crown
🧶 Materials
Yarn (DK / Worsted):
-
Cream / beige – skin
-
Deep red / burgundy – robe
-
Black or dark gray – hair & bun
-
Pink – nose/lips embroidery
Tools & Supplies:
-
2.5–3.0 mm crochet hook
-
Fiberfill stuffing
-
Tapestry needle
-
Stitch marker
-
Scissors
-
Optional: blush or pink thread for cheeks
-
Optional: wooden base for display
🔤 Abbreviations (US Terms)
MR – Magic Ring
sc – Single Crochet
inc – Increase (2 sc in one stitch)
dec – Invisible Decrease
ch – Chain
sl st – Slip Stitch
FO – Fasten Off
( ) – stitch count
🪷 Pattern Instructions
🙂 Head (Skin Color)
R1: MR 6 (6)
R2: inc ×6 (12)
R3: (sc, inc) ×6 (18)
R4: (2 sc, inc) ×6 (24)
R5: (3 sc, inc) ×6 (30)
R6: (4 sc, inc) ×6 (36)
R7: (5 sc, inc) ×6 (42)
R8–R14: sc around (42)
R15: (5 sc, dec) ×6 (36)
R16: (4 sc, dec) ×6 (30)
R17: (3 sc, dec) ×6 (24)
R18: (2 sc, dec) ×6 (18)
Stuff firmly.
R19: (sc, dec) ×6 (12)
R20: dec ×6 (6)
FO and close.
😌 Face Embroidery
-
Embroider closed curved eyes with black thread
-
Add thin curved eyebrows
-
Stitch a small pink nose/lip oval at center
-
Lightly blush cheeks
Expression should be calm and peaceful 🌸
🖤 Hair Cap (covers front & back)
R1: MR 6 (6)
R2: inc ×6 (12)
R3: (sc, inc) ×6 (18)
R4: (2 sc, inc) ×6 (24)
R5: (3 sc, inc) ×6 (30)
R6: (4 sc, inc) ×6 (36)
R7: (5 sc, inc) ×6 (42)
R8–R11: sc around (42)
R12: (5 sc, dec) ×6 (36)
R13: (4 sc, dec) ×6 (30)
R14: (3 sc, dec) ×6 (24)
FO leaving long tail.
Fit over head so it frames the forehead and fully covers the back of head.
🟤 Top Bun (Make 1)
R1: MR 6 (6)
R2: inc ×6 (12)
R3: (sc, inc) ×6 (18)
R4: (2 sc, inc) ×6 (24)
R5–R6: sc around (24)
Lightly stuff.
FO and sew to the top center of hair cap so it is visible from front and back.
👂 Ears (Make 2)
R1: MR 6 (6)
R2: inc ×6 (12)
R3–R4: sc around (12)
Flatten slightly.
FO and sew at eye level on each side.
🧍 Body (Torso Base – Skin)
R1: MR 6 (6)
R2: inc ×6 (12)
R3: (sc, inc) ×6 (18)
R4: (2 sc, inc) ×6 (24)
R5: (3 sc, inc) ×6 (30)
R6: (4 sc, inc) ×6 (36)
R7–R10: sc around (36)
Switch to robe color.
R11: (5 sc, dec) ×6 (30)
R12: (3 sc, dec) ×6 (24)
Stuff lightly.
🦵 Legs (Make 2 – Robe Color)
R1: MR 6 (6)
R2: inc ×6 (12)
R3: (sc, inc) ×6 (18)
R4–R7: sc around (18)
Lightly stuff.
Flatten tops.
Sew legs crossed at ankles to form lotus position and attach to body.
💪 Arms (Make 2 – Skin)
R1: MR 6 (6)
R2: (sc, inc) ×3 (9)
R3–R8: sc around (9)
Stuff lightly.
Flatten hand end.
Optional: stitch small finger lines with thread.
FO and sew arms so palms touch in prayer position 🙏
🧣 Robe Wrap (Burgundy)
Ch 16
Row 1–12: sc across, turn
Row 13–18: increase 1 stitch at each side every 2 rows
FO.
Drape from left shoulder across chest and over lap.
Sew lightly to body so folds look natural.
🪡 Assembly Order
1️⃣ Attach hair cap and bun
2️⃣ Sew ears
3️⃣ Attach head to body
4️⃣ Attach crossed legs
5️⃣ Attach arms in prayer pose
6️⃣ Drape and sew robe
7️⃣ Weave in all ends
🌿 Finishing Touches
-
Shape face gently with fingers
-
Adjust robe folds
-
Add blush to cheeks
-
Place on wooden base if desired
-
Surround with plants or candles for calm display 🕯️🌱
🕊️ Final Thoughts
This Meditating Buddha amigurumi is a symbol of peace and balance. With its rounded bun, serene face, prayer hands, and lotus pose, it captures the gentle harmony seen in the photo while remaining simple and elegant to crochet.
Whether made for yourself or as a gift, this doll brings a quiet moment of mindfulness into every stitch. 💛🧘♀️