Carry a touch of childhood nostalgia wherever you go with this Amigurumi Winnie the Pooh Backpack crochet pattern! Inspired by the lovable bear from the Hundred Acre Wood, this charming backpack captures Pooh’s signature round shape, cheerful expression, and cozy warmth in every stitch. With its soft golden hues, adorable ears, and playful details, this crochet backpack is perfect for adding a whimsical touch to your accessories. Whether you’re crafting for Disney fans, creating a fun and functional bag, or simply enjoy making character-inspired amigurumi designs, this pattern lets you stitch up a delightful Winnie the Pooh backpack bursting with personality! 🍯🐻✨
Designed for customization, this pattern allows you to experiment with different shades of yellow and red, embroidered details, or even tiny accessories like a miniature honey pot or bee for extra charm. Craft a classic Pooh backpack with his signature look, create a pastel version for a dreamy aesthetic, or even stitch up a full set of Disney-inspired amigurumi bags for a magical collection! Whether gifted as a cherished keepsake, displayed as a playful accent, or made simply for the joy of crafting, this Amigurumi Winnie the Pooh Backpack is a fun and creative project—perfect for bringing a touch of handmade enchantment to every stitch! 🧶💖
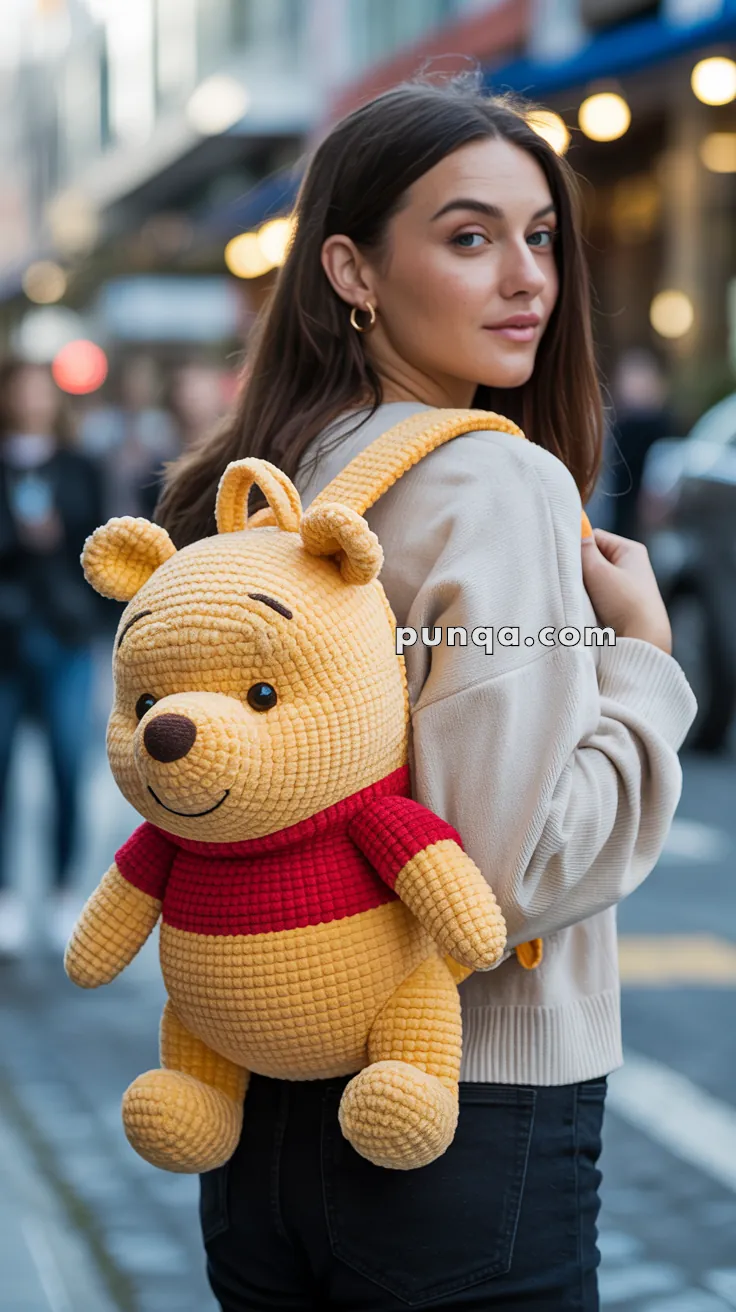
🎒 Amigurumi Winnie the Pooh Backpack Crochet Pattern
Carry your essentials with a hug! This adorable Winnie the Pooh backpack is not just an accessory, it’s a huggable friend! Featuring detailed ears, plump limbs, a red shirt, and secure backpack straps, this pattern is designed for real-life use with functional space and a secure closure. Perfect for kids or grown-up fans of this lovable bear! 🧸🍯
✨ Skill Level
Intermediate
Techniques included:
- Amigurumi shaping
- Color changes
- Backpack construction
- Plush limb shaping
- Zipper installation
- Facial embroidery
- Strap construction
📏 Finished Size
Approximately:
- 16–18 inches (40–45 cm) tall
- Plush oversized backpack shape
Using super bulky chenille or velvet yarn with a 5–6.5 mm hook.
🧶 Materials
Yarn Colors
- Golden yellow
- Bright red
- Dark brown
- Black embroidery thread
Supplies
- 5–6.5 mm crochet hook
- 18–22 mm safety eyes
- Polyester stuffing
- 30–35 cm zipper
- Tapestry needle
- Stitch markers
- Optional fabric lining
🧵 Required Yarn Amounts
- Golden yellow: 520–620 g
- Bright red: 160–190 g
- Dark brown: 20 g
- Black embroidery thread: small amount
- Polyester stuffing: 400–500 g
🔤 Abbreviations
- MR – Magic Ring
- sc – Single Crochet
- inc – Increase
- dec – Invisible Decrease
- sl st – Slip Stitch
- ch – Chain
- BLO – Back Loop Only
- FO – Fasten Off
🐻 Head
Using golden yellow yarn.
Round 1
6 sc in MR (6)
Round 2
inc around (12)
Round 3
(1 sc, inc) ×6 (18)
Round 4
(2 sc, inc) ×6 (24)
Round 5
(3 sc, inc) ×6 (30)
Round 6
(4 sc, inc) ×6 (36)
Round 7
(5 sc, inc) ×6 (42)
Round 8
(6 sc, inc) ×6 (48)
Round 9
(7 sc, inc) ×6 (54)
Round 10
(8 sc, inc) ×6 (60)
Rounds 11–23
sc around (60)
Insert eyes between Rounds 16–17 with 13 stitches between them.
The head should remain very round and oversized.
Round 24
(8 sc, dec) ×6 (54)
Round 25
(7 sc, dec) ×6 (48)
Stuff firmly.
Round 26
(6 sc, dec) ×6 (42)
───────────────
🟡 Neck Transition
Round 27
(5 sc, dec) ×6 (36)
Rounds 28–29
sc around (36)
The neck should stay short and thick so the head blends smoothly into the upper body.
───────────────
👕 Upper Body & Red Shirt
Switch to bright red yarn.
Round 30
(5 sc, inc) ×6 (42)
Rounds 31–38
sc around (42)
The shirt should sit high and look cropped.
The red section must remain shorter than the yellow belly underneath.
───────────────
🍯 Rounded Lower Belly
Switch back to golden yellow yarn.
Round 39
(6 sc, inc) ×6 (48)
Rounds 40–51
sc around (48)
This section creates the large plush tummy.
Stuff firmly and shape the belly outward with your hands while filling.
The belly should appear fuller and rounder than the upper torso.
Round 52
(6 sc, dec) ×6 (42)
Round 53
(5 sc, dec) ×6 (36)
Round 54
(4 sc, dec) ×6 (30)
Round 55
(3 sc, dec) ×6 (24)
Do not fully close if adding backpack compartment.
FO.
───────────────
🎒 Backpack Opening
Create a vertical opening centered on the back panel.
Using yellow yarn:
work one neat edging round around the opening.
Sew zipper securely inside.
Optional:
add fabric lining for cleaner interior finish.
The zipper should remain mostly hidden while worn.
───────────────
👂 Ears (Make 2)
Using golden yellow yarn.
Round 1
6 sc in MR
Round 2
inc around (12)
Round 3
(1 sc, inc) ×6 (18)
Rounds 4–5
sc around (18)
Round 6
(1 sc, dec) ×6 (12)
Flatten lightly.
Do not overstuff.
Curve slightly inward before attaching.
Attach high on head.
───────────────
🐻 Snout
Using golden yellow yarn.
Round 1
6 sc in MR
Round 2
inc around (12)
Round 3
(1 sc, inc) ×6 (18)
Round 4
(2 sc, inc) ×6 (24)
Rounds 5–6
sc around (24)
Stuff lightly.
Sew low on face centered beneath eyes.
The snout should protrude softly outward.
───────────────
🟤 Nose
Using dark brown yarn.
Round 1
6 sc in MR
Round 2
inc around (12)
Round 3
sc around (12)
Stuff lightly.
Flatten slightly into oval shape.
Sew onto upper snout.
───────────────
😊 Facial Details
Using dark brown or black yarn:
- Embroider curved eyebrows
- Embroider soft smiling mouth
- Add tiny vertical mouth line beneath nose
Keep expression gentle and friendly.
───────────────
💪 Arms With Sleeves (Make 2)
The red shirt sleeves must continue onto the upper arms.
Hand & Lower Arm
Using golden yellow yarn.
Round 1
6 sc in MR
Round 2
inc around (12)
Round 3
(1 sc, inc) ×6 (18)
Rounds 4–10
sc around (18)
Red Sleeve Section
Switch to bright red yarn.
Rounds 11–17
sc around (18)
Upper Arm Taper
Round 18
(1 sc, dec) ×6 (12)
Rounds 19–20
sc around (12)
Stuff lightly.
Flatten top edge.
FO leaving long tail.
The yellow should only form the lower forearm and paw area, while the upper arm clearly appears covered by the red shirt sleeve.
───────────────
🦵 Legs (Make 2)
Using golden yellow yarn.
Round 1
6 sc in MR
Round 2
inc around (12)
Round 3
(1 sc, inc) ×6 (18)
Round 4
(2 sc, inc) ×6 (24)
Rounds 5–9
sc around (24)
Round 10
(2 sc, dec) ×6 (18)
Rounds 11–16
sc around (18)
Stuff firmly.
Flatten tops slightly.
The legs should look chunky, rounded, and slightly dangling.
───────────────
🎒 Backpack Straps (Make 2)
Using golden yellow yarn.
Foundation
Ch 85–95 depending on desired length.
Row 1
sc across
Rows 2–5
ch 1, turn, sc across
FO.
The straps should look thick, soft, and plush.
Sew securely into upper and lower back.
───────────────
🪡 Assembly
🧵 Sew ears high on head
🧵 Attach snout beneath eyes
🧵 Sew nose onto snout
🧵 Attach arms beside shirt area
🧵 Attach legs low on belly
🧵 Install zipper into back opening
🧵 Sew backpack straps securely
Shape belly outward after assembly.
───────────────
✨ Shaping Tips
✨ Keep head very round and oversized
✨ Make lower belly fuller than upper torso
✨ Keep red shirt cropped and short
✨ Ensure sleeves continue onto arms
✨ Allow legs to dangle slightly forward
✨ Curve ears inward gently
🌿 Finishing Touches
✨ Brush chenille lightly for extra softness
✨ Shape tummy evenly with hands
✨ Steam straps lightly if needed
✨ Adjust stuffing before zipper closure
✨ Reinforce straps securely for wearability
Your plush bear backpack is now complete! 🧸🎒✨
With its oversized cuddly belly, tiny ears, cropped red shirt, soft sleeves, and huggable plush proportions, this adorable handmade backpack becomes the perfect mix of cozy toy and wearable accessory.