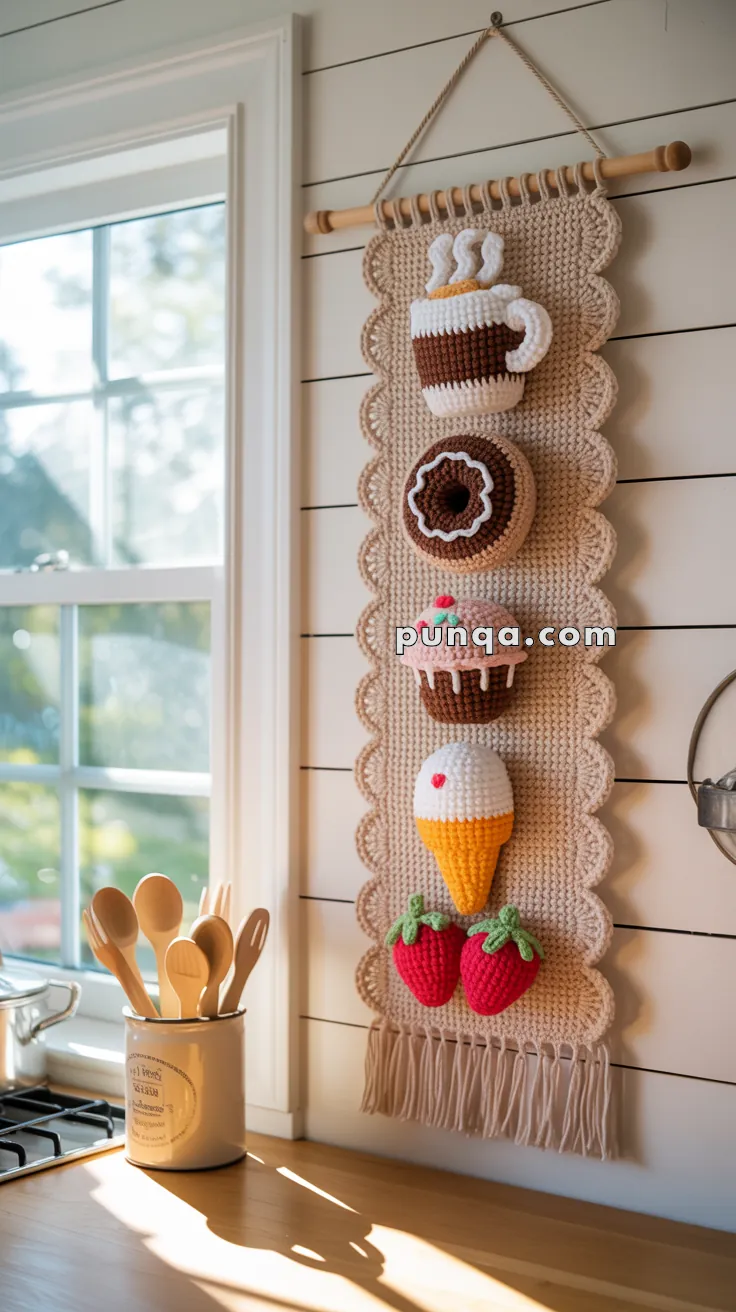
Add a sprinkle of sweetness to your space with this Sweet Kitchen Wall Hanging crochet pattern! Featuring an irresistible lineup of 3D amigurumi treats—including a steamy mug, frosted donut, cupcake, ice cream cone, and two juicy strawberries—this charming wall hanging is a feast for the eyes and a celebration of cozy creativity. Stitched onto a scalloped beige panel with playful fringe and hung from a wooden rod, it’s the perfect way to add a handmade touch of whimsy to your kitchen, dining nook, or craft corner. 🍩🧁🍓
Designed for joyful detail, this pattern invites you to play with vibrant yarns, textured stitches, and expressive accents like swirls of frosting, sprinkles, and tiny smiles. Whether you’re crafting a cheerful gift or treating yourself to a fun weekend project, this Sweet Kitchen Wall Hanging is a delightful and satisfying make—perfect for bringing a dash of handmade happiness to every corner of your home! 🧶☕✨
🍩☕ Sweet Kitchen Wall Hanging Crochet Pattern
Turn your kitchen into a cozy café corner with this crochet wall hanging featuring a steaming mug, donut, cupcake, ice cream cone, and two strawberries, all mounted on a scalloped beige panel with fringe and a wooden dowel hanger. The treats are softly stuffed and dimensional, just like in the photo.
✨ Skill Level
Intermediate – uses amigurumi basics, simple embroidery, shaping, and assembly.
📏 Finished Size & Gauge
Gauge (approx.):
10 sc × 12 rows = 10 × 10 cm (4 in × 4 in) with 3.0 mm hook in single crochet
Finished measurements:
- Panel (without fringe): ~13 cm wide × 55 cm long
- Panel with scallops and fringe: ~65–70 cm total hanging length
(Exact size may vary slightly depending on tension.)
🧶 Materials
- DK-weight yarn in:
- Beige – main panel & scallops
- Brown – mug body, donut upper ring
- Dark brown – donut lower ring
- White – mug top, mug handle, steam, donut icing, cupcake drips, ice cream scoop
- Pink – cupcake frosting
- Yellow or golden – ice cream cone and scoop band
- Tan – mug top foam
- Red – cupcake cherry, ice cream dot, strawberries
- Green – strawberry leaves
- Crochet hook: 3.0–3.25 mm
- Polyfill stuffing
- Wooden dowel ~28–30 cm long
- Yarn/twine for hanging cord
- Tapestry needle
- Stitch markers
- Scissors
🧵 Abbreviations (US Terms)
MR – magic ring
sc – single crochet
inc – increase (2 sc in same st)
dec – decrease (sc2tog)
sl st – slip stitch
ch – chain
BLO – back loop only
FO – fasten off
🪄 Main Panel
Base Rectangle
Beige
Ch 32
Row 1: sc in 2nd ch from hook and across (31)
Rows 2–125: ch 1, turn, sc in each st across (31)
Fasten off and weave in ends.
This creates a tall, narrow panel.
Scalloped Border (Sides + Top)
Work a continuous shell border along one side, the top, and the other side. The bottom edge remains straight for fringe.
Each shell: (sc, hdc, dc, hdc, sc) in the same space.
Attach beige yarn at bottom-right corner of the panel.
Right Side Edge (working up along row-ends)
Repeat to top-right corner:
- [Side repeat] Work 1 shell into the first available row-end, sl st into the next row-end.
Aim to place about 10–11 shells along the side; adjust by occasionally working two shells separated by only one row-end if needed so the scallops stay round and evenly sized.
Top Edge
When you reach the top-right corner, continue across the top:
- [Top repeat] sl st in next st, work 1 shell in next st across the top 31 stitches.
You should end with a shell near each top corner and a smooth row of arches.
Left Side Edge (working down)
Turn the work and continue down the left side row-ends using the same [Side repeat] as before, mirroring the right side.
Fasten off and weave in ends.
Fringe
Cut multiple beige strands ~14–15 cm long.
At the bottom edge of the panel, insert fringe:
- Hold 2 strands together, fold in half.
- Insert hook into bottom-row stitch from front to back, pull fold through, yarn over both tails and pull through loop (lark’s head knot).
Work fringe along entire bottom. Trim evenly.
🪵 Dowel & Hanging Cord
Lay the dowel along the wrong side of the top row (Row 125).
Fold the very top row over the dowel to meet Row 124 on the back.
Working from the back, whipstitch through both layers (Row 125 and Row 124) across the width to form a neat casing that traps the dowel in place.
Attach a length of twine or yarn to each dowel end and knot securely to form the hanging cord.
Treat Appliqués
All treats are lightly stuffed and sewn onto the front center of the panel in this vertical order:
- Mug (top)
- Donut
- Cupcake
- Ice cream cone
- Two strawberries (bottom)
Leave about 2–3 cm of space between each treat for a clean layout.
☕ Steaming Mug
Colors:
- Body: brown
- Rim & handle: white
- Foam: tan
- Steam: white
Mug Body
Brown
R1: MR, 6 sc
R2: inc x6 (12)
R3: (1 sc, inc) x6 (18)
R4: (2 sc, inc) x6 (24)
R5: (3 sc, inc) x6 (30)
R6–11: sc around (30)
Switch to white
R12–15: sc around (30)
Stuff firmly and FO.
Handle
White
Ch 12
Row 1: sc in 2nd ch from hook and across (11)
FO.
Shape into a smooth C and sew to the right side of the mug.
Foam Top
Tan
R1: MR, 6 sc
R2: inc x6 (12)
R3: (1 sc, inc) x6 (18)
FO, lightly stuff and stitch centered on the mug top, just inside the white rim.
Steam Curls (Make 3)
White
Ch 14
sl st in 2nd ch, sc in next, hdc, dc, dc, dc, hdc, sc, sl st in remaining chains to taper.
Shape into gentle S-curves.
Sew all three vertically staggered and centered directly above the foam, with slight overlap.
🍩 Donut
Colors:
- Upper ring: light brown
- Lower ring: dark brown
- Icing: white
This donut is a true ring with a hole.
Donut Top Half
Light brown
Ch 18, join with sl st to form ring (do not twist).
R1: sc around ring (18)
R2: (2 sc, inc) x6 (24)
R3: sc around (24)
FO.
Donut Bottom Half
Dark brown
Repeat as for top half.
Assembly
Holding the two halves together, sew the inner ring edges first, aligning stitches.
Add stuffing into the outer ring area as you go, then sew the outer edges together, forming a padded torus with an open center hole.
With white yarn, surface stitch a wavy line around the top half to mimic icing.
🧁 Cupcake
Colors:
- Base: brown
- Frosting: pink
- Drips: white
- Cherry: red
- Leaves: green
Cupcake Base
Brown
R1: MR, 6 sc
R2: inc x6 (12)
R3: (1 sc, inc) x6 (18)
R4–6: BLO, sc around (18)
Stuff well and FO.
Frosting Top
Pink
R1: MR, 6 sc
R2: inc x6 (12)
R3: (1 sc, inc) x6 (18)
R4–5: sc around (18)
FO, stuff very lightly.
Drip Edge
Attach white to any st on frosting:
[(ch 4, sl st in same st), sl st in next st] repeat around, making loops in about every second stitch so the drips are spaced, not continuous.
Sew frosting onto base so drips hang slightly over the brown base edge.
Cherry
Red
R1: MR, 6 sc
R2: inc x6 (12)
R3: dec x6 (6)
FO and close, leaving tail for sewing.
Leaves (2)
Green
Ch 5
sl st in 2nd ch from hook, sc in next, hdc, dc
FO.
Sew the cherry on top-center of frosting and attach leaves beside it.
🍦 Ice Cream Cone
Colors:
- Scoop: white
- Band + cone: golden yellow
- Dot: red
Scoop
White
R1: MR, 6 sc
R2: inc x6 (12)
R3: (1 sc, inc) x6 (18)
R4–7: sc around (18)
Switch to golden yellow
R8: BLO, sc around (18) – creates the horizontal band
Switch back to white (optional if you want one more white row)
R9: sc around (18)
FO and stuff lightly.
Cone
Golden yellow
R1: MR, 6 sc
R2: (1 sc, inc) x3 (9)
R3: sc around (9)
R4: (2 sc, inc) x3 (12)
R5–11: sc around (12)
Stuff and sew to the bottom of the scoop so the yellow band sits right at the scoop–cone junction, forming the ridge seen in the photo.
Scoop Dot
Using red yarn, embroider a small satin stitch dot slightly off-center on the scoop front.
🍓 Strawberries (2)
Strawberry Body (Make 2)
Red
R1: MR, 6 sc
R2: inc x6 (12)
R3: (1 sc, inc) x6 (18)
R4–6: sc around (18)
R7: (1 sc, dec) x6 (12)
R8: dec x6 (6)
Stuff, FO and close.
Shape into a slightly elongated berry (wider at top, narrower toward bottom).
Strawberry Caps (2)
Green
R1: MR, 6 sc
In each stitch: (ch 4, sl st in same st) – gives 6 points.
FO and sew to top of each strawberry.
Angle berries slightly outward when attaching to the panel.
🔗 Assembly onto Panel
- Lay the panel flat, right side up.
- Pin treats in this vertical order, leaving roughly 2–3 cm of blank space between each:
- Mug near top, below the scallops and dowel.
- Donut centered under mug.
- Cupcake under donut.
- Ice cream cone under cupcake.
- Two strawberries at the bottom, touching or slightly overlapping, just above the fringe.
- Using matching yarn tails and a tapestry needle, whipstitch around the back edges of each treat onto the panel. Do not press them flat; keep the stuffing lightly raised for a dimensional effect.
- Check that the panel hangs straight, with treats centered.
💡 Styling Ideas
- Make seasonal variations (pumpkin spice mug, Christmas sprinkles on donut).
- Add tiny embroidered sprinkles on cupcake frosting and donut.
- Crochet a matching pair for a café or bakery wall.
This sweet wall hanging brings a soft, handmade café vibe to your kitchen, with every scallop, stitch, and treat shaped to match the original design as closely as possible.