Welcome to the quirky and elegant world of amigurumi! 🦩✨ Today, I’m excited to share my free crochet pattern for an Ostrich—a tall, feathery friend full of charm, personality, and delightful detail! 🌿 Whether you love crafting unique wildlife-inspired designs, enjoy making expressive animal figures, or simply want to stitch up a lovable ostrich with long legs and fluffy textures, this pattern will guide you through creating a beautifully detailed plush companion with all the grace and playfulness of this fascinating bird! 🤎
This design embraces soft curves, textured feathers, and a touch of whimsy to bring this elegant and quirky creature to life! 🧶🏞️ I’ve carefully outlined each step to ensure your Amigurumi Ostrich turns out just right—ready to add a playful safari touch to your collection or become a treasured handmade gift! 🎁 So grab your hooks, pick out soft neutrals, bold blacks, and warm beiges, and let’s stitch up a delightful ostrich friend! ✨
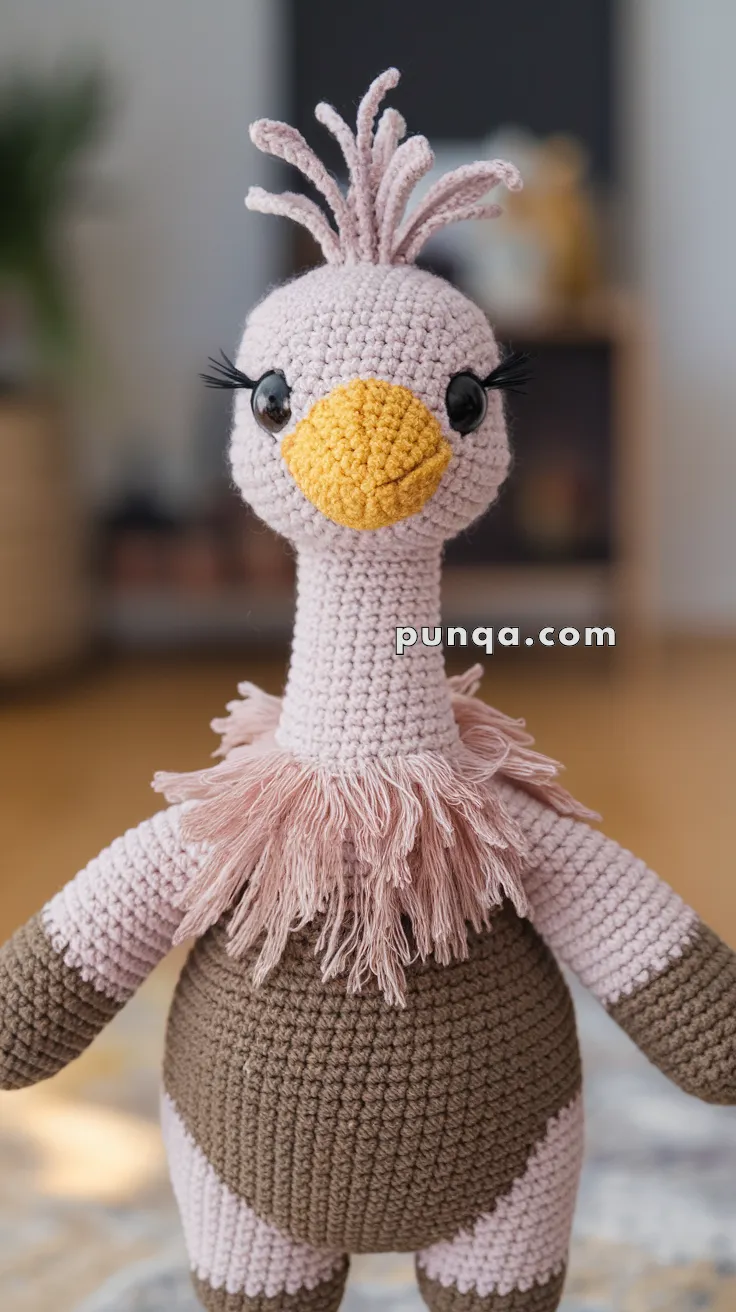
🐦 Amigurumi Ostrich Crochet Pattern
Create a graceful and charming handmade ostrich with long elegant neck, soft feather collar, fluffy head plume, and gentle expression. This design captures the delicate proportions, soft color palette, and cozy texture of the reference doll, making it a perfect decorative companion or heartfelt gift.
✨ Skill Level
Intermediate
(Includes shaping, color changes, fringe work, and multi-part assembly.)
📏 Finished Size
Approx. 32–35 cm (12.5–14 in) tall using worsted weight yarn and a 3.5 mm hook.
🧶 Materials
Yarn (Worsted Weight)
- Light Pink — head, neck, upper arms, upper legs
- Brown — body, lower arms, lower legs
- Yellow — beak
- Pale Rose / Mauve — feather collar and head plume
Tools & Supplies
- 3.5 mm crochet hook
- 12 mm safety eyes
- Polyester fiberfill
- Tapestry needle
- Stitch markers
- Scissors
- Optional: black embroidery thread for eyelashes
🎯 Gauge
Not critical. Crochet tightly so the figure holds its shape.
🌀 Abbreviations (US Terms)
MR – Magic Ring
sc – Single crochet
inc – Increase
dec – Decrease
ch – Chain
sl st – Slip stitch
st – Stitch
🧠 Head
Light Pink
Rnd 1: MR 6
Rnd 2: inc ×6 (12)
Rnd 3: (sc, inc) ×6 (18)
Rnd 4: (2 sc, inc) ×6 (24)
Rnd 5: (3 sc, inc) ×6 (30)
Rnd 6: (4 sc, inc) ×6 (36)
Rnd 7–13: sc 36
Insert safety eyes between rounds 9–10, spacing 8 sts apart.
Rnd 14: (4 sc, dec) ×6 (30)
Rnd 15: (3 sc, dec) ×6 (24)
Rnd 16: (2 sc, dec) ×6 (18)
Rnd 17: (sc, dec) ×6 (12)
Stuff firmly.
Rnd 18: dec ×6 (6)
Fasten off and close.
Optional: embroider delicate eyelashes.
🪶 Head Plume (Make 7)
Pale Rose
Ch 14
Starting in 2nd ch from hook: sc 13
Fasten off, leaving long tail.
Attach all plumes to the top center of the head, spacing evenly. Trim ends slightly and fan upward.
👃 Beak
Yellow
Rnd 1: MR 6
Rnd 2: (sc, inc) ×3 (9)
Rnd 3–4: sc 9
Rnd 5: (sc, dec) ×3 (6)
Lightly stuff, flatten slightly, and sew centered between eyes.
🦒 Neck
Tall and slender.
Light Pink
Rnd 1: MR 6
Rnd 2: inc ×6 (12)
Rnd 3: (sc, inc) ×6 (18)
Rnd 4–15: sc 18
Stuff firmly and attach to bottom of head.
🪶 Feather Collar (Fringe)
Pale Rose
Cut 70–90 strands of yarn, each approx. 7 cm long.
Attach fringe around base of neck using latch-hook method. Trim evenly and fluff outward to form a soft collar.
🍗 Body
Rounded and plump.
Brown
Rnd 1: MR 6
Rnd 2: inc ×6 (12)
Rnd 3: (sc, inc) ×6 (18)
Rnd 4: (2 sc, inc) ×6 (24)
Rnd 5: (3 sc, inc) ×6 (30)
Rnd 6: (4 sc, inc) ×6 (36)
Rnd 7: (5 sc, inc) ×6 (42)
Rnd 8–16: sc 42
Rnd 17: (5 sc, dec) ×6 (36)
Rnd 18: (4 sc, dec) ×6 (30)
Rnd 19: (3 sc, dec) ×6 (24)
Rnd 20: (2 sc, dec) ×6 (18)
Stuff firmly.
Rnd 21: (sc, dec) ×6 (12)
Rnd 22: dec ×6 (6)
Fasten off and close.
Attach neck securely to top of body.
💪 Arms / Wings (Make 2)
Slender arms with brown tips.
Start with Brown
Rnd 1: MR 6
Rnd 2: (sc, inc) ×3 (9)
Rnd 3–5: sc 9
Switch to Light Pink
Rnd 6–14: sc 9
Lightly stuff only upper portion. Fasten off and sew to sides of body just under the feather collar.
🦵 Legs (Make 2)
Chunky legs for standing stability.
Start with Brown
Rnd 1: MR 6
Rnd 2: inc ×6 (12)
Rnd 3: (sc, inc) ×6 (18)
Rnd 4–6: sc 18
Switch to Light Pink
Rnd 7–14: sc 18
Stuff firmly and sew to bottom of body.
🧵 Assembly
- Sew beak to face.
- Attach neck to head.
- Add feather collar around neck base.
- Sew head to body.
- Attach arms to sides.
- Attach legs to bottom.
- Secure head plumes.
Weave in all ends and adjust stuffing so ostrich stands steadily.
🛋️ Display & Styling
This elegant ostrich stands beautifully on shelves, desks, or nursery displays. The long neck, fluffy collar, and soft colors make it a stunning decorative piece.
🧼 Care Instructions
- Hand wash gently in cool water
- Press excess water out with towel
- Lay flat to dry
- Do not tumble dry
🎁 Perfect For
- Nursery décor
- Bird lovers
- Handmade gifts
- Craft fairs
- Whimsical home accents
Your graceful ostrich is now complete! With her tall posture, fluffy feathers, and gentle eyes, she brings warmth, charm, and personality to any space. Happy crocheting 🐦🧶✨