Bring the playful charm of a Puffin to life with this Amigurumi Puffin crochet pattern! 🐧✨ With its bright beak, round body, and adorable stance, this design captures the essence of this quirky seabird in yarn form. Whether you’re crafting for a nature-inspired décor piece, a heartfelt gift, or simply love bird-themed amigurumi, this FREE pattern is a fantastic addition to your collection.
Designed for intermediate crocheters, this pattern allows for customization in feather textures, color variations, and even tiny accessories like embroidered details or a miniature coastal perch to enhance its personality. Choose classic black, white, and orange for a realistic look or experiment with pastel hues for a whimsical twist! Whether displayed as part of a wildlife setup or gifted to a fellow crochet enthusiast, this amigurumi puffin is sure to impress.
Grab your hook, select your favorite yarn, and let’s bring this cheerful seabird to life—one stitch at a time! 🧶✨
🐧 Amigurumi Puffin Crochet Pattern
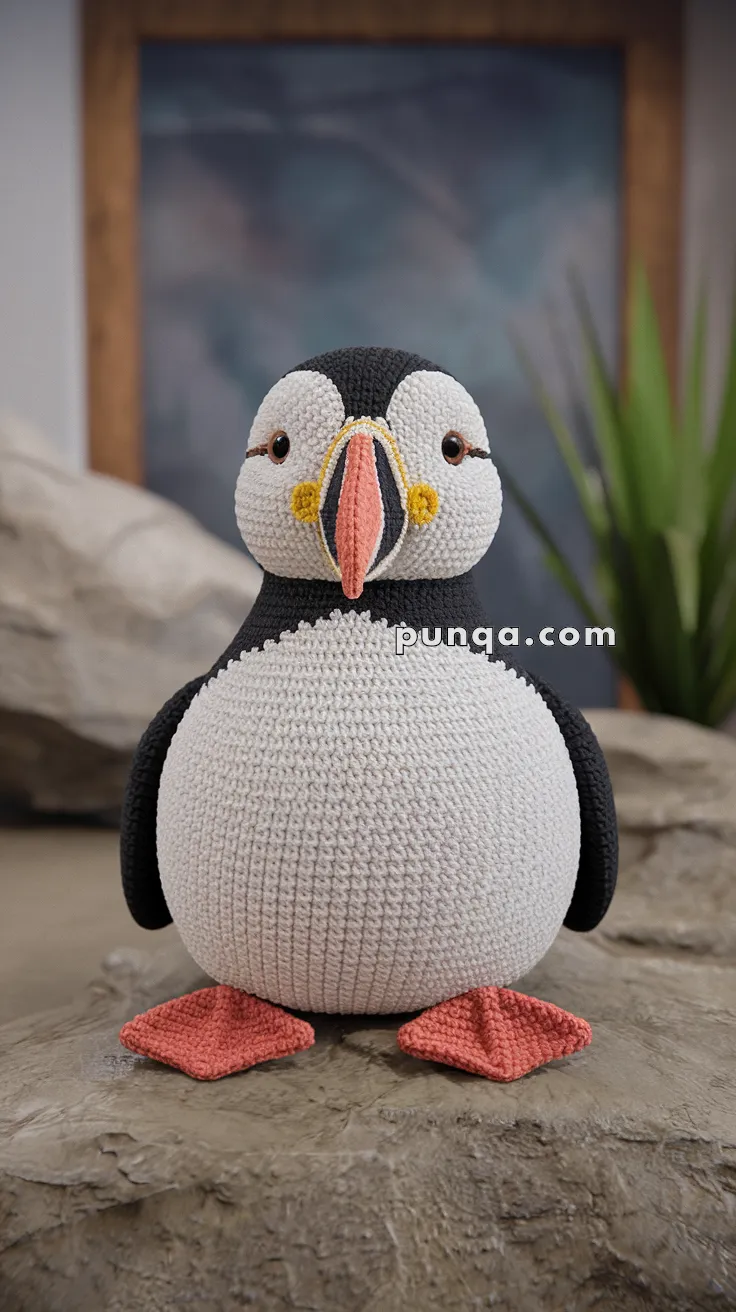
Bring a touch of coastal charm into your home with this adorable puffin! With its oversized round belly, tall oval head, bold white face patches, long black wings, and iconic tri-colored beak, this puffin captures the exact proportions and personality seen in classic puffin photography—and in the reference image used for this pattern.
✨ Skill Level
Intermediate — includes shaping, color transitions, structured beak components, and careful assembly.
📏 Finished Size
Approximately 10–11 in (25–28 cm) tall when using DK/worsted yarn and a 3–3.5 mm hook.
The belly is intentionally very round, and the head is a tall oval, as seen in the photo.
🧶 Materials
-
White yarn — belly, face patches (~60 g)
-
Black yarn — head top, wings, back (~50 g)
-
Coral/red-orange yarn — beak tip (~5 g)
-
Light orange yarn — mid-beak & feet (~10 g)
-
Yellow yarn — beak base & cheek dots (~5 g)
-
8–10 mm safety eyes (the photo shows medium-large eyes)
-
3.0–3.5 mm crochet hook
-
Polyester stuffing
-
Tapestry needle
-
Stitch marker
-
Scissors
-
Optional: thin craft wire for shaping the webbed feet
🧵 Abbreviations (US Terms)
MR — Magic Ring
sc — Single Crochet
inc — Increase (2 sc in same stitch)
dec — Decrease (sc 2 together)
ch — Chain
sl st — Slip Stitch
FO — Fasten Off
🐧 Body & Head (One Piece)
The puffin in the photo has a massive round belly and a tall head with a clean color break. This shaping below recreates that perfectly.
Belly (White)
R1 — MR, 6 sc (6)
R2 — inc ×6 (12)
R3 — (sc, inc) ×6 (18)
R4 — (2 sc, inc) ×6 (24)
R5 — (3 sc, inc) ×6 (30)
R6 — (4 sc, inc) ×6 (36)
R7 — (5 sc, inc) ×6 (42)
R8 — (6 sc, inc) ×6 (48)
R9 — (7 sc, inc) ×6 (54) ← This creates the very large belly seen in the photo.
R10–23 — sc around (54)
Stuff firmly as you go to keep the sphere smooth.
Transition to Upper Body (Black)
R24 — Switch to black, sc around (54)
R25–27 — sc around (54)
Neck Taper
R28 — (7 sc, dec) ×6 (48)
R29 — (6 sc, dec) ×6 (42)
R30 — (5 sc, dec) ×6 (36)
Head Expansion (Still Black)
R31 — (5 sc, inc) ×6 (42)
R32 — (6 sc, inc) ×6 (48)
R33 — (7 sc, inc) ×6 (54)
Head Height
R34–42 — sc around (54)
The puffin’s head in the photo is tall and oval — these rounds create that height.
Head Decreases
R43 — (7 sc, dec) ×6 (48)
R44 — (6 sc, dec) ×6 (42)
R45 — (5 sc, dec) ×6 (36)
R46 — (4 sc, dec) ×6 (30)
R47 — (3 sc, dec) ×6 (24)
R48 — (2 sc, dec) ×6 (18)
R49 — (sc, dec) ×6 (12)
R50 — dec ×6 (6)
FO and close.
Eye Placement (Very Important for Photo Accuracy)
Insert 8–10 mm safety eyes:
-
between Rounds 36–38
-
spaced 7 stitches apart
-
positioned over the upper third of the white face patches
🤍 Face Patches (Make 2)
The face patches in the photo are large oval shapes that curve upward.
Use white.
R1 — MR, 6 (6)
R2 — inc ×6 (12)
R3 — (sc, inc) ×6 (18)
R4 — (2 sc, inc) ×6 (24)
R5 — (3 sc, inc) ×6 (30)
R6 — sc around (30)
Flatten to create an oval.
FO, leaving a long tail.
Assembly
-
Sew patches symmetrically on the front of the head.
-
Tilt each patch slightly upward, matching the photo.
-
Eyes go through the patches before securing.
🧡 Beak (Three Color Sections)
The beak in the image is:
• Tall
• Flattened vertically
• Has 3 clear color bands
• Has vertical white/grey embroidery ridges
Beak Pattern
Start with coral yarn (tip).
R1 — MR, 6 (6)
R2 — (sc, inc) ×3 (9)
R3 — sc around (9)
Switch to light orange:
R4 — sc around (9)
R5 — (2 sc, inc) ×3 (12)
R6 — (3 sc, inc) ×3 (15)
Switch to yellow (beak base):
R7 — sc around (15)
R8 — (3 sc, dec) ×3 (12)
R9 — sc around (12)
Stuff lightly (not firmly; it should flatten).
Flatten the piece and sew the full length vertically to the center front of the head.
Beak Embroidery
Using white + light grey yarn:
-
Add 3–4 vertical ridges
-
Space evenly
-
Curve slightly outward near the tip (as in the photo)
🟡 Cheek Dots (Make 2)
The puffin has small, bright yellow cheek circles below the eye line.
R1 — MR, 6 (6)
FO, leaving tail.
Sew slightly below the eyes and close to the beak.
🖤 Wings (Make 2 – Long & Flat)
The wings in the photo are long and sleek, almost reaching the feet.
Use black.
R1 — MR, 6 (6)
R2 — inc ×6 (12)
R3 — (sc, inc) ×6 (18)
R4–22 — sc around (18)
Flatten — do NOT stuff.
Sew along the body side from the “shoulder” to below midline, angled gently inward.
🧡 Feet (Make 2 – Large Webbed Triangles)
Feet in the image are:
• Broad
• Sharp triangular shape
• Point slightly forward
Use light orange.
Ch 9
Row 1 — sc in 2nd ch, sc 7 (8)
Row 2 — ch 1, turn, dec, sc 6 (7)
Row 3 — ch 1, turn, dec, sc 5 (6)
Row 4 — ch 1, turn, dec, sc 4 (5)
Row 5 — ch 1, turn, dec, sc 3 (4)
Row 6 — ch 1, turn, dec, sc 2 (3)
Row 7 — ch 1, turn, dec, sc (2)
Row 8 — ch 1, turn, dec (1)
FO.
Flatten.
Sew to the very front-bottom of the belly, angled slightly outward but pointing forward.
🪶 Final Assembly & Shaping
-
Sew face patches first
-
Attach eyes through patches
-
Sew beak centered and vertical
-
Add cheek dots
-
Attach wings along body length
-
Sew feet forward-facing under belly
-
Shape head slightly downward so it “looks at you” like the photo
-
Smooth and round the belly
🌟 Optional Enhancements
-
Add blush using pink yarn or fabric marker
-
Add a grey shadow patch on the sides of the beak
-
Lightly weight the bottom with pellets for stability
-
Add tiny embroidered nostrils
🧶 Your Puffin Is Complete!
This pattern faithfully recreates the puffin shown in the reference image — including the oversized spherical belly, the tall oval head, the beautifully shaped tri-colored beak, long sleek wings, and perfectly angled webbed feet.