Welcome to the quaint and nostalgic world of vintage motoring amigurumi! 🚗💛 Today, I’m delighted to share my FREE crochet pattern for an Amigurumi Citroën 2CV—a charming miniature of France’s iconic “Deux Chevaux” that captures the car’s timeless appeal. Whether you’re crafting a gift for a classic car enthusiast, creating a whimsical French countryside diorama, or simply celebrating retro automotive design, this pattern features the 2CV’s signature curved silhouette, distinctive wheel arches, and that beloved roll-back roof perfect for imaginary sunny drives.
This design blends authentic details with amigurumi whimsy, with step-by-step instructions for the car’s sloping hood, textured stitching for the canvas roof, and optional extras like crochet luggage racks or tiny French flags. Choose buttery yellow, soft gray, or pastel mint yarn for that quintessential vintage look, and add embroidered headlights for extra character. 🇫🇷 So grab your hooks, pick your coziest yarn, and let’s stitch up a little automotive legend—one that’s as full of charm as it is of crochet love. “Petit à petit, l’oiseau fait son nid… et la 2CV prend vie!”
🚗 Amigurumi Citroën 2CV Crochet Pattern
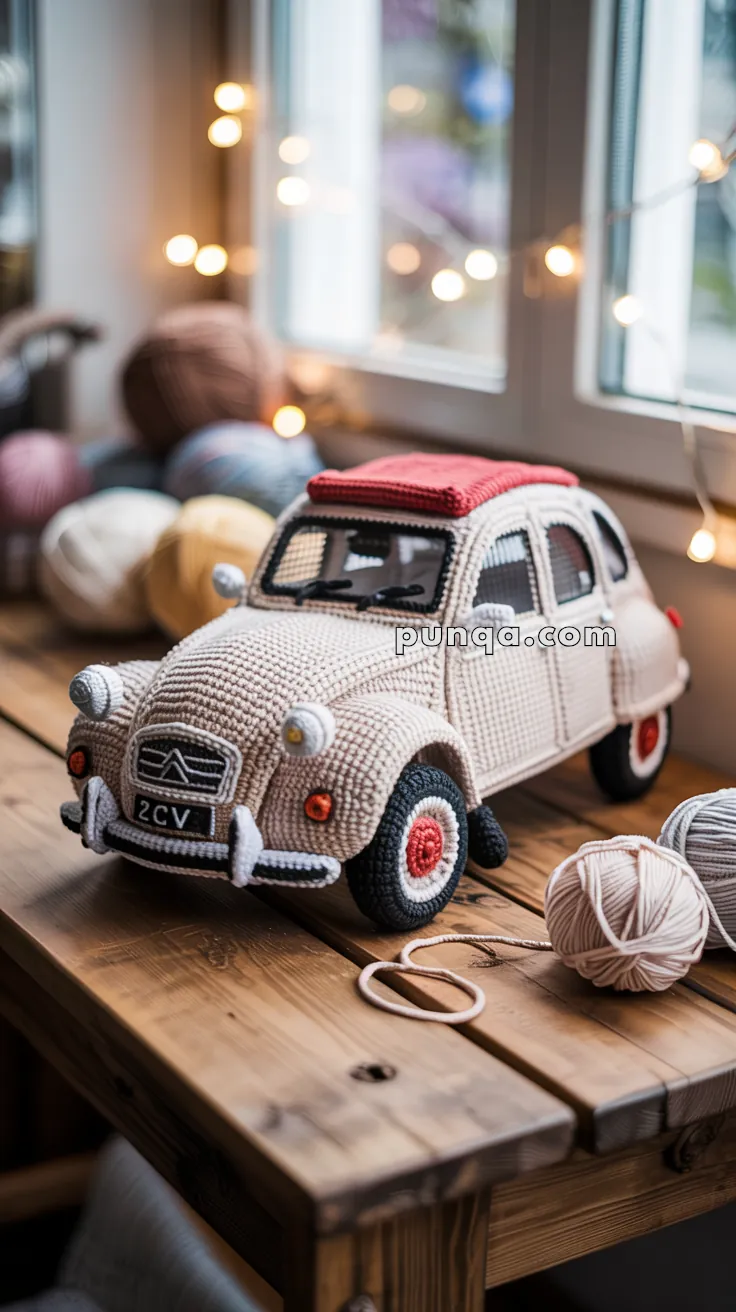
This charming crochet Citroën 2CV is inspired by the iconic French classic and carefully designed to match the photo in every detail — from its rounded body and curved roofline to its signature headlights, ribbed hood texture, slim bumpers, and soft-top roof.
Unlike boxy toy cars, the real 2CV has a smooth, organic silhouette with subtle curves, rounded fenders, narrow tires, and delicate detailing. This pattern follows that exact structure, using sculpted shaping, layered parts, and clean surface work for a true miniature replica.
Perfect for collectors, vintage car lovers, and anyone who appreciates elegant handmade models.
✨ Skill Level
Advanced
This project includes:
- sculpted 3D shaping
- curved assembly
- layered body panels
- realistic door construction
- dimensional wheel arches
- surface embroidery
- reinforced structure work
📏 Finished Size
Approx. 24–26 cm (9.5–10 inches) long
Using worsted-weight cotton yarn and a 2.5–3 mm crochet hook.
🧶 Yarn Requirements
Light Cream / Pale Grey Yarn
Approx. 145 g
Used for:
- body shell
- hood
- doors
- roof frame
- fenders
- rear section
Black Yarn
Approx. 45 g
Used for:
- tires
- bumpers
- grille
- windshield trim
- license plate
- window outlines
White Yarn
Approx. 18 g
Used for:
- wheel rims
- grille details
- logo accents
Red Yarn
Approx. 20 g
Used for:
- rolled roof
- wheel hubs
- rear lights
Yellow Yarn
Small amount
Used for:
- headlight centers
🪡 Supplies
- 2.5–3 mm crochet hook
- Polyester stuffing
- Plastic canvas or thick cardboard
- Yarn needle
- Stitch markers
- Thin floral wire (optional for mirrors)
- Fabric glue (optional)
🔤 Abbreviations (US Terms)
- MR – magic ring
- sc – single crochet
- inc – increase
- dec – invisible decrease
- sl st – slip stitch
- ch – chain
- BLO – back loop only
- FO – fasten off
🚘 Lower Chassis Base
The car body is long and softly rounded with flat lower edges and curved sides.
With Light Cream Yarn
Row 1
Ch 33
Starting in 2nd chain from hook:
31 sc, 3 sc in last chain
Working opposite side:
30 sc, inc
(66)
Row 2
inc, 30 sc, inc x3, 30 sc, inc x2
(72)
Row 3
(sc, inc) x2, 30 sc, (sc, inc) x4, 30 sc, (sc, inc) x2
(80)
Rows 4–6
sc around (80)
Insert plastic canvas base trimmed to fit.
This keeps the underside flat and prevents collapsing.
🚗 Lower Body Walls
Row 7 — BLO
sc around (80)
This creates the lower body seam visible above the chassis.
Rows 8–13
sc around (80)
The body should now resemble a soft rectangular shell with rounded corners.
Do not overstuff.
🚪 Sculpted Door Panels (Make 2)
The doors in the photo are raised panels with rounded upper corners and visible seams.
With Light Cream Yarn
Row 1
Ch 15
sc across (14)
Rows 2–13
ch 1, turn, sc across
FO.
Round the top corners gently during sewing.
Attach centered on each side panel.
Leave space at the front for the curved fender section.
🚘 Rear Quarter Panels (Make 2)
These create the rounded rear body shape behind the doors.
With Light Cream Yarn
Row 1
Ch 9
sc across (8)
Rows 2–8
sc across
FO.
Attach behind each door panel.
Curve slightly inward toward rear wheel arch.
🪟 Side Windows (Make 2)
The windows are rounded rectangles with slightly arched tops.
With Black Yarn
Row 1
Ch 12
sc across (11)
Rows 2–7
sc across
FO.
Curve upper corners gently while attaching.
Sew above doors leaving a visible cream border.
🚘 Front Windshield
The windshield is wide and softly curved.
With Black Yarn
Row 1
Ch 18
sc across (17)
Rows 2–8
sc across
FO.
Attach above hood with slight backward angle.
🚘 Rear Window
With Black Yarn
Row 1
Ch 10
sc across (9)
Rows 2–5
sc across
FO.
Attach centered on rear roof section.
🚙 Roof Structure
The roof arches softly downward from front to back.
With Light Cream Yarn
Row 1
Ch 21
sc across (20)
Rows 2–18
sc across
FO.
Curve naturally while sewing to body.
Do not keep roof perfectly flat.
🟥 Rolled Fabric Roof
The roof is thick, padded, and slightly raised like folded fabric.
With Red Yarn
Row 1
Ch 18
sc across (17)
Rows 2–12
sc across
FO.
Lightly stuff very thinly.
Fold side edges slightly downward before sewing.
Surface crochet black edging around entire roof.
Attach centered along roof curve.
🚘 Hood Panel
The hood slopes gently downward and includes ribbed texture.
With Light Cream Yarn
Row 1
Ch 15
sc across (14)
Rows 2–12
sc across
FO.
Attach below windshield and shape downward.
Hood Ribbing
Using surface slip stitches:
Create 5 evenly spaced vertical ribs running from windshield to grille.
🚘 Front Fenders (Make 2)
The front fenders are large rounded domes extending outward from the body.
With Light Cream Yarn
R1
MR 6
R2
inc x6 (12)
R3
(sc, inc) x6 (18)
R4
(2 sc, inc) x6 (24)
R5
(3 sc, inc) x6 (30)
R6–7
sc around (30)
Lightly stuff.
Flatten back edge slightly before sewing.
Attach above front wheel openings.
🚘 Rear Fenders (Make 2)
Rear fenders are smaller and more tapered.
With Light Cream Yarn
R1
MR 6
R2
inc x6 (12)
R3
(sc, inc) x6 (18)
R4
(2 sc, inc) x6 (24)
R5–6
sc around (24)
Lightly stuff.
Attach above rear wheels.
🛞 Wheels (Make 4)
The wheels are narrow with layered rims and red centers.
Tire — Black
R1
MR 6
R2
inc x6 (12)
R3
(sc, inc) x6 (18)
R4
(2 sc, inc) x6 (24)
R5–7
sc around (24)
Stuff firmly.
White Rim
Join white yarn.
R8
BLO sc around (24)
R9
sc around (24)
FO.
Red Hubcap
With Red Yarn
R1
MR 6
R2
inc x6 (12)
FO.
Attach centered.
💡 Headlights (Make 2)
The headlights protrude outward on short rounded mounts.
With Light Grey Yarn
R1
MR 6
R2
inc x6 (12)
R3–4
sc around (12)
Lightly stuff.
FO.
Embroider tiny yellow centers.
Attach high on front fenders.
🚦 Rear Lights (Make 2)
With Red Yarn
MR 6
FO.
Attach low on rear corners.
🪞 Side Mirrors (Make 2)
Mirror Base — Grey
MR 5
FO.
Stem
Ch 4
Attach below windshield corners.
Optional:
Insert floral wire for shaping.
🪵 Front Bumper
The bumper is slim with curved ends and vertical supports.
With Black Yarn
Row 1
Ch 24
sc across
Vertical Supports (Make 2)
Ch 6
sc back down chain
Attach beneath bumper ends.
🪵 Rear Bumper
With Black Yarn
Row 1
Ch 20
sc across
FO.
Curve gently during sewing.
🚘 Front Grille
With Black Yarn
Row 1
Ch 12
sc across
Rows 2–4
sc across
FO.
Attach between headlights.
Chrome Trim
Using white yarn:
Surface stitch narrow trim around grille edge.
Citroën Logo
Embroider two stacked chevrons in white yarn.
🪪 License Plate
With Black Yarn
Row 1
Ch 10
sc across
Row 2
sc across
FO.
Embroider “2CV” in white.
Attach beneath grille.
🧵 Windshield Wipers
Using black embroidery yarn:
Create two thin angled lines across lower windshield.
Secure tightly.
🪡 Assembly
Step 1
Attach hood beneath windshield.
Step 2
Sew door panels onto body sides.
Step 3
Attach rear quarter panels behind doors.
Step 4
Attach side windows above doors.
Step 5
Attach windshield and rear window.
Step 6
Attach roof structure and red fabric roof.
Step 7
Attach front and rear fenders.
Step 8
Attach wheels evenly beneath arches.
Step 9
Attach grille, headlights, and rear lights.
Step 10
Attach bumpers and license plate.
Step 11
Add mirrors and windshield wipers.
Step 12
Surface stitch around:
- doors
- windows
- hood edges
- trunk seams
✨ Final Shaping Tips
- Keep roof softly rounded
- Flatten underside gently
- Shape hood downward
- Keep wheel arches pronounced
- Curve bumpers outward slightly
- Leave visible trim borders around windows
- Slightly pinch rear body inward for authentic silhouette
- Keep tires narrow and tall
🌟 Finished Vintage Crochet Car
Your Citroën 2CV is now complete — a faithful yarn tribute to one of the most beloved cars in automotive history. With its soft curves, classic proportions, ribbed hood, and cozy fabric roof, this miniature captures the unmistakable charm of the French original.
Whether displayed in a collector’s cabinet or gifted to a vintage car lover, this little 2CV is ready to roll straight into hearts. 🇫🇷🧶✨