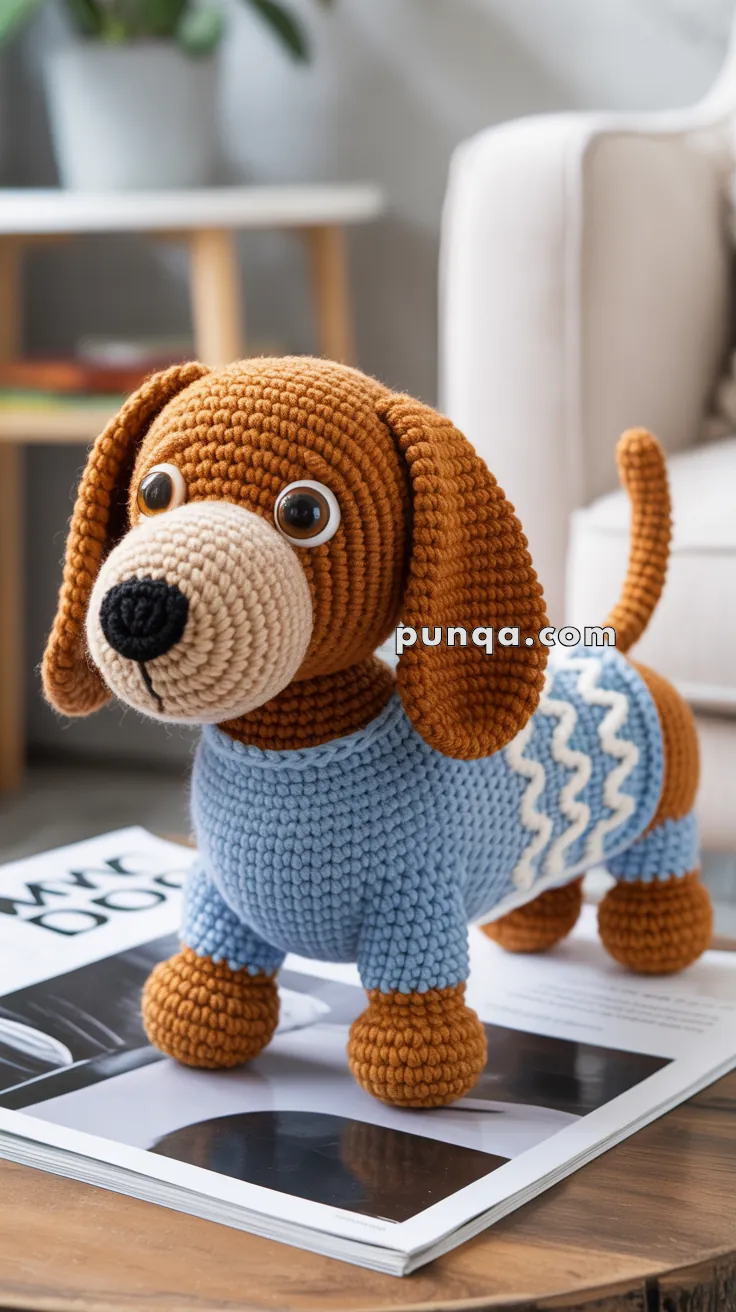
Amigurumi Dachshund Organizer – Free Crochet Pattern

A crocheted dachshund-shaped organizer on a wooden table, holding various craft supplies such as scissors and yarn in its back pockets.
Spread the love

Meet your new crafting companion—the Amigurumi Dachshund Organizer, a delightful blend of cuteness and practicality! 🐶🧶 This multifunctional pup isn’t just a plushie; he’s a loyal little helper with side pockets perfect for holding yarn balls, scissors, hooks, and all your favorite tools. With his long, cozy body and sweet expression, he’s ready to sit by your side and keep your workspace tidy while adding a playful touch to your crochet corner.

Perfect for crocheters who love functional décor and adorable designs, this pattern invites you to stitch up a dachshund that’s both charming and useful. Customize his colors, add a name tag, or tuck in tiny accessories to make him truly yours. The Amigurumi Dachshund Organizer is a joyful way to stitch up organization, personality, and a whole lot of handmade love—one loop at a time! 🧵💛

A crocheted dachshund-shaped organizer on a wooden table, holding various craft supplies such as scissors and yarn in its back pockets.
Pattern Usage Policy

🐶 Amigurumi Dachshund Organizer Crochet Pattern

Keep your yarns, hooks, and craft supplies tidy with this adorable dachshund crochet organizer! This multifunctional amigurumi doubles as a cute plush dog and a handy storage buddy with side pockets for yarn balls, scissors, and tools.

✨ Skill Level

Intermediate – requires shaping, color changes, and assembly skills.

📏 Finished Size

Approximately 30–35 cm (12–14 inches) long using worsted yarn and 3.5 mm hook.

🧶 Materials

  • Worsted weight yarn:
    • Beige/tan – body, legs, head, muzzle, pockets (200g)
    • Brown – ears, collar (50g)
    • Black – nose, embroidery for mouth (small amount)
  • Crochet hook: 3.5 mm (E/4)
  • Polyester fiberfill stuffing
  • Safety eyes: 12–14 mm black plastic eyes (or embroider with black yarn)
  • Yarn needle for sewing & embroidery
  • Stitch markers
  • Scissors

🪡 Abbreviations (US Terms)

  • MR = Magic Ring
  • ch = chain
  • sc = single crochet
  • inc = increase (2 sc in same stitch)
  • dec = decrease (sc2tog)
  • sl st = slip stitch
  • st(s) = stitch(es)
  • BLO = back loop only
  • FLO = front loop only
  • FO = fasten off

🐕 PATTERN INSTRUCTIONS

HEAD

With beige yarn:

Round 1: MR, 6 sc into ring (6)
Round 2: inc × 6 (12)
Round 3: (sc, inc) × 6 (18)
Round 4: (2 sc, inc) × 6 (24)
Round 5: (3 sc, inc) × 6 (30)
Round 6: (4 sc, inc) × 6 (36)
Rounds 7–10: sc around (36)
Round 11: (4 sc, dec) × 6 (30)
Rounds 12–14: sc around (30)

Muzzle shaping:
Round 15: 10 sc, 6 inc, 14 sc (36)
Round 16: sc around (36)
Round 17: 10 sc, (sc, dec) × 4, 14 sc (32)

Insert safety eyes between rounds 10–11, approximately 8–9 stitches apart.

Round 18: (2 sc, dec) × 8 (24)
Round 19: (sc, dec) × 8 (16)

Stuff head very firmly.

Round 20: dec × 8 (8)

FO, leaving a long tail. Weave through remaining stitches and pull tight to close.

Nose & Mouth Embroidery:

  • With black yarn, embroider a triangular or oval nose at the tip of the muzzle
  • Embroider a vertical line from the nose down
  • Add a curved smile line on each side

EARS (Make 2)

With brown yarn:

Round 1: MR, 6 sc into ring (6)
Round 2: (sc, inc) × 3 (9)
Round 3: (2 sc, inc) × 3 (12)
Round 4: sc around (12)
Round 5: (3 sc, inc) × 3 (15)
Rounds 6–16: sc around (15)

FO, leaving a long tail for sewing.

Do not stuff. Flatten ears and sew to sides of head at rounds 8–10, positioning them to hang down naturally.


BODY

With beige yarn:

Starting with an oval base:

Round 1: Ch 12. Starting in 2nd ch from hook: inc, 9 sc, 4 sc in last ch. Continue working on opposite side of chain: 9 sc, inc (24)
Round 2: 2 inc, 9 sc, 4 inc, 9 sc, 2 inc (32)
Round 3: (sc, inc) × 2, 9 sc, (sc, inc) × 4, 9 sc, (sc, inc) × 2 (40)
Round 4: sc around (40)
Round 5: BLO sc around (40) ✨ This creates a ridge for pocket attachment
Rounds 6–33: sc around (40) Adjust number of rounds for desired length
Round 34: (3 sc, dec) × 8 (32)
Round 35: sc around (32)
Round 36: (2 sc, dec) × 8 (24)
Round 37: sc around (24)

Stuff body firmly, but leave the top portion (last 5 rounds) lightly stuffed for easier head attachment.

FO, leaving a long tail for sewing head.


POCKET BAND

With beige yarn:

Foundation: Ch 66
Row 1: Sc in 2nd ch from hook and across (65), turn
Rows 2–4: Ch 1, sc across (65), turn

Creating pocket dividers:

Row 5: Ch 1, 10 sc, ch 2, skip 2 sts, 10 sc, ch 2, skip 2 sts repeat 4 more times, 11 sc (creates 6 sections), turn
Row 6: Ch 1, sc across, working 2 sc into each ch-2 space (65), turn
Rows 7–12: Ch 1, sc across (65), turn

Do not fasten off. Continue with edging:

Edging: Ch 1, sc evenly around all edges of the pocket band (sc in ends of rows along sides, 3 sc in corners). Join with sl st to first sc.

FO, leaving a very long tail for sewing.

To attach pocket band:

  • Wrap the pocket band around the body at the ridge created in round 5 (the BLO round)
  • The band should fit snugly around the body’s circumference (40 sts × gauge ≈ 65 sts flat measurement)
  • Pin in place, creating 6 evenly-spaced pocket compartments
  • Using the long tail and yarn needle, sew the bottom edge of the band securely to the body, stitching into the FLO of round 5
  • Sew the top edge of the band securely to the body
  • Sew vertical seams at each of the 6 divider positions (where the ch-2 spaces were) from top to bottom to create individual pocket compartments

LEGS (Make 4)

With beige yarn:

Round 1: MR, 6 sc into ring (6)
Round 2: inc × 6 (12)
Round 3: BLO sc around (12) Creates foot definition
Rounds 4–9: sc around (12)

Stuff bottom portion only (paw area). Leave top portion unstuffed for easier sewing.

FO, leaving a long tail.

Sew legs to the underside of the body, positioning them evenly: two near the front (around rounds 5–10 of the body) and two near the back (around rounds 25–30 of the body).


TAIL

With beige yarn:

Round 1: MR, 6 sc into ring (6)
Rounds 2–12: sc around (6)

Stuff lightly.

FO, leaving a long tail. Sew to the back end of the body (near round 37), pointing slightly upward or straight back.


COLLAR

With brown yarn:

Foundation: Ch 30 (measure around neck area where head meets body; adjust as needed)
Row 1: Sc in 2nd ch from hook and across (29), turn
Row 2: Ch 1, sc across (29), turn
Row 3: Ch 1, sc across (29)

Do not turn. Continue with edging:

Edging: Ch 1, sc evenly around all edges of collar (sc in ends of rows, 3 sc in corners). Join with sl st to first sc.

FO, leaving a long tail.

Optional: Add a small decorative element like a button, crocheted buckle, or bone-shaped appliqué.

Wrap collar around the neck (where head meets body) and sew ends together securely.


🧵 ASSEMBLY

Follow this order for best results:

  1. Prepare all pieces: Make sure all loose ends are trimmed except for the sewing tails. Have stuffing ready.
  2. Attach pocket band to body: This is easier to do before attaching the head. Follow the detailed instructions in the Pocket Band section. Ensure all 6 pockets are functional and properly divided.
  3. Attach head to body: Position the head at the front (narrower end) of the body, slightly overlapping the top edge. Pin in place. Sew securely all around using the long tail from the body, adding extra stuffing to the neck area as you sew for stability. Make sure the head is centered and facing forward.
  4. Attach ears: Sew ears to sides of head at rounds 8–10, positioning them symmetrically. They should hang down naturally like floppy dachshund ears.
  5. Attach legs: Sew all four legs to the underside of the body, spacing them evenly. Front legs should be positioned closer to the head, back legs closer to the tail area. Make sure the dog can stand balanced.
  6. Attach tail: Sew tail to the back end of the body, centered on the back seam.
  7. Add collar: Wrap collar around neck area (where head meets body) and sew the two short ends together. Position any decorative element at the front or side.
  8. Final details:
    • Check that all parts are securely attached
    • Weave in all remaining loose ends
    • Shape the pockets with your fingers to ensure they’re open and functional
    • Add any final embroidery or embellishments

🎀 Finishing & Use

Your dachshund organizer is complete! Fill the pockets with:

  • Small yarn balls or mini skeins
  • Crochet hooks and knitting needles (sorted by size)
  • Scissors and measuring tape
  • Stitch markers and row counters
  • Yarn needles and tapestry needles
  • Buttons and other notions

This adorable organizer will keep your craft supplies tidy while adding charm to your workspace! 🧶🐕


💡 Tips & Troubleshooting

  • Stuffing: Stuff the head and body firmly to maintain shape and provide stability. Keep legs and tail lightly stuffed for flexibility.
  • Pocket band fit: If your pocket band is too loose or tight, adjust the foundation chain length. Measure around your body at round 5 and chain accordingly (the flat measurement will be larger than the circumference).
  • Pocket depth: Adjust rows 7–12 of the pocket band for deeper or shallower pockets based on what you plan to store.
  • Body length: Add or remove rounds in the body section (rounds 6–33) to customize the dachshund’s length. Dachshunds are characteristically long, so don’t be afraid to make it extra lengthy!
  • Stability: For extra stability, especially if making a larger version, you can:
    • Insert a cardboard oval cut to size in the bottom of the body before final stuffing
    • Use heavier stuffing or add poly pellets to the bottom
    • Make the legs slightly longer for better support
  • Gauge matters: This pattern assumes a tight amigurumi gauge (no gaps showing stuffing). If your stitches are loose, go down a hook size.
  • Safety eyes alternative: If making this for young children or prefer an embroidered look, skip safety eyes and embroider eyes with black yarn instead.

📐 Stitch Count Verification

To help ensure accuracy, here are total stitch counts for key rounds:

  • Head: Starts at 6, increases to 36, decreases back to 8
  • Body: Starts at 24, increases to 40, maintains 40 for length, decreases to 24
  • Pocket band: 65 stitches wide (accommodates 40-stitch circumference when wrapped)
  • Ears: 15 stitches around
  • Legs: 12 stitches around

Enjoy creating your new crafting companion! This little dachshund will faithfully guard your supplies and bring a smile to your face every time you craft. 🎨✨


Spread the love

Comments

No comments yet. Why don’t you start the discussion?

Leave a Reply

Your email address will not be published. Required fields are marked *