Welcome to the playful and adventurous world of amigurumi! 🐊✨ Today, I’m excited to share my free crochet pattern for an Alligator—a bold and quirky companion perfect for wildlife-themed collections, swamp-inspired décor, or anyone who enjoys crafting unique plush creatures! 🌿 Whether you love stitching up expressive animals, enjoy making textured and detailed designs, or simply want to add a charming alligator to your handmade lineup, this pattern will guide you through creating a beautifully sculpted plush friend with a long snout, ridged back, and adorable little legs! 💚
This design embraces dynamic shaping, earthy greens, and fun details to bring a touch of swamp magic to your crochet creations! 🧶🏞️ I’ve carefully outlined each step to ensure your Amigurumi Alligator turns out just right—ready to lounge in your collection or become a treasured handmade gift! 🎁 So grab your hooks, pick out deep greens, soft yellows, and rich browns, and let’s stitch up a delightful alligator friend! ✨
🐊 Amigurumi Alligator Crochet Pattern
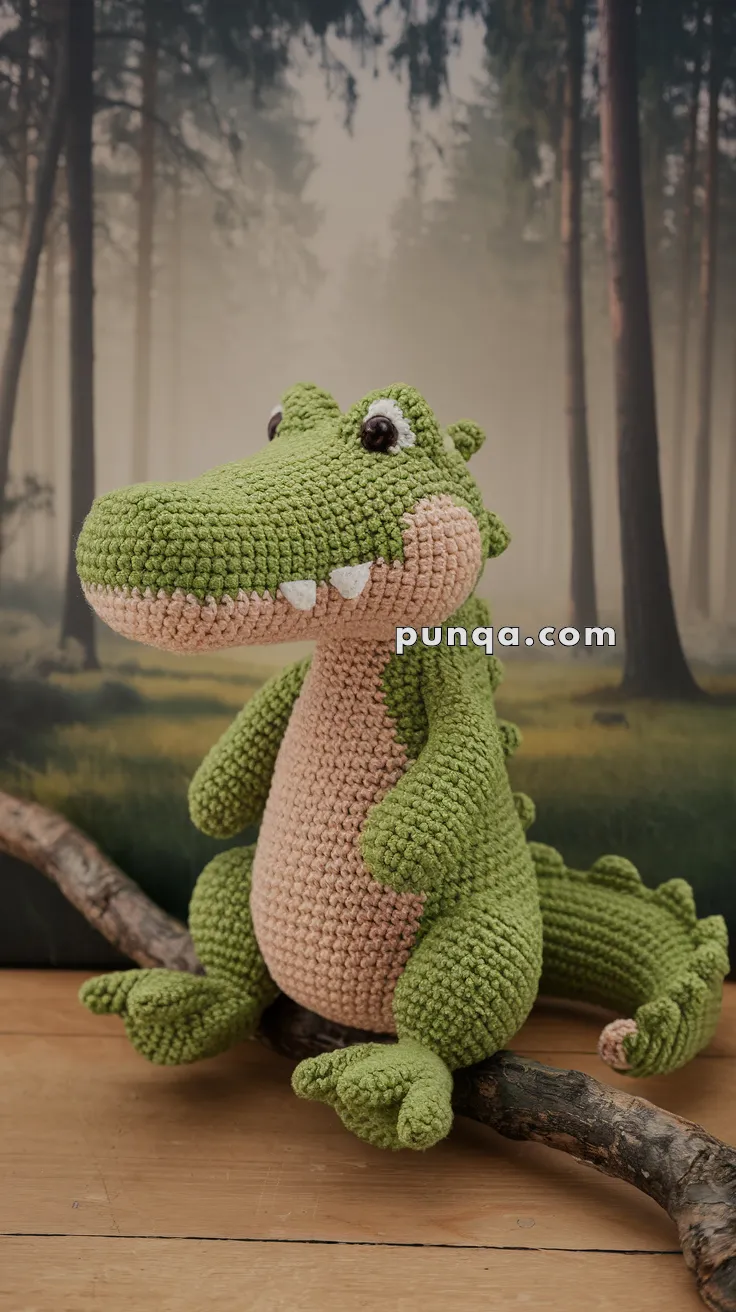
Create a soft, storybook-style alligator with a broad flattened snout, raised cartoon eyes, tiny white teeth, a warm peach lower jaw and belly, long relaxed arms, chunky three-toed feet, a thick curved tail, and a row of soft dorsal spikes running from the head down the back and tail. 💚
The finished alligator is designed in a relaxed seated pose rather than a four-legged crawling position. The body is pear-shaped and upright, the belly is added as a separate appliqué, and the head uses a separate oversized muzzle so the snout stays wide, long, and distinctly flat instead of becoming round.
✨ Skill Level
Intermediate to Advanced
This pattern includes:
- Oval shaping
- Large dimensional muzzle construction
- Separate upper and lower jaw pieces
- Raised eye bumps
- Belly appliqué
- Three-toed feet
- Long tapered tail
- Soft dorsal spikes
- Seated-pose assembly
- Light sculpting and shaping
📏 Finished Size
Using bulky chenille or plush yarn with a 4 mm crochet hook, the finished alligator measures approximately:
- 33–36 cm / 13–14 in tall while seated
- 27–31 cm / 10½–12 in from belly to tail tip when the tail is curved
- About 19–21 cm / 7½–8¼ in across the widest part of the head
Exact size depends on yarn, tension, hook size, stuffing, and tail position.
🧶 Required Yarn Amount
For one alligator:
- 💚 Moss or olive green — approximately 240–280 g
- 🤎 Soft peach, dusty beige, or light tan — approximately 100–120 g
- 🤍 White — approximately 8–10 g
- 🖤 Dark brown or black — approximately 3–5 g
Polyester fiberfill — approximately 300–380 g
If you are using a thinner worsted-weight yarn instead of chenille, the finished alligator will be smaller and you will need less yarn.
🧵 Materials
- 4 mm crochet hook for bulky/chenille yarn
- Optional 3.5 mm hook for the teeth and eye whites
- Two 12–14 mm dark safety eyes
- Polyester fiberfill
- Tapestry needle
- Long doll-making needle
- Stitch markers
- Pins
- Scissors
- Optional plastic pellets for sitting stability
- Optional plastic canvas for the foot soles
For a child under three, embroider the eyes instead of using safety eyes.
🔤 Abbreviations — US Terms
MR — Magic Ring
sc — Single Crochet
inc — Increase: 2 sc in the same stitch
dec — Invisible Decrease
sl st — Slip Stitch
ch — Chain
hdc — Half Double Crochet
dc — Double Crochet
BLO — Back Loop Only
FLO — Front Loop Only
FO — Fasten Off
st — Stitch
Work in continuous rounds unless stated otherwise.
🐊 Head
The back of the head is a rounded green oval. The long muzzle is added separately so the face keeps its wide crocodilian profile.
Using green yarn:
R1
MR 6.
(6)
R2
inc ×6.
(12)
R3
(1 sc, inc) ×6.
(18)
R4
(2 sc, inc) ×6.
(24)
R5
(3 sc, inc) ×6.
(30)
R6
(4 sc, inc) ×6.
(36)
R7
(5 sc, inc) ×6.
(42)
R8
(6 sc, inc) ×6.
(48)
R9–17
sc around.
(48)
R18
(6 sc, dec) ×6.
(42)
R19
(5 sc, dec) ×6.
(36)
Begin stuffing.
R20
(4 sc, dec) ×6.
(30)
R21
(3 sc, dec) ×6.
(24)
Continue stuffing firmly.
R22
(2 sc, dec) ×6.
(18)
R23
(1 sc, dec) ×6.
(12)
R24
dec ×6.
(6)
FO and close.
Shape the head into a wide oval, keeping the forehead broad and the lower front slightly flattened.
🐽 Broad Upper Snout
The upper snout is long, wide, and gently flattened.
Using green yarn:
R1
Ch 13.
Starting in the second chain:
11 sc, 3 sc in the final chain.
Continue along the opposite side:
10 sc, inc.
(26)
R2
inc, 10 sc, 3 inc, 10 sc, 2 inc.
(32)
R3
2 sc, inc, 10 sc, (2 sc, inc) ×3, 10 sc, (2 sc, inc) ×2.
(38)
R4
(5 sc, inc) ×6, 2 sc.
(44)
R5–9
sc around.
(44)
R10
(9 sc, dec) ×4.
(40)
R11
sc around.
(40)
Lightly stuff.
Do not make the snout firm and cylindrical; keep the stuffing shallow so it remains broad and flat.
FO, leaving a long sewing tail.
🤎 Lower Jaw
The lower jaw is slightly narrower and flatter than the upper snout.
Using peach yarn:
R1
Ch 12.
Starting in the second chain:
10 sc, 3 sc in the final chain.
Continue on the opposite side:
9 sc, inc.
(24)
R2
inc, 9 sc, 3 inc, 9 sc, 2 inc.
(30)
R3
2 sc, inc, 9 sc, (2 sc, inc) ×3, 9 sc, (2 sc, inc) ×2.
(36)
R4
sc around.
(36)
R5
sc around.
(36)
FO, leaving a long tail.
Add only a thin layer of stuffing.
Flatten the jaw strongly so it remains visibly lower than the upper snout.
🪡 Joining the Snout and Jaw
Place the peach jaw beneath the green upper snout.
The green section should overhang the peach section slightly at:
- The front
- Both sides
- The upper mouth corners
Sew the back and side edges together.
Leave the center mouth line slightly open visually.
You can add a narrow dark-brown embroidered line between the two pieces to emphasize the smile.
🪡 Attaching the Snout to the Head
Pin the completed muzzle across the lower-front half of the head.
The snout should:
- Project strongly forward
- Remain almost horizontal
- Sit wider than the head at the very front
- Tilt very slightly upward
- Leave plenty of forehead above it for the raised eyes
Sew around the entire back opening.
Add stuffing through the remaining gap before closing.
🤍 Teeth — Make 2
The two visible teeth are small triangular points at the sides of the mouth.
Using white yarn:
Row 1
Ch 4.
Starting in the second chain:
sc, hdc, dc.
FO.
Make two.
Fold each piece slightly and stitch one tooth into each side of the mouth seam.
The point should face downward.
Keep the teeth small rather than oversized.
👁 Raised Eye Bumps — Make 2
Using green yarn:
R1
MR 6.
(6)
R2
inc ×6.
(12)
R3
(1 sc, inc) ×6.
(18)
R4–5
sc around.
(18)
R6
(1 sc, dec) ×6.
(12)
Add a small amount of stuffing.
FO, leaving a long sewing tail.
🤍 Eye Whites — Make 2
Using white yarn:
R1
MR 6.
(6)
R2
inc ×6.
(12)
FO.
Insert one safety eye through the center of each white circle.
Place the white circle against the front of the green eye bump and secure the washer from inside the bump before closing or sewing it to the head.
The white should appear as a narrow halo around the dark eye.
🪡 Attaching the Eyes
Place the eye bumps high on the head.
Position them:
- Close to the upper snout
- Slightly apart
- Angled outward
- With the pupils facing forward
The bumps should project clearly from the forehead.
Sew around each base several times.
👃 Optional Nostrils
Using dark brown yarn, embroider two tiny shallow nostrils near the upper outer sides of the snout.
Keep them subtle.
🧍 Pear-Shaped Body
The body is upright, broad at the lower belly, and narrower near the shoulders.
Using green yarn:
R1
MR 6.
(6)
R2
inc ×6.
(12)
R3
(1 sc, inc) ×6.
(18)
R4
(2 sc, inc) ×6.
(24)
R5
(3 sc, inc) ×6.
(30)
R6
(4 sc, inc) ×6.
(36)
R7
(5 sc, inc) ×6.
(42)
R8
(6 sc, inc) ×6.
(48)
R9–19
sc around.
(48)
Begin stuffing firmly.
R20
(6 sc, dec) ×6.
(42)
R21–23
sc around.
(42)
R24
(5 sc, dec) ×6.
(36)
R25–27
sc around.
(36)
R28
(4 sc, dec) ×6.
(30)
R29–30
sc around.
(30)
R31
(3 sc, dec) ×6.
(24)
Finish stuffing firmly.
FO, leaving a long tail.
Flatten the lower rear slightly so the body sits securely.
🤎 Belly Panel
The belly is a separate long peach oval extending from beneath the chin to the bottom of the torso.
Using peach yarn:
R1
Ch 17.
Starting in the second chain:
15 sc, 3 sc in final chain.
Continue on opposite side:
14 sc, inc.
(34)
R2
inc, 14 sc, 3 inc, 14 sc, 2 inc.
(40)
R3
(5 sc, inc) ×6, 4 sc.
(46)
R4–12
sc around.
(46)
R13
(5 sc, dec) ×6, 4 sc.
(40)
R14
sc around.
(40)
R15
(4 sc, dec) ×6, 4 sc.
(34)
FO, leaving a long sewing tail.
Flatten the panel.
🪡 Attaching the Belly
Position the narrow end high on the chest beneath the neck.
The wide lower section should cover most of the front belly.
Sew around the entire outer edge using peach yarn.
Do not stuff the panel.
💪 Arms — Make 2
The arms are long, rounded, and slightly tapered toward the hands.
Using green yarn:
R1
MR 6.
(6)
R2
inc ×6.
(12)
R3
(1 sc, inc) ×6.
(18)
R4–7
sc around.
(18)
R8
(4 sc, dec) ×3.
(15)
R9–17
sc around.
(15)
R18
(3 sc, dec) ×3.
(12)
R19–20
sc around.
(12)
Lightly stuff, concentrating stuffing toward the hand.
Flatten the shoulder opening.
FO, leaving a long tail.
🪡 Attaching the Arms
Sew the arms high on the sides of the torso.
Angle them downward so the hands rest naturally beside the belly.
The arms should hang almost vertically rather than sticking outward.
🦵 Hind Thighs — Make 2
Using green yarn:
R1
MR 6.
(6)
R2
inc ×6.
(12)
R3
(1 sc, inc) ×6.
(18)
R4
(2 sc, inc) ×6.
(24)
R5
(3 sc, inc) ×6.
(30)
R6–10
sc around.
(30)
R11
(3 sc, dec) ×6.
(24)
R12
(2 sc, dec) ×6.
(18)
Stuff firmly.
FO, leaving a long tail.
Sew the thighs low on each side of the body.
🐾 Feet — Make 2
The feet are broad and point forward.
Using green yarn:
R1
Ch 8.
Starting in the second chain:
6 sc, 3 sc in final chain.
Continue along opposite side:
5 sc, inc.
(16)
R2
inc, 5 sc, 3 inc, 5 sc, 2 inc.
(22)
R3
(3 sc, inc) ×5, 2 sc.
(27)
R4–6
sc around.
(27)
R7
(7 sc, dec) ×3.
(24)
Stuff firmly.
FO.
Flatten the back opening.
🐾 Toes — Make 6
Each foot has three short rounded toes.
Using green yarn:
R1
MR 5.
(5)
R2–4
sc around.
(5)
FO.
Do not stuff heavily.
Sew three toes in a fan across the front of each foot.
Position the center toe slightly farther forward than the side toes.
🪡 Attaching the Feet
Sew one foot in front of each hind thigh.
The soles should face down and the toes should point slightly outward.
The feet should be wide enough apart to stabilize the sitting pose.
🐊 Tail
The tail is thick at the body, long, and gradually tapered.
Using green yarn:
R1
MR 6.
(6)
R2
inc ×6.
(12)
R3
(1 sc, inc) ×6.
(18)
R4
(2 sc, inc) ×6.
(24)
R5
(3 sc, inc) ×6.
(30)
R6–13
sc around.
(30)
R14
(3 sc, dec) ×6.
(24)
R15–20
sc around.
(24)
R21
(2 sc, dec) ×6.
(18)
R22–29
sc around.
(18)
R30
(4 sc, dec) ×3.
(15)
R31–37
sc around.
(15)
R38
(3 sc, dec) ×3.
(12)
R39–46
sc around.
(12)
R47
(2 sc, dec) ×3.
(9)
R48–53
sc around.
(9)
R54
(1 sc, dec) ×3.
(6)
R55–57
sc around.
(6)
Stuff as you go.
Pack the base firmly but keep the narrow half lighter so it can curve.
FO and close.
🤎 Tail Tip Accent
Using peach yarn:
R1
MR 6.
(6)
R2
inc ×6.
(12)
R3–4
sc around.
(12)
R5
dec ×6.
(6)
Lightly stuff.
FO.
Sew the small peach cap onto the tail tip.
🪡 Attaching the Tail
Sew the wide end of the tail low on the back.
Curve the tail toward one side of the body.
Add one hidden tacking stitch where the tail touches the floor or body if you want it to remain in position.
🪭 Dorsal Spikes
The back has a row of soft triangular bumps extending from the top of the head down the spine and along the tail.
Make approximately 12–15 spikes in three sizes.
Small Spike
Using green yarn:
R1: MR 4. (4)
R2: sc around. (4)
R3: (1 sc, inc) ×2. (6)
R4: sc around. (6)
FO.
Medium Spike
R1: MR 4. (4)
R2: (1 sc, inc) ×2. (6)
R3: sc around. (6)
R4: (2 sc, inc) ×2. (8)
R5: sc around. (8)
FO.
Large Spike
R1: MR 4. (4)
R2: (1 sc, inc) ×2. (6)
R3: (2 sc, inc) ×2. (8)
R4: sc around. (8)
R5: (3 sc, inc) ×2. (10)
R6: sc around. (10)
FO.
Do not stuff heavily.
Flatten each base slightly.
🪡 Spike Placement
Arrange the spikes in a single row:
- Small spikes on the upper head
- Medium spikes at the back of the head and neck
- Larger spikes down the upper body
- Medium spikes along the tail base
- Small spikes toward the tail tip
Leave a small gap between each spike.
Sew firmly at the base.
🪡 Head-to-Body Assembly
Position the head at the top front of the body.
The muzzle should angle slightly upward.
Add extra stuffing in the neck area before closing the seam.
Sew around the connection multiple times.
Because the snout is long and front-heavy, reinforce the underside of the neck with additional hidden stitches.
⚖️ Sitting Stability
To keep the alligator upright:
- Stuff the lower body firmly.
- Keep the head firmly packed but avoid excessive stuffing in the muzzle.
- Stuff the thighs and feet well.
- Position the hind feet wide apart.
- Allow the tail to touch the display surface behind or beside the body.
- Add a sealed pouch of plastic pellets to the lower body if necessary.
The tail can act as a third point of support.
🪡 Assembly Order
For the cleanest finish:
- Complete the head.
- Make and attach the upper snout and lower jaw.
- Add the teeth.
- Make the eye bumps and attach the eyes.
- Complete the body.
- Sew on the belly panel.
- Attach the head.
- Sew on the arms.
- Add the hind thighs.
- Make and attach the feet and toes.
- Attach the tail.
- Sew on all dorsal spikes.
- Add nostrils and mouth details.
- Adjust the final sitting pose.
✨ Final Shaping
Pay special attention to the silhouette:
- Keep the snout broad, long, and flattened.
- Let the peach jaw remain clearly visible beneath the green upper muzzle.
- Keep the eye bumps raised above the skull.
- Make the neck relatively narrow beneath the oversized head.
- Keep the body full and pear-shaped.
- Center the peach belly.
- Let the arms hang long beside the belly.
- Position the feet forward with distinct toes.
- Curve the tail strongly to one side.
- Keep the spikes soft and slightly irregular rather than perfectly identical.
💡 Helpful Crochet Tips
Use very small amounts of stuffing in the snout at first. You can always add more before finishing the seam, but overstuffing immediately makes the muzzle too round.
Pin the jaw to the upper muzzle before sewing. Check it from the front and both sides to ensure the peach section is evenly visible.
Attach both eye bumps before permanently securing either one.
For chenille yarn, invisible decreases can sometimes be difficult to see. Mark every decrease round carefully.
Do not overstuff the arms or tail; softer stuffing allows them to curve naturally.
When assembling the feet, pin all six toes before sewing any of them permanently.
🧼 Care Instructions
Spot clean with a damp cloth.
Allow the alligator to air dry completely.
Reshape the snout, feet, spikes, and tail while damp.
Avoid machine washing if safety eyes, plastic pellets, or plastic canvas are used.
🌿 Display Ideas
This friendly alligator makes a playful addition to:
- 🐊 Jungle-themed nurseries
- 🌿 Woodland displays
- 📚 Children’s reading corners
- 🧸 Amigurumi collections
- 🎁 Handmade birthday gifts
- 🌳 Nature-inspired shelves
Its soft shape and warm contrasting belly also make it especially charming beside other crocheted forest or swamp animals.
💚 Final Thoughts
Your friendly alligator is ready to settle into its new home. 🐊✨
With its oversized flattened snout, peach lower jaw, tiny teeth, raised expressive eyes, long belly panel, relaxed arms, chunky three-toed feet, thick curved tail, and row of soft back spikes, this plush combines a wonderfully goofy expression with a cozy storybook silhouette.
Happy crocheting! 🧶🌿