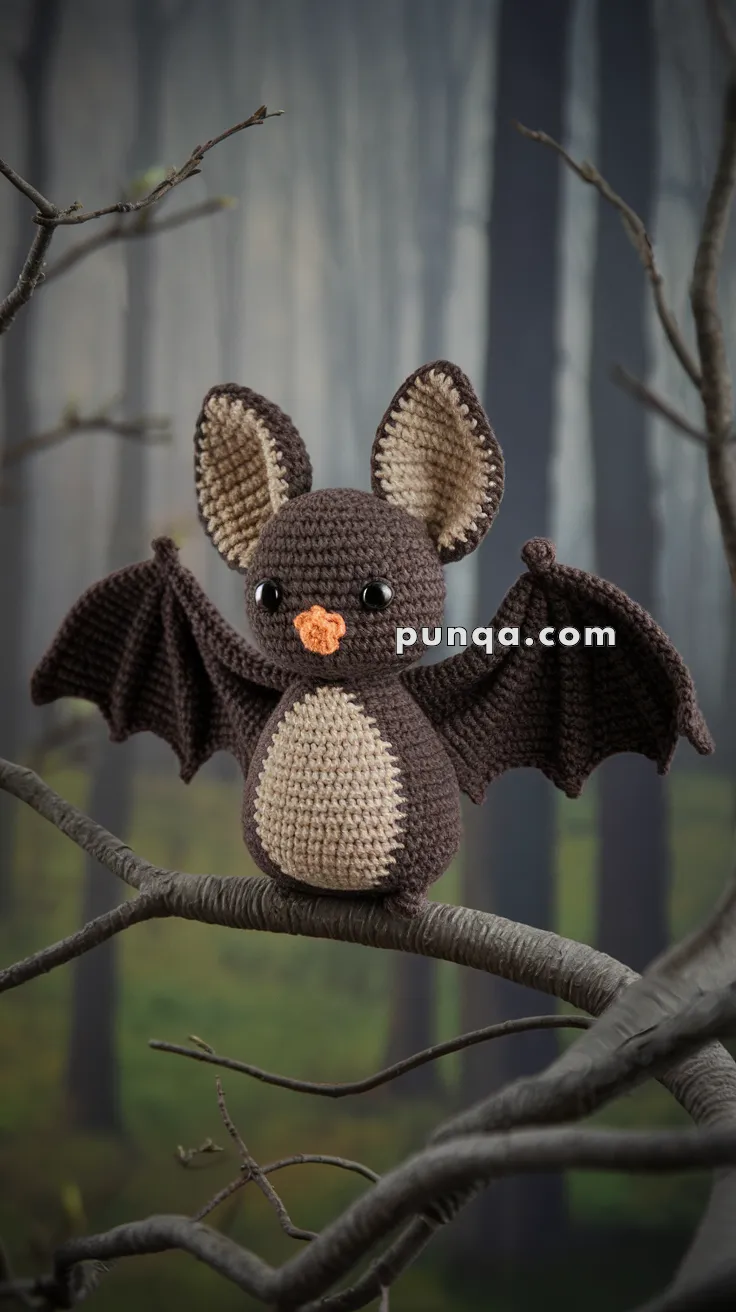
Meet the Amigurumi Bat Baby, a charming little creature that’s ready to flutter into your heart! 🦇🧶 With its upright pose, broad structured wings, large beige-lined ears, and plump beige belly, this brown baby bat is the perfect blend of spooky and sweet. Whether you’re crafting for Halloween, adding to a nocturnal animal collection, or just love unique plush designs, this tiny bat brings a delightful twist to your crochet lineup.
Perfect for crocheters who enjoy sculpted shapes and expressive features, this pattern invites you to stitch up a winged companion full of personality and warmth. Add a tiny bow tie, perch it upside down for fun, or pair it with other nighttime critters for a whimsical display. The Amigurumi Bat Baby is a joyful way to stitch up charm, curiosity, and a sprinkle of handmade magic—one loop at a time! 🧵✨🌙
🦇 Amigurumi Bat Baby Crochet Pattern
Meet your new nocturnal friend — a charming baby bat with oversized ears, wide scalloped wings, and a soft beige belly. Perfect for Halloween decor, woodland nursery themes, or simply for bat lovers, this adorable amigurumi combines gentle shaping with whimsical details for an irresistibly cute result.
✨ Skill Level
Intermediate – includes shaping, flat wing construction, layered ears, and careful assembly.
📏 Finished Size
Approximately 18–20 cm (7–8 inches) tall
Using DK or light worsted yarn with a 3.0 mm hook.
🧶 Yarn Requirements (DK or Light Worsted)
Dark brown (head, body, wings, outer ears): 90–100 g
Beige (belly patch, inner ears): 35–40 g
Orange (nose): less than 5 g
Polyester stuffing: 120–150 g
🧵 Materials
3.0 mm crochet hook
10 mm black safety eyes
Tapestry needle
Stitch markers
Fiberfill stuffing
Optional: light starch or thin wire for wing shaping
🔤 Abbreviations (US Terms)
MR – magic ring
sc – single crochet
inc – increase (2 sc in one stitch)
dec – invisible decrease
sl st – slip stitch
ch – chain
FO – fasten off
Work in continuous rounds unless otherwise noted.
🦇 Head and Body (One Piece Construction)
With dark brown yarn.
Head
R1: MR 6 sc (6)
R2: inc x6 (12)
R3: (1 sc, inc) x6 (18)
R4: (2 sc, inc) x6 (24)
R5: (3 sc, inc) x6 (30)
R6: (4 sc, inc) x6 (36)
R7–12: sc around (36)
Insert safety eyes between R9–10, spaced about 6 stitches apart.
R13: (4 sc, dec) x6 (30)
R14: (3 sc, dec) x6 (24)
R15: (2 sc, dec) x6 (18)
Lightly stuff the head to keep it round and firm.
R16: (1 sc, dec) x6 (12)
Body
R17: inc x6 (18)
R18: (2 sc, inc) x6 (24)
R19: (3 sc, inc) x6 (30)
R20–25: sc around (30)
This section creates the full rounded belly.
R26: (3 sc, dec) x6 (24)
R27: (2 sc, dec) x6 (18)
Stuff firmly so the base remains stable and slightly weighted.
R28: (1 sc, dec) x6 (12)
R29: dec x6 (6)
FO and close tightly.
The final shape should be slightly wider at the lower body than at the neck, creating a balanced seated silhouette.
🌰 Belly Patch
With beige yarn.
Ch 7
Round 1:
Sc in 2nd ch from hook, sc 4, 3 sc in last stitch.
Working along underside: sc 4, 2 sc in last stitch (14)
Round 2:
(2 sc, inc) around (approx. 18)
Round 3–5:
sc around (18)
FO leaving a long tail.
Sew vertically on the front of the body, starting just below the head and ending near the lower belly curve. The patch should form a smooth oval tapering slightly at the top.
🧡 Nose
With orange yarn.
R1: MR 5 sc (5)
R2: inc x5 (10)
R3–4: sc around (10)
R5: (3 sc, dec) x2 (8)
Do not overstuff.
Flatten slightly vertically before sewing.
Position centered beneath the eyes and slightly raised on the snout area.
👂 Ears (Make 2)
Outer Ear – Dark Brown
R1: MR 6 sc (6)
R2: (1 sc, inc) x3 (9)
R3: (2 sc, inc) x3 (12)
R4: (3 sc, inc) x3 (15)
R5: (4 sc, inc) x3 (18)
R6–7: sc around (18)
FO.
Inner Ear – Beige
Repeat R1–R4 only (15 stitches).
FO.
Sew inner panel onto outer ear.
Lightly fold the base and sew to the top sides of the head.
Ears should be tall, wide, and slightly angled forward for expression.
🦇 Wings (Make 2 – Worked Flat)
With dark brown yarn.
Ch 21
Row 1: sc in 2nd ch from hook, sc across (20)
Row 2: ch 1, turn, sc 15, ch 5, skip 4, sc to end
Row 3: ch 1, turn, sc 11, ch 5, skip 4, sc to end
Row 4: ch 1, turn, sc 7, ch 4, skip 3, sc to end
Row 5: ch 1, turn, sc across
FO leaving a long tail.
Gently shape so three scalloped dips form naturally along the lower edge.
Sew the straight inner edge to the side of the body just below the head. Wings should extend outward horizontally with a slight upward lift.
Optional: lightly steam or starch to emphasize scalloped shaping.
🧷 Assembly
-
Sew belly patch neatly in place.
-
Attach ears symmetrically, ensuring they stand upright.
-
Sew wings so they spread evenly on both sides.
-
Attach nose centered beneath eyes.
-
Adjust stuffing and reshape gently by hand.
🌙 Final Look
The finished bat should have:
• A round, compact body
• A smooth oval beige belly
• Tall upright ears with contrast interiors
• Broad wings with three defined scallops
• A small centered vertical nose
✨ Completion
Your handcrafted bat baby is now ready to perch on a shelf, decorate a seasonal display, or become a cuddly woodland companion. Its bold ears, soft belly, and beautifully shaped wings create a balanced and charming silhouette that captures both sweetness and personality.
Enjoy every stitch — and let your little night creature take flight into its new home. 🦇🧶