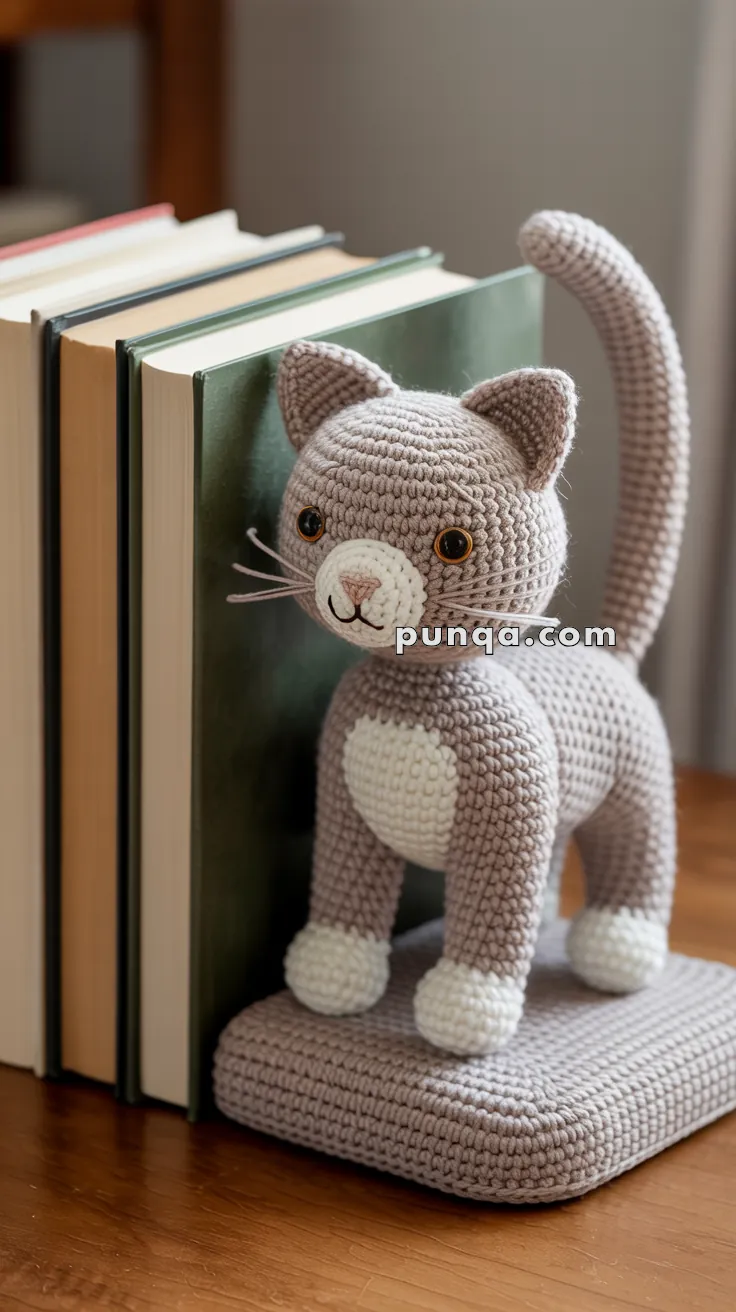
If your bookshelf needs a little feline flair, this Amigurumi Cat Bookend is the purr-fect companion to keep your stories in line! 🐾📚 With its cozy curves, twitchy whiskers, and sleepy-eyed charm, this crochet cutie brings both personality and practicality to your space. Whether you’re a lifelong cat lover or just looking to add a handmade touch to your home, this project is a delightful way to stitch up some whimsy.
Designed to wrap around a standard bookend, this clever kitty can be customized with stripes, spots, or even a tiny collar and bell. You can play with yarn textures to give it a plushy feel or keep it sleek and minimalist—either way, it’s guaranteed to make your shelf smile. From nursery nooks to craft corners, this Cat Bookend Amigurumi adds a dash of charm and a whole lot of character. 🧶🐱💛
🐱 Amigurumi Cat Bookend Crochet Pattern
Add a little handmade personality to your bookshelf with this sweet standing cat bookend. 🧶📚 With its softly rounded gray head, pointed ears, cream muzzle and chest, neat white paws, long upright tail, and sturdy padded base, this project is both decorative and practical.
The cat is constructed in a true four-legged standing pose with a compact oval torso, straight front legs, slightly set-back hind legs, and a long tail that rises dramatically behind the body. The thick rounded-rectangle base is reinforced and weighted so the finished piece can sit securely beside books without tipping.
✨ Skill Level
Intermediate
This project includes:
- Rounded head and body shaping
- Four-leg standing construction
- Oval muzzle and chest appliqués
- Tall curved-tail construction
- Pointed ears
- Weighted padded base
- Facial embroidery
- Reinforced assembly for stability
📏 Finished Size
Using worsted-weight cotton or cotton-blend yarn with a 3–3.5 mm crochet hook, the finished piece measures approximately:
- Cat to top of ears: 21–23 cm / 8¼–9 in
- Cat to top of raised tail: 27–30 cm / 10½–12 in
- Cat body length: approximately 15–17 cm / 6–6¾ in
- Base: approximately 16 × 11 cm / 6¼ × 4¼ in
- Base thickness: approximately 2.5–3 cm / 1–1¼ in
Finished measurements will vary with yarn, hook size, tension, stuffing, and base reinforcement.
🧶 Required Yarn Amounts
For one complete cat bookend:
- 🩶 Warm light gray or taupe-gray — approximately 185–220 g
- 🤍 Cream or soft white — approximately 35–45 g
- 🩷 Dusty pink — approximately 2–3 g
- 🤎 Dark brown or black — approximately 3–5 g
Polyester fiberfill — approximately 180–230 g
You may need another 15–20 g of gray yarn if you make the base larger or the tail especially long.
🧵 Materials
- 3–3.5 mm crochet hook
- Two 10–12 mm amber-brown or dark safety eyes
- Polyester fiberfill
- Tapestry needle
- Long doll-making needle
- Stitch markers
- Pins
- Scissors
- Strong sewing thread
- Plastic canvas or thin rigid plastic for the base
- Poly pellets, glass beads, metal washers, or another enclosed weighting material
- Small fabric pouch for the weights
- Optional 1.5–2 mm aluminum craft wire for the tail
- Floral tape for wrapping wire
If the piece will be handled by a small child, omit wire and loose weights and embroider the eyes instead.
🔤 Abbreviations — US Terms
MR — Magic Ring
sc — Single Crochet
inc — Increase: 2 sc in one stitch
dec — Invisible Decrease
sl st — Slip Stitch
ch — Chain
hdc — Half Double Crochet
BLO — Back Loop Only
FLO — Front Loop Only
FO — Fasten Off
st — Stitch
Work in continuous rounds unless instructed otherwise.
🐱 Rounded Head
The head is softly rounded but slightly longer from forehead to chin than a perfect sphere.
Using gray yarn:
R1
MR 6.
(6)
R2
inc ×6.
(12)
R3
(1 sc, inc) ×6.
(18)
R4
(2 sc, inc) ×6.
(24)
R5
(3 sc, inc) ×6.
(30)
R6
(4 sc, inc) ×6.
(36)
R7
(5 sc, inc) ×6.
(42)
R8
(6 sc, inc) ×6.
(48)
R9–16
sc around.
(48)
Insert the eyes between Rounds 11 and 12, approximately 8 stitches apart.
R17
(6 sc, dec) ×6.
(42)
R18
(5 sc, dec) ×6.
(36)
R19
(4 sc, dec) ×6.
(30)
Begin stuffing firmly.
R20
(3 sc, dec) ×6.
(24)
R21
(2 sc, dec) ×6.
(18)
Continue stuffing, keeping the cheeks softly rounded.
R22
(1 sc, dec) ×6.
(12)
R23
dec ×6.
(6)
FO and close.
Gently shape the head so the lower face projects slightly forward rather than remaining completely spherical.
🤍 Oval Muzzle
The muzzle is broad, low, and softly raised.
Using cream or white yarn:
R1
Ch 8.
Starting in the second chain:
6 sc, 3 sc in final chain.
Continue along opposite side:
5 sc, inc.
(16)
R2
inc, 5 sc, 3 inc, 5 sc, 2 inc.
(22)
R3
(3 sc, inc) ×5, 2 sc.
(27)
R4–5
sc around.
(27)
FO, leaving a long sewing tail.
Add only a thin layer of stuffing.
Flatten the back edge gently.
🪡 Attaching the Muzzle
Pin the muzzle to the lower center of the face.
Its upper edge should sit just below the eyes.
Keep it horizontal and broad rather than round.
Sew around most of the edge, add a little extra stuffing if necessary, then finish closing.
🩷 Nose
Using dusty-pink yarn:
R1
MR 5.
(5)
R2
inc ×5.
(10)
FO.
Flatten the circle into a tiny rounded triangle with your fingers while sewing.
Attach it near the upper center of the muzzle.
😊 Mouth
Using dark-brown or black embroidery thread:
- Make a short vertical line downward from the nose.
- Curve one line gently toward the left.
- Repeat toward the right.
The finished mouth should resemble a small rounded “W.”
Keep the expression subtle.
〰️ Whiskers
Use smooth gray-brown or pale taupe embroidery yarn.
Add three whiskers on each side.
Make them long and fine:
- Upper whisker angled slightly upward
- Middle whisker nearly horizontal
- Lower whisker angled slightly downward
The whiskers should begin at the outer edges of the muzzle rather than directly beneath the nose.
👂 Pointed Ears — Make 2
The ears are tall, softly pointed, and slightly cupped.
Using gray yarn:
R1
MR 4.
(4)
R2
(1 sc, inc) ×2.
(6)
R3
(2 sc, inc) ×2.
(8)
R4
(3 sc, inc) ×2.
(10)
R5
(4 sc, inc) ×2.
(12)
R6
(5 sc, inc) ×2.
(14)
R7
(6 sc, inc) ×2.
(16)
R8–10
sc around.
(16)
Do not stuff.
Flatten the ear.
FO, leaving a long sewing tail.
🪡 Ear Placement
Pin the ears high on the crown, roughly above the outer edges of the eyes.
Pinch the bottom of each ear slightly before sewing to create a shallow cup.
Angle both ears slightly outward.
Sew securely through both layers at the base.
🐈 Oval Body
The torso is a horizontal oval rather than a round upright body.
Using gray yarn:
R1
MR 6.
(6)
R2
inc ×6.
(12)
R3
(1 sc, inc) ×6.
(18)
R4
(2 sc, inc) ×6.
(24)
R5
(3 sc, inc) ×6.
(30)
R6
(4 sc, inc) ×6.
(36)
R7
(5 sc, inc) ×6.
(42)
R8
(6 sc, inc) ×6.
(48)
R9–19
sc around.
(48)
Begin stuffing firmly.
R20
(6 sc, dec) ×6.
(42)
R21–23
sc around.
(42)
R24
(5 sc, dec) ×6.
(36)
R25
(4 sc, dec) ×6.
(30)
R26
(3 sc, dec) ×6.
(24)
Finish stuffing.
FO, leaving a long tail.
When shaping, gently elongate the torso from chest to rump.
🤍 Chest Patch
The chest patch is a vertical oval covering the upper front torso.
Using cream yarn:
R1
Ch 9.
Starting in the second chain:
7 sc, 3 sc in final chain.
Continue along opposite side:
6 sc, inc.
(18)
R2
inc, 6 sc, 3 inc, 6 sc, 2 inc.
(24)
R3
(3 sc, inc) ×6.
(30)
R4–5
sc around.
(30)
FO.
Do not stuff.
Flatten the piece and sew it vertically over the front chest.
The upper edge should begin just beneath the neck, with the lower edge ending above the front legs.
🐾 Front Legs — Make 2
The front legs are straight and slightly longer than the back legs.
Begin with cream yarn for the paw.
R1
MR 6.
(6)
R2
inc ×6.
(12)
R3
(1 sc, inc) ×6.
(18)
R4–6
sc around.
(18)
R7
BLO (1 sc, dec) ×6.
(12)
Switch to gray.
R8–18
sc around.
(12)
Stuff the paw firmly.
Stuff the leg moderately.
Flatten the upper opening.
FO, leaving a long sewing tail.
🐾 Rear Legs — Make 2
The hind legs sit slightly farther back beneath the rump.
Begin with cream yarn.
R1
MR 6.
(6)
R2
inc ×6.
(12)
R3
(1 sc, inc) ×6.
(18)
R4–6
sc around.
(18)
R7
BLO (1 sc, dec) ×6.
(12)
Switch to gray.
R8–16
sc around.
(12)
Stuff firmly.
Flatten the upper opening.
FO, leaving a long tail.
🐾 Paw Shaping
The paws remain plain and rounded without embroidered claws.
To create a soft foot shape:
- Add a little extra stuffing to the cream section.
- Press the underside flat against a table.
- Massage the transition between cream and gray to keep it smooth.
- Make both front paws equal in height before assembly.
🐈 Long Upright Tail
The tail is one of the most important features. It rises almost vertically from the rump, curves gently toward the head, and remains thick throughout most of its length.
Using gray yarn:
R1
MR 6.
(6)
R2
inc ×6.
(12)
R3
(1 sc, inc) ×6.
(18)
R4–8
sc around.
(18)
R9
(4 sc, dec) ×3.
(15)
R10–29
sc around.
(15)
R30
(3 sc, dec) ×3.
(12)
R31–42
sc around.
(12)
R43
(2 sc, dec) ×3.
(9)
R44–48
sc around.
(9)
Stuff lightly as you work.
FO and close.
The tail should measure approximately 22–25 cm / 8¾–10 in before shaping.
🔧 Optional Tail Support
For a firmly upright display tail, use wrapped aluminum craft wire.
Cut the wire slightly shorter than the finished tail.
Fold each end into a closed loop.
Wrap the entire wire with floral tape.
Insert the wire down the center of the tail and surround it completely with fiberfill.
Never allow a bare wire end to press against the crochet fabric.
🪡 Tail Placement
Sew the wide tail base high on the rump.
The first several centimeters should rise almost vertically.
Curve the upper half gently forward.
Add several reinforcement stitches around the tail base because the long tail creates considerable leverage.
🐱 Head-to-Body Assembly
Place the head on the front upper portion of the body.
The neck seam should sit slightly forward of center.
Tilt the head only a few degrees forward.
Pin thoroughly before sewing.
Add extra stuffing between the head and chest if the neck feels weak.
Sew around the entire connection at least twice.
🪡 Leg Placement
Front Legs
Position the front legs:
- Directly beneath the chest
- Nearly vertical
- Slightly wider than the muzzle
- Approximately 3–4 cm apart
Rear Legs
Position the hind legs:
- Beneath the rear half of the torso
- Slightly farther apart
- Angled only a little backward
All four paws must touch the base simultaneously.
Pin the legs while the cat is standing before sewing them permanently.
🧱 Thick Rounded Bookend Base
The base is a thick padded rounded rectangle rather than two simple flat rectangles.
Use gray yarn.
Base Panel — Make 2
R1
Ch 27.
Starting in the second chain:
25 sc, 3 sc in final chain.
Continue along opposite side:
24 sc, inc.
(54)
R2
inc, 24 sc, 3 inc, 24 sc, 2 inc.
(60)
R3
2 sc, inc, 24 sc, (2 sc, inc) ×3, 24 sc, (2 sc, inc) ×2.
(66)
R4
3 sc, inc, 24 sc, (3 sc, inc) ×3, 24 sc, (3 sc, inc) ×2.
(72)
R5
4 sc, inc, 24 sc, (4 sc, inc) ×3, 24 sc, (4 sc, inc) ×2.
(78)
FO after the first panel.
Make the second panel but do not fasten off.
Depending on your yarn tension, the finished panels should measure approximately 16 × 11 cm.
🧱 Base Sidewall
With the second panel still attached:
R6
BLO sc around.
(78)
R7–11
sc around.
(78)
This creates a sidewall approximately 2.5–3 cm deep.
FO, leaving a long joining tail.
⚖️ Reinforcing the Base
Cut two pieces of plastic canvas slightly smaller than the base.
Place one inside the bottom.
Prepare a securely closed fabric pouch containing:
- Poly pellets
- Glass beads
- Flat metal washers
Position the weight toward the book-facing side of the base rather than directly beneath the tail.
Add a thin layer of fiberfill around and above the weight.
Place the second plastic-canvas insert on top.
The base should feel firm and moderately heavy, not soft like a cushion.
🪡 Closing the Base
Place the separate top panel over the stuffed sidewall.
Align the stitches.
Using gray yarn, sc through both layers around the entire edge.
At the rounded corners, work loosely to avoid puckering.
FO and weave in securely.
Press the finished base on a flat surface and massage the corners until they are evenly rounded.
📚 Cat Placement on the Base
Position the cat slightly toward the back-right or back-center portion of the base, leaving enough flat base area beside it for the books.
Pin all four paws to the base.
Check:
- The head is upright.
- All four legs are vertical enough to support the body.
- The tail does not pull the cat backward.
- The books can rest firmly against the side of the cat/base assembly.
Sew each paw firmly to the base using matching yarn and several passes.
For additional security, add one or two hidden stitches between the lower belly and base.
⚖️ Making the Bookend Functional
A decorative crochet base alone is usually too light to resist several hardcover books.
For functional use:
- Keep the weight concentrated low in the base.
- Use plastic canvas above and below the weight.
- Sew all four paws directly through the upper base panel.
- Place the cat close to the books rather than at the outer edge.
- Use metal washers or glass pellets for more weight in less space.
- Make sure the weighted pouch cannot shift inside the base.
For heavy books, the finished base should ideally weigh approximately 700 g–1 kg / 1½–2¼ lb.
🪡 Recommended Assembly Order
For the cleanest finish:
- Crochet and stuff the head.
- Install the eyes.
- Make and attach the muzzle.
- Add nose, mouth, and whiskers.
- Make and attach the ears.
- Crochet and stuff the body.
- Attach the chest patch.
- Make all four legs.
- Pin the legs to the body and check standing balance.
- Sew the legs securely.
- Attach the head.
- Make and shape the tail.
- Sew the tail to the rump.
- Construct and weight the base.
- Position the complete cat on the base.
- Sew all four paws to the base.
- Make final adjustments to the tail and posture.
✨ Final Shaping
For the finished silhouette:
- Keep the head round and slightly forward-facing.
- Position the ears upright and moderately wide apart.
- Keep the muzzle small and centered.
- Make the torso horizontal rather than upright.
- Position the chest patch high between the front legs.
- Keep the front legs straight.
- Place the hind legs beneath the rear half of the body.
- Make all four cream paws similar in size.
- Raise the tail vertically from the rump.
- Curve only the upper portion of the tail.
- Keep the base thick with softly rounded corners.
💡 Helpful Tips
Pin all four legs before permanently attaching any of them. A difference of only one or two rounds in position can make a standing four-legged animal look uneven.
Check the cat from the front, back, and both sides while the legs are pinned.
Stuff the front legs firmly enough to remain straight, but do not pack them so tightly that they become rigid tubes.
Keep the tail relatively lightly stuffed around its upper curve.
Use a smooth cotton yarn for the embroidered mouth and whiskers, even if the rest of the project uses a slightly fuzzy yarn.
If the head tends to droop, add a tightly rolled cylinder of stuffing inside the neck before completing the seam.
🧼 Care Instructions
Dust regularly with a soft brush or lint roller.
Spot clean with a damp cloth.
Allow the bookend to air dry completely.
Do not machine wash a bookend containing plastic canvas, metal weights, pellets, or internal wire.
Keep the base dry to protect the internal reinforcement.
📚 A Cozy Guardian for Your Books
Your little crochet cat is ready for bookshelf duty. 🐱📖
With its soft gray coloring, rounded face, cream muzzle and chest, neat white paws, alert ears, long whiskers, compact standing body, dramatically raised tail, and thick weighted base, this bookend blends practical structure with the warmth of handmade décor.
Place it beside a row of favorite novels, cookbooks, journals, or children’s stories for a charming little shelf companion that looks as though it is proudly guarding the entire collection. 🧶💕