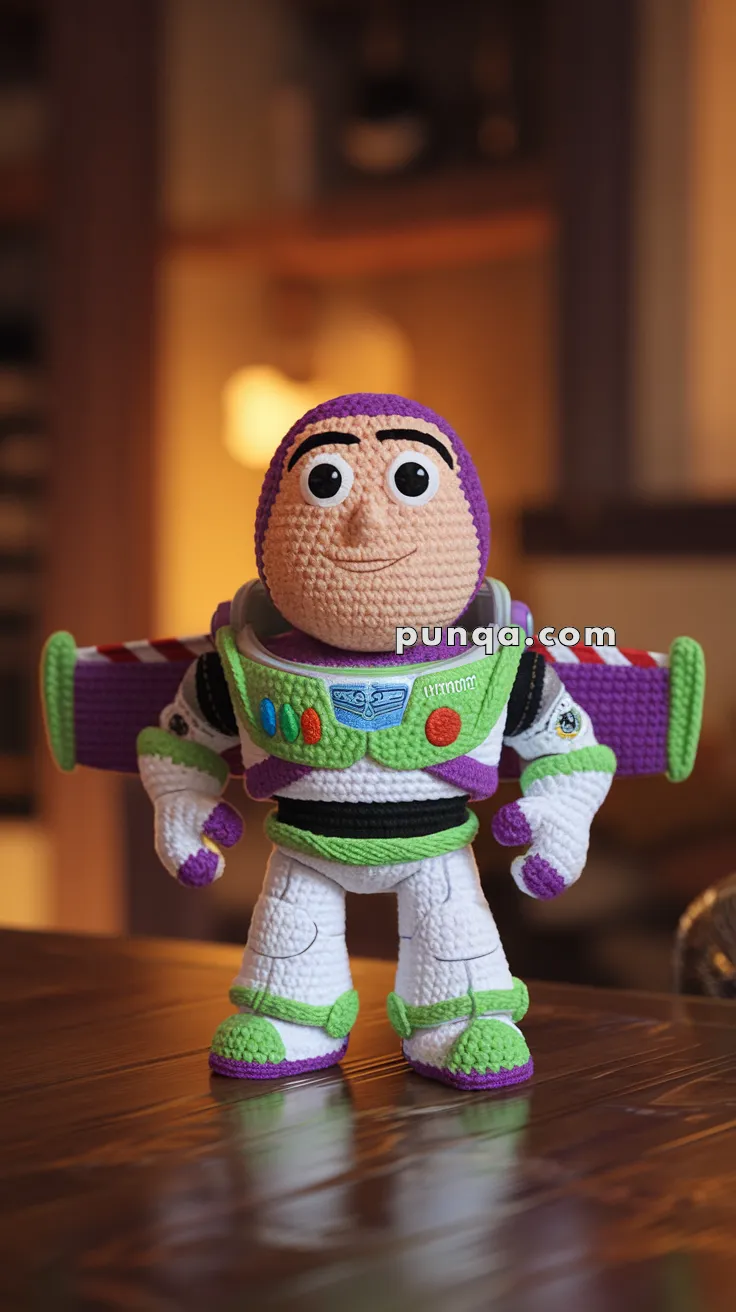
Embark on an intergalactic crochet adventure with this Amigurumi Buzz Lightyear pattern! 🚀✨ With his iconic space suit, determined expression, and heroic stance, this design brings the legendary Toy Story space ranger to life in yarn form. Whether you’re crafting for a Pixar fan, a themed décor piece, or simply love character-inspired amigurumi, this FREE pattern is a stellar addition to your collection.
Designed for intermediate crocheters, this pattern allows for customization in suit details, facial features, and even tiny accessories like a miniature jetpack or a laser button to enhance Buzz’s adventurous presence. Choose classic green, white, and purple for an authentic look or experiment with bold hues for a creative twist! Whether displayed as part of a Toy Story lineup or gifted to a fellow crochet enthusiast, this amigurumi Buzz Lightyear is sure to impress. Grab your hook, select your favorite yarn, and let’s bring this legendary space ranger to life—one stitch at a time! 🧶✨
🚀 Amigurumi Buzz Lightyear Crochet Pattern
“To infinity and beyond!” ✨ This detailed Buzz Lightyear amigurumi brings the beloved Space Ranger from Toy Story to life. Complete with his purple hood, green chest plate, striped jetpack wings, and bold cartoonish proportions, this project is perfect for Disney fans, collectors, and adventurous crocheters.
✨ Skill Level
Advanced Intermediate
Includes shaping, color changes, appliqué work, and structured accessories.
📏 Finished Size
Approx. 28–32 cm (11–13 inches) tall
(using DK yarn and a 3.5–4.0 mm hook)
🧶 Materials (Approximate Yarn Amounts)
DK weight yarn:
- Skin tone (head): 50–60 g
- White (main suit): 100–120 g
- Purple (hood, boots, jetpack): 70–80 g
- Lime Green (chest armor, trim): 40–50 g
- Black (belt, eyebrows, details): 15–20 g
- Red & Blue (buttons): small amounts
Additional materials:
- Thin craft wire or pipe cleaner (for structured wings)
- Optional felt or embroidery thread (for crisp chest details)
Supplies:
- 3.5–4.0 mm crochet hook
- Polyester fiberfill
- Tapestry needle
- Stitch markers
🧵 Abbreviations (US Terms)
MR – Magic Ring
sc – Single Crochet
inc – Increase
dec – Invisible decrease
sl st – Slip stitch
ch – Chain
FO – Fasten Off
CC – Color Change
👤 Head
With skin tone:
Rnd 1: MR 6 (6)
Rnd 2: inc ×6 (12)
Rnd 3: (sc, inc) ×6 (18)
Rnd 4: (2 sc, inc) ×6 (24)
Rnd 5: (3 sc, inc) ×6 (30)
Rnd 6: (4 sc, inc) ×6 (36)
Rnd 7–16: sc 36
Rnd 17: (4 sc, dec) ×6 (30)
Rnd 18: (3 sc, dec) ×6 (24)
Rnd 19: (2 sc, dec) ×6 (18)
Stuff firmly.
Rnd 20: (sc, dec) ×6 (12)
Rnd 21: dec ×6 (6)
FO
👀 Face Details
Attach safety eyes or crocheted eyes evenly spaced.
Embroider thick eyebrows and a soft curved smile for a friendly expression.
🟣 Hood
With purple:
Rnd 1: MR 6
Rnd 2: inc ×6 (12)
Rnd 3: (sc, inc) ×6 (18)
Rnd 4: (2 sc, inc) ×6 (24)
Rnd 5: (3 sc, inc) ×6 (30)
Rnd 6: (4 sc, inc) ×6 (36)
Rnd 7: (5 sc, inc) ×6 (42)
Rnd 8–12: sc 42
Rnd 13: BLO sc 42
FO and fit snugly around the head, framing the face neatly.
🚀 Torso
With white:
Rnd 1: MR 6
Rnd 2: inc ×6 (12)
Rnd 3: (sc, inc) ×6 (18)
Rnd 4: (2 sc, inc) ×6 (24)
Rnd 5: (3 sc, inc) ×6 (30)
Rnd 6–10: sc 30
Rnd 11–13: incorporate lime green across the front section
Rnd 14: (3 sc, dec) ×6 (24)
Rnd 15: (2 sc, dec) ×6 (18)
Stuff firmly and fasten off.
💪 Arms (Make 2)
With white:
Rnd 1: MR 6
Rnd 2: inc ×6 (12)
Rnd 3–8: sc 12
Switch to purple:
Rnd 9–11: sc 12
Lightly stuff and fasten off.
🟢 Wrist Bands
Chain 14, join to form a ring.
Work 2 rounds of single crochet.
Slide onto wrists and secure.
🦵 Legs (Make 2)
Start with purple:
Rnd 1: MR 6
Rnd 2: inc ×6 (12)
Rnd 3: (sc, inc) ×6 (18)
Rnd 4–6: sc 18
Switch to white:
Rnd 7–17: sc 18
Stuff firmly and fasten off.
🥾 Boots
With purple:
Rnd 1: MR 6
Rnd 2: inc ×6 (12)
Rnd 3: (sc, inc) ×6 (18)
Rnd 4: (2 sc, inc) ×6 (24)
Rnd 5–6: sc 24
Switch to lime green:
Rnd 7: sc 24
Flatten slightly to create a stable base.
🎒 Jetpack
With purple:
Row 1: ch 16, sc across (15)
Rows 2–8: sc across
Make two panels, sew together, and lightly stuff.
Attach flat against the back.
🪽 Wings
With white and red:
Row 1: ch 26
Rows 2–6: alternate red and white stripes
Add green tips using short rows.
Insert wire inside if desired to keep wings extended.
Attach evenly to the jetpack so they extend outward.
🔘 Chest Panel Details
- Crochet small circles for buttons
- Add embroidered or felt panels
- Stitch fine details with contrasting yarn
🧩 Assembly
Attach head securely to torso.
Fit hood snugly around the face.
Sew arms slightly forward.
Attach legs evenly for balance.
Secure boots under legs.
Attach jetpack centered on the back.
Sew wings straight and symmetrical.
Add chest details neatly.
✨ Finishing Touches
Shape the head for a smooth, rounded look 🚀
Ensure wings are aligned and level
Adjust arms for a confident stance
Check that boots sit flat for stability
💛 Final Thoughts
This space ranger amigurumi combines bold design, structured shaping, and playful detail into a striking handmade figure. With its vibrant suit, iconic wings, and expressive face, it’s a fun and rewarding project that stands out beautifully in any collection.
Enjoy bringing your own heroic character to life—one stitch at a time! 🧶🌌