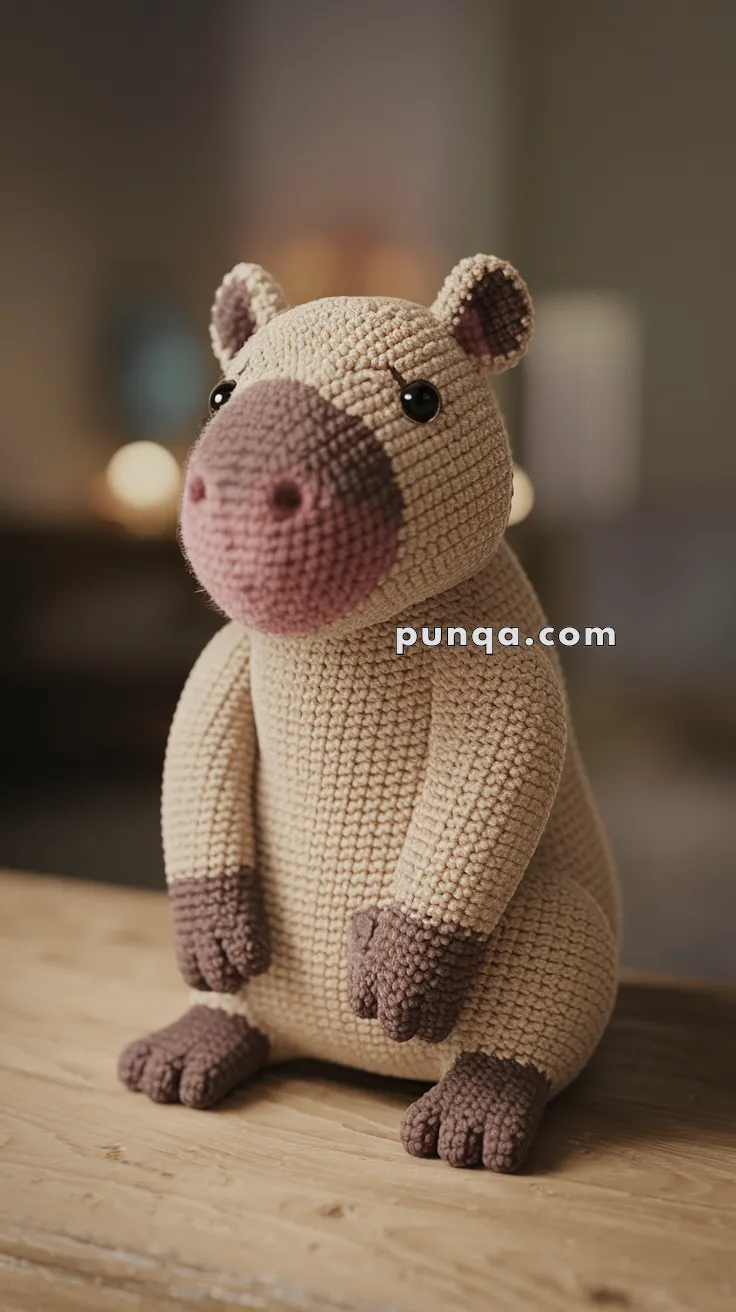
Bring a dose of adorable charm to your crochet collection with the Amigurumi Capybara, a project that’s as cuddly as it is unique! 🧶✨ With its large oval body, short curved arms, and broad flat feet complete with visible toe lines, this design captures the gentle, laid-back personality of the world’s favorite oversized rodent. The huge round snout that dominates its head, paired with dark brown paw tips and inner-ear lining, makes this capybara irresistibly cute and full of character.
Perfect for animal lovers and crocheters who enjoy crafting whimsical companions, this plush capybara is both fun to make and delightful to display. Whether gifted to a friend, added to a collection of handmade critters, or simply enjoyed as a cozy keepsake, the Amigurumi Capybara is a joyful way to crochet personality, playfulness, and a sprinkle of handmade magic—one loop at a time! 🧵💛🌿
Amigurumi Capybara Crochet Pattern
Capybaras are famous for their peaceful personalities, soft expressions, and gentle presence — and this amigurumi version captures all of that charm in plush form.
Perfect as a minimalist shelf decoration, a thoughtful handmade gift, a cozy nursery accent, or simply a relaxing creature to keep beside your workspace, this amigurumi capybara brings a touch of tranquility wherever you place it. Grab your yarn, settle in, and stitch up your very own gentle friend!
You can crochet this capybara in two ways:
- Option A: Head & body in one piece
- Option B (Beginner): Head and body made separately and sewn together
Both options result in the same finished look.
✨ Skill Level
Advanced Beginner – Intermediate
Includes shaping, color changes, and finger & toe construction.
📏 Finished Size
Approx. 22–26 cm (9–10 inches) tall when seated
(using DK / light worsted yarn with 2.5–3.0 mm hook)
🧶 Materials
Yarn (DK / Light Worsted):
- Warm beige / tan – head & body (≈80 g)
- Dusty mauve – snout (≈20 g)
- Chocolate brown – hands, feet, inner ears (≈25 g)
- Black – mouth embroidery (small amount)
Notions:
- 12–14 mm safety eyes
- Fiberfill stuffing
- Yarn needle
- Stitch marker
- Scissors
🧵 Abbreviations (US Terms)
MR – Magic ring
sc – single crochet
inc – increase
dec – invisible decrease
ch – chain
sl st – slip stitch
FO – fasten off
Work in continuous rounds unless stated.
OPTION A – ONE-PIECE HEAD & BODY
🐽 Head, Snout & Body (Worked as One Piece)
Start with Mauve (Snout)
R1: MR 6 (6)
R2: inc ×6 (12)
R3: (sc, inc) ×6 (18)
R4: (2 sc, inc) ×6 (24)
R5: (3 sc, inc) ×6 (30)
R6: (4 sc, inc) ×6 (36)
R7–11: sc around (36)
Switch to Beige.
R12–22: sc around (36)
Insert eyes between R12–13, 10–12 sts apart.
R23: (4 sc, dec) ×6 (30)
R24–30: sc around (30)
R31: (3 sc, dec) ×6 (24)
R32–38: sc around (24)
R39: (2 sc, dec) ×6 (18)
R40–46: sc around (18)
R47: (sc, dec) ×6 (12)
R48–52: sc around (12)
Stuff firmly, shaping a rounded belly.
R53: dec ×6 (6)
FO and close.
OPTION B – BEGINNER FRIENDLY (HEAD & BODY SEPARATE)
🐽 Head
Start with Mauve.
R1: MR 6
R2: inc ×6 (12)
R3: (sc, inc) ×6 (18)
R4: (2 sc, inc) ×6 (24)
R5: (3 sc, inc) ×6 (30)
R6: (4 sc, inc) ×6 (36)
R7–11: sc around (36)
Switch to Beige.
R12–17: sc around (36)
Insert eyes between R12–13 (10–12 sts apart).
R18: (4 sc, dec) ×6 (30)
R19: (3 sc, dec) ×6 (24)
R20: (2 sc, dec) ×6 (18)
Stuff firmly.
R21: (sc, dec) ×6 (12)
R22: dec ×6 (6)
FO and close.
🧍 Body
R1: MR 6
R2: inc ×6 (12)
R3: (sc, inc) ×6 (18)
R4: (2 sc, inc) ×6 (24)
R5: (3 sc, inc) ×6 (30)
R6: (4 sc, inc) ×6 (36)
R7–18: sc around (36)
R19: (4 sc, dec) ×6 (30)
R20–22: sc around (30)
R23: (3 sc, dec) ×6 (24)
R24–26: sc around (24)
R27: (2 sc, dec) ×6 (18)
Stuff firmly.
R28: sc around (18)
FO leaving long tail.
Sew head to body.
👃 Nostrils
With mauve yarn:
- Add two small nostrils between snout rounds 6–7
- Space 3–4 stitches apart
- Keep subtle and shallow
👂 Ears (Make 2)
Start Beige.
R1: MR 6
R2: (2 sc, inc) ×2 (8)
R3: sc around (8)
Switch to Brown.
R4–5: sc around (8)
Flatten and FO.
Attach high on the sides of the head, brown facing forward.
🤲 Arms with 3 Fingers (Make 2)
Hand (Brown)
R1: MR 6
R2: (sc, inc) ×3 (9)
Create 3 fingers:
R3: (ch 2, 2 sc in chain, sl st next st) ×3
(creates 3 rounded fingers)
R4: sc around base stitches only (9)
Switch to Beige.
R5–14: sc around (9)
Lightly stuff only the upper arm.
FO.
Attach arms just below head, angled inward toward belly.
🦶 Legs with 3 Toes (Make 2)
Foot (Brown)
R1: MR 6
R2: inc ×6 (12)
R3: (sc, inc) ×6 (18)
Create 3 toes:
R4: (ch 2, 2 sc in chain, sl st next st) ×3
(creates 3 rounded toes)
R5: sc around base stitches only (18)
Switch to Beige.
R6–13: sc around (18)
Stuff firmly in foot, lightly in leg.
FO.
Attach legs close together at front base so the capybara sits upright.
🦫 Tail (Small)
With brown:
R1: MR 5
R2–3: sc around (5)
FO.
Attach low on back.
😊 Mouth
With black yarn:
- Stitch a tiny straight mouth line below snout
- No eyebrows
- No blush
🧩 Assembly
- Attach ears high and slightly outward
- Sew arms resting against belly
- Attach legs close together at front base
- Add nostrils and mouth
- Shape fingers and toes gently outward
✂️ Finishing Touches
- Flatten feet so the doll sits steadily
- Keep stuffing firm for rounded shape
- Steam lightly if needed
- Weave in all ends neatly
🌿 Final Notes
Your capybara is now complete — calm, rounded, and true to its gentle character.
With its large snout, wide-set eyes, small ears, and clearly shaped three fingers and three toes, this design reflects the peaceful look shown in the image.
Whether placed on a shelf, styled in a cozy interior, or gifted to someone special, this capybara brings warmth and quiet charm to any space.
This is not just an amigurumi — it’s a serene little companion stitched with care. 🧶🦫✨