Curl up with the cozy charm of the Amigurumi Cat, a delightful crochet project that’s bursting with personality and plushy perfection! 🐱🧶 With its oversized head, tapered tail, and realistic sitting pose (four legs and all!), this feline friend looks just like a toy come to life—ready to perch on your shelf, snuggle into a gift box, or become a beloved companion for cat lovers of all ages.
Perfect for crocheters who enjoy expressive shaping and adorable details, this pattern invites you to explore soft textures, playful proportions, and a touch of whiskered whimsy. Customize your kitty with stripes, spots, or solid colors, add a tiny collar or bow, or stitch up a whole litter in different poses. The Amigurumi Cat is a heartwarming way to stitch up snuggles, smiles, and a whole lot of handmade meow-gic—one loop at a time! 🧵🐾
🐱 Amigurumi Cat Crochet Pattern
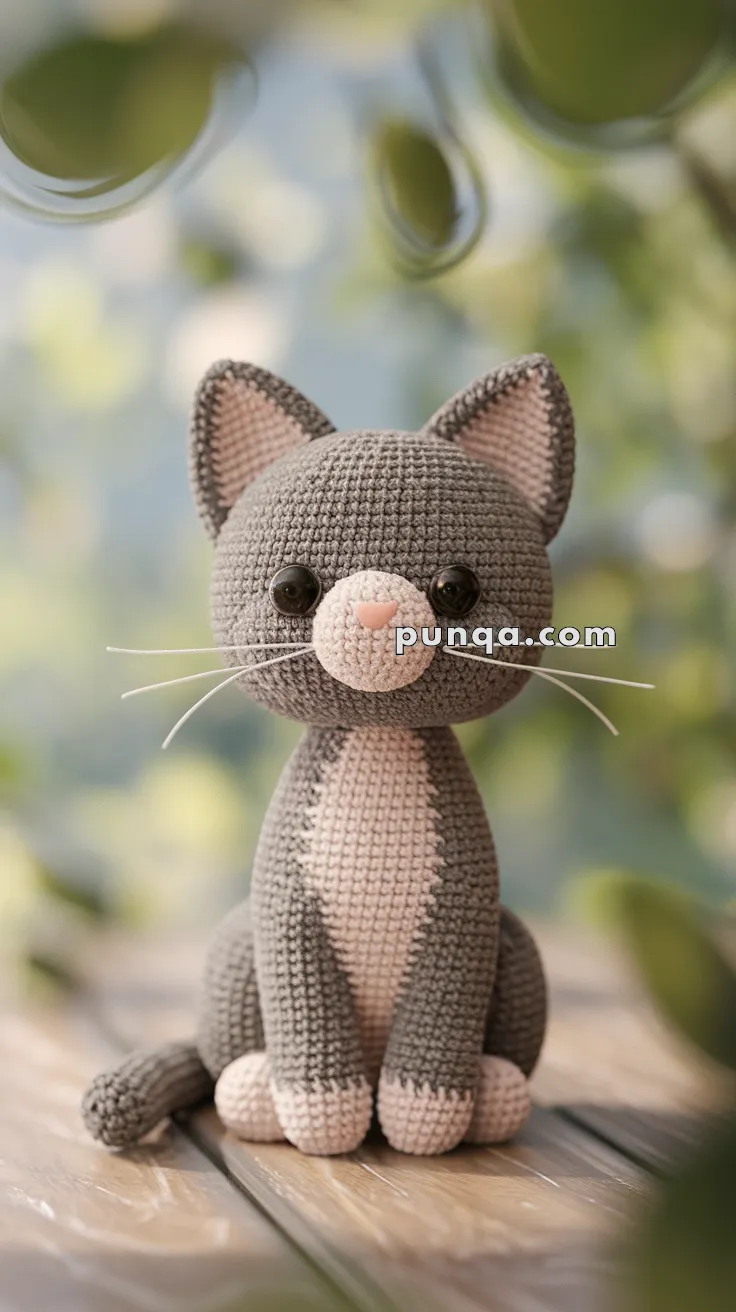
This sweet gray kitty sits tall with big curious eyes, a soft pink belly, and playful paw tips. With its oversized head, tapered tail, and realistic sitting pose (four legs!), it looks just like a plush toy come to life. Follow this step-by-step pattern to make your own adorable cat amigurumi!
✨ Skill Level
🧶 Intermediate
Includes shaping, color placement, assembly, and facial detailing.
📏 Finished Size
Approx. 20–22 cm (8–8.5 inches) tall (sitting)
🧶 Materials & Yarn Amount
DK or light worsted yarn:
Gray (head, body, ears, tail): 95 g (~285 m)
Beige / light cream (muzzle, chest, paw bottoms): 50 g (~150 m)
Soft pink (nose, inner ears): 5 g (~15 m)
Other:
3.0 mm crochet hook
10–12 mm black safety eyes
Polyfill stuffing (220–260 g)
Tapestry needle
Stitch markers
Thin fishing line or stiff thread (whiskers)
🧵 Abbreviations (US Terms)
MR – magic ring
sc – single crochet
inc – increase
dec – invisible decrease
ch – chain
sl st – slip stitch
FO – fasten off
🐱 Head (Large, smooth sphere)
With gray:
Rnd 1: MR 6
Rnd 2: inc ×6 (12)
Rnd 3: (1 sc, inc) ×6 (18)
Rnd 4: (2 sc, inc) ×6 (24)
Rnd 5: (3 sc, inc) ×6 (30)
Rnd 6: (4 sc, inc) ×6 (36)
Rnd 7: (5 sc, inc) ×6 (42)
Rnd 8–15: sc around (42)
👉 Insert eyes between Rnds 11–12, spaced 8–9 stitches apart
Close head
Rnd 16: (5 sc, dec) ×6 (36)
Rnd 17: (4 sc, dec) ×6 (30)
Rnd 18: (3 sc, dec) ×6 (24)
Stuff firmly
Rnd 19: (2 sc, dec) ×6 (18)
Rnd 20: (1 sc, dec) ×6 (12)
Rnd 21: dec ×6 (6)
FO.
🐾 Muzzle (Full, round, prominent)
With beige:
Rnd 1: MR 6
Rnd 2: inc ×6 (12)
Rnd 3: (1 sc, inc) ×6 (18)
Rnd 4–6: sc around (18)
Lightly stuff
FO and sew centered under eyes.
👉 Keep shape perfectly round and slightly protruding
Nose & Mouth
Embroider a small soft triangle nose in pale pink
Optional: tiny straight stitch under nose for subtle mouth
👂 Ears (Tall, slightly narrow triangles)
Make 2 outer (gray):
Rnd 1: MR 4
Rnd 2: (1 sc, inc) ×2 (6)
Rnd 3: (2 sc, inc) ×2 (8)
Rnd 4: (3 sc, inc) ×2 (10)
Rnd 5: (4 sc, inc) ×2 (12)
FO.
Inner ears (beige/pink):
Rnd 1: MR 4
Rnd 2: (1 sc, inc) ×2 (6)
Rnd 3: (2 sc, inc) ×2 (8)
FO and sew inside.
👉 Slightly pinch base before attaching
👉 Position high and slightly angled outward
🧍 Body (Slim, upright with centered chest)
Start with beige:
Rnd 1: MR 6
Rnd 2: inc ×6 (12)
Rnd 3: (1 sc, inc) ×6 (18)
Rnd 4: (2 sc, inc) ×6 (24)
Rnd 5–9: sc around (24)
Form chest panel
Switch to gray while keeping front stitches beige
Rnd 10–18: sc around (24)
👉 Maintain a clean vertical beige chest shape
Close body
Rnd 19: (2 sc, dec) ×6 (18)
Rnd 20: (1 sc, dec) ×6 (12)
Stuff firmly (slightly heavier at bottom)
FO.
🐾 Front Legs (Straight and symmetrical)
Make 2:
Start with beige:
Rnd 1: MR 6
Rnd 2: inc ×6 (12)
Rnd 3–4: sc around (12)
Switch to gray:
Rnd 5–13: sc around (12)
Light stuffing
FO.
👉 Sew very close together at front
👉 Bottoms slightly flattened
🐾 Back Legs (Rounded, visible side shapes)
Make 2 (gray):
Rnd 1: MR 6
Rnd 2: inc ×6 (12)
Rnd 3–6: sc around (12)
Flatten slightly
FO.
👉 Attach low on sides
👉 Keep rounded and slightly protruding
🐱 Tail (Medium length, softly curved)
With gray:
Rnd 1: MR 6
Rnd 2: inc ×6 (12)
Rnd 3–5: sc around (12)
Rnd 6: (2 sc, dec) ×3 (9)
Rnd 7–15: sc around (9)
Light stuffing
FO.
👉 Curve gently and rest to one side
🧵 Whiskers
Cut 6 thin strands (6–8 cm)
Insert 3 per side of muzzle
👉 Keep straight and slightly outward
🧩 Assembly
🪡 Sew muzzle centered below eyes
🪡 Attach ears symmetrically on top
🪡 Join head to body with slight forward tilt
🪡 Attach front legs touching at center
🪡 Sew back legs at lower sides
🪡 Attach tail slightly off-center
🧶 Shaping Tips
✨ Keep head smooth and round
✨ Muzzle should be clearly raised
✨ Chest panel centered and even
✨ Front paws aligned neatly together
✨ Back legs support upright sitting pose
✨ Tail relaxed and natural
✂️ Finishing Touches
✨ Adjust stuffing for clean silhouette
✨ Align facial features carefully
✨ Trim whiskers evenly
✨ Lightly shape cheeks if needed
🐾 Final Result
A beautifully balanced sitting cat with soft contrast colors, a sweet rounded face, and a calm upright posture. The combination of a prominent muzzle, glossy eyes, and tidy paws gives this design a lifelike yet cozy handmade feel. 🧶🐱💛