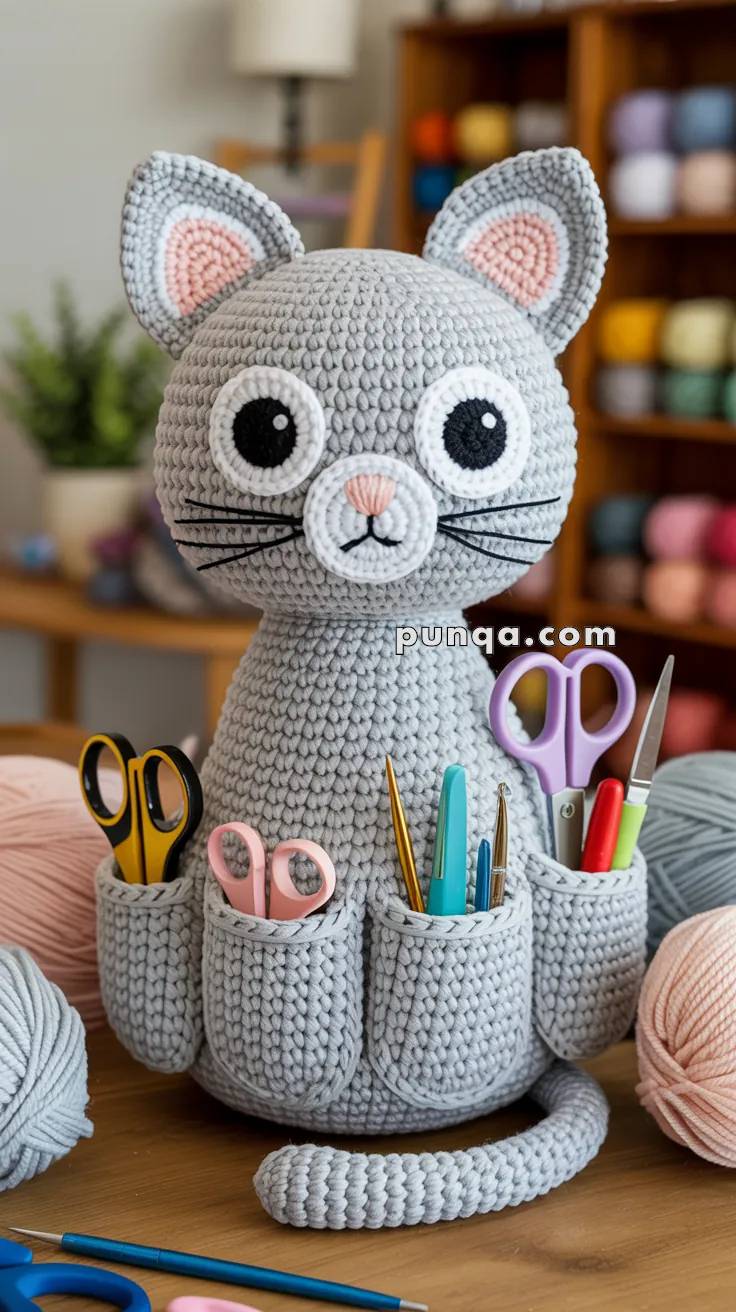
Tidy up your crafting space with a purr-fect companion—the Amigurumi Cat Organizer, a crochet project that’s as helpful as it is heart-melting! 🧶🐱 With its round base, roomy pockets, and sweet kitty face, this adorable organizer is ready to keep your hooks, scissors, and stitch markers in check while adding a cozy touch to your workspace. Whether perched on your desk or nestled beside your yarn stash, it’s sure to bring a smile every time you reach for your tools.
Ideal for crocheters who love combining function with charm, this pattern invites you to play with soft textures, playful shaping, and feline-inspired details. Customize your kitty with different colors, add little whiskers or bows, and make it truly your own. The Amigurumi Cat Organizer is a delightful way to stitch up organization, personality, and a whole lot of handmade joy—one loop at a time! 🧵💖
🐱 Crochet Cat Organizer Pattern
This adorable crochet cat organizer is the perfect blend of practicality and charm. With its cylindrical pockets, oversized head, sweet embroidered details, and sturdy base, it keeps all your craft essentials—scissors, hooks, pens, and more—within easy reach. Made with bulky yarn for durability and structure, this project is both functional and irresistibly cute.
✨ Skill Level
Intermediate – includes shaping, structural building, and multi-part assembly.
📏 Finished Size
Approx. 30–32 cm (12–12.5 in) tall
Base diameter: 16–18 cm (6–7 in)
🧶 Materials & Yarn Amount
- Light gray bulky yarn (body, head, ears, tail, pockets): 380–420 g
- White yarn (eyes, muzzle): 60–80 g
- Pink yarn (inner ears, nose): 10–15 g
- Black yarn (pupils, whiskers): small amount
Supplies:
- 5.0–5.5 mm hook
- Fiberfill stuffing (~200 g)
- Yarn needle, stitch marker
- Optional: plastic canvas or cardboard base insert
🧵 Abbreviations (US Terms)
MR – magic ring
sc – single crochet
inc – increase
dec – invisible decrease
sl st – slip stitch
FO – fasten off
BLO – back loop only
🐾 Base (Wide & Structured)
R1: MR, 6 sc (6)
R2: inc ×6 (12)
R3: (1 sc, inc) ×6 (18)
R4: (2 sc, inc) ×6 (24)
R5: (3 sc, inc) ×6 (30)
R6: (4 sc, inc) ×6 (36)
R7: (5 sc, inc) ×6 (42)
R8: (6 sc, inc) ×6 (48)
R9: (7 sc, inc) ×6 (54)
R10: (8 sc, inc) ×6 (60)
R11: (9 sc, inc) ×6 (66)
👉 Insert stabilizer if desired
🐱 Body (Tall Cylinder)
Continue from base:
R12: BLO sc around (66)
R13–22: sc around (66)
👉 Keep lower half lightly stuffed for firmness
🔻 Neck Transition (Smooth Taper)
R23: (9 sc, dec) ×6 (60)
R24: (8 sc, dec) ×6 (54)
R25: (7 sc, dec) ×6 (48)
R26: (6 sc, dec) ×6 (42)
R27: (5 sc, dec) ×6 (36)
R28–30: sc around (36)
FO leaving long tail
👉 This creates a clean narrowing before the head
📦 Pockets (Make 8)
R1: MR, 6 sc
R2: inc ×6 (12)
R3–13: sc around (12)
R14: sl st loosely around
FO with long tail
Placement
- 4 pockets evenly spaced on the front
- 4 pockets mirrored on the back
- Bottom edge aligned near Body R13
- Tops reach mid-body
👉 Sew bottom first, then sides
👉 Leave top open and slightly rounded
🐾 Head (Large & Rounded)
R1: MR, 6 sc (6)
R2: inc ×6 (12)
R3: (1 sc, inc) ×6 (18)
R4: (2 sc, inc) ×6 (24)
R5: (3 sc, inc) ×6 (30)
R6: (4 sc, inc) ×6 (36)
R7: (5 sc, inc) ×6 (42)
R8: (6 sc, inc) ×6 (48)
R9: (7 sc, inc) ×6 (54)
R10–17: sc around (54)
R18: (7 sc, dec) ×6 (48)
R19: (6 sc, dec) ×6 (42)
R20: (5 sc, dec) ×6 (36)
R21: (4 sc, dec) ×6 (30)
R22: (3 sc, dec) ×6 (24)
Stuff firmly
R23: (2 sc, dec) ×6 (18)
R24: (1 sc, dec) ×6 (12)
R25: dec ×6 (6)
FO
👀 Eyes (Make 2)
White base:
MR 6
inc ×6 (12)
(1 sc, inc) ×6 (18)
Black pupil:
MR 6
inc ×6 (12)
👉 Attach pupil centered
👉 Sew eyes evenly spaced on face
🐽 Muzzle
R1: MR 6
R2: inc ×6 (12)
R3: (1 sc, inc) ×6 (18)
R4: sc around
Light stuffing
👉 Attach centered below eyes
Embroider pink triangular nose and small mouth
👂 Ears (Make 2)
Outer (gray):
MR 6 → 12 → 18 → 24
Inner (pink):
MR 6 → 12 → 18
Attach inner piece
Flatten slightly and sew upright
🐈 Tail
R1: MR 6
R2: inc ×6 (12)
R3–22: sc around (12)
Light stuffing
👉 Attach low and curve gently around base
🧩 Assembly
- Sew pockets onto body
- Attach neck section securely
- Sew head centered on neck
- Attach ears symmetrically
- Add eyes and muzzle
- Embroider whiskers (3 per side, straight)
- Attach tail
✨ Final Shaping Tips
- Keep base firm and flat
- Neck should visibly narrow before head
- Head remains round and slightly forward-facing
- Pockets should stay upright and evenly spaced
💗 Final Thoughts
This cat organizer combines structure and softness with a clean cylindrical form, defined neck transition, and balanced proportions. The large expressive face and practical pockets create a charming yet highly functional piece—perfect for organizing tools while adding personality to your workspace. 🐱🧶✨