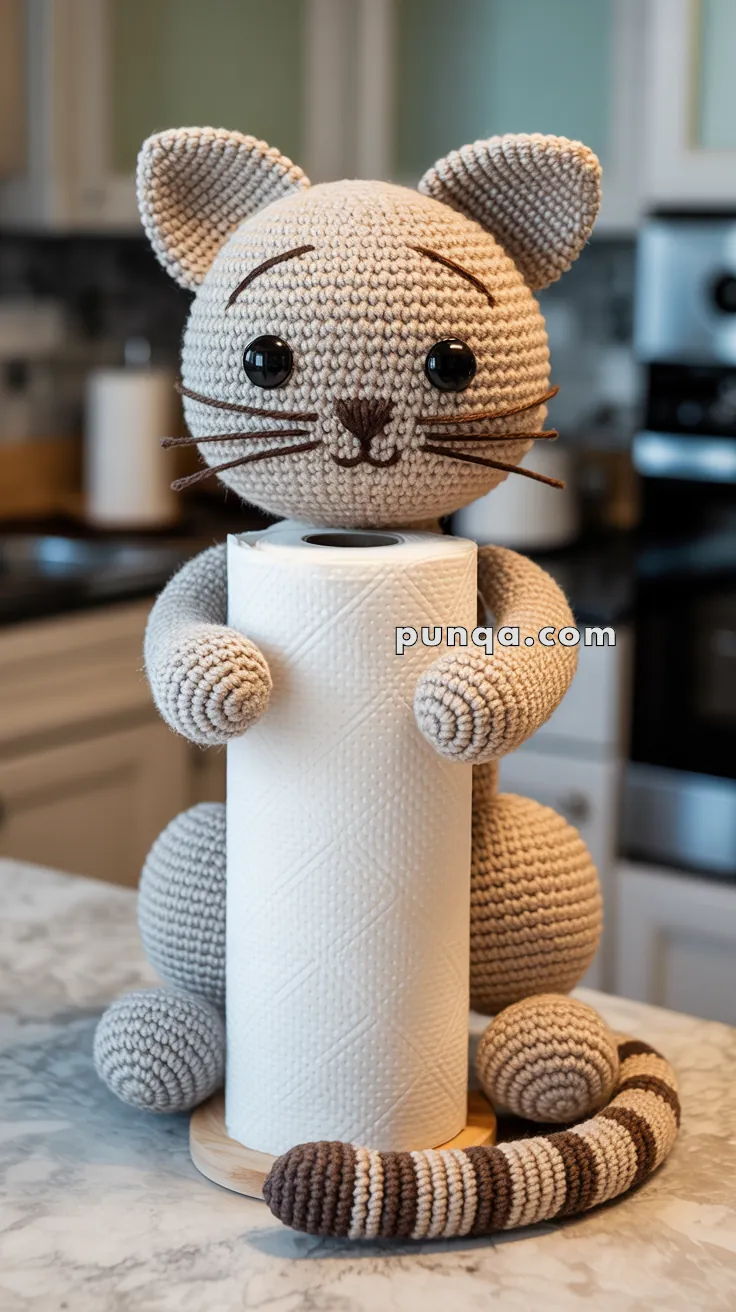
Add a purr-fect touch of charm to your kitchen or bathroom with the Amigurumi Cat Towel Roll Holder, a cozy crochet project that’s as practical as it is adorable! 🐱🧶 With its sturdy arms, striped tail, and sweet embroidered face, this handmade kitty is ready to lend a helping paw while brightening up your space. Whether perched on a countertop or gifted to a fellow cat lover, it’s sure to bring smiles and a sprinkle of feline flair.
Ideal for crocheters who enjoy playful shaping and expressive details, this pattern invites you to explore soft textures, cozy colors, and a dash of whiskered whimsy. Customize your cat with different fur patterns, add a little bow or collar, or stitch up a whole litter for a full handmade family. The Amigurumi Cat Towel Roll Holder is a delightful way to stitch up personality, function, and a whole lot of meow-gical charm—one loop at a time! 🧵🐾
🐾 Amigurumi Cat Paper Towel Holder Crochet Pattern
This adorable crochet cat is designed to sit securely behind a paper towel roll and hug it with its paws. The body is built with a rounded seated base and a tall torso so the cat reaches near the top of the roll, just like the photo. With oversized eyes, soft ears, and a striped tail curled around the base, this piece is both decorative and functional. 🧶✨
✨ Skill Level
Beginner–Intermediate
Basic shaping, firm stuffing, and assembly.
📏 Finished Size
Approx. 15–16 in (38–41 cm) tall with worsted yarn and 3–3.5 mm hook.
Fits a standard paper towel roll.
🧶 Materials
Worsted weight yarn:
- Light gray — main body
- Dark brown — nose, whiskers, tail stripes
3.0–3.5 mm hook
20–22 mm safety eyes
Fiberfill stuffing (very firm)
Pipe cleaner or floral wire (arms & tail)
Yarn needle, scissors
🪡 Abbreviations (US)
MR = magic ring
sc = single crochet
inc = increase
dec = decrease
FO = fasten off
🐱 Head
R1: MR, 6 sc (6)
R2: inc x6 (12)
R3: (sc, inc) x6 (18)
R4: (2 sc, inc) x6 (24)
R5: (3 sc, inc) x6 (30)
R6: (4 sc, inc) x6 (36)
R7: (5 sc, inc) x6 (42)
R8: (6 sc, inc) x6 (48)
R9: (7 sc, inc) x6 (54)
R10: (8 sc, inc) x6 (60)
R11–24: sc around (60)
Insert eyes between R14–15 (~12 sts apart).
R25: (8 sc, dec) x6 (54)
R26: (7 sc, dec) x6 (48)
R27: (6 sc, dec) x6 (42)
R28: (5 sc, dec) x6 (36)
R29: (4 sc, dec) x6 (30)
R30: (3 sc, dec) x6 (24)
R31: (2 sc, dec) x6 (18)
Stuff firmly.
R32: (sc, dec) x6 (12)
R33: dec x6 (6)
FO and close.
Embroider nose, mouth, brows, and whiskers.
👂 Ears (Make 2)
R1: MR, 6 sc
R2: (sc, inc) x3 (9)
R3: (2 sc, inc) x3 (12)
R4–6: sc around
Flatten and sew angled outward.
🐾 Lower Body (Seated Hip Base)
This creates the rounded sitting shape you see behind the roll.
R1: MR, 6 sc
R2: inc x6 (12)
R3: (sc, inc) x6 (18)
R4: (2 sc, inc) x6 (24)
R5: (3 sc, inc) x6 (30)
R6: (4 sc, inc) x6 (36)
R7: (5 sc, inc) x6 (42)
R8–18: sc around (42)
R19: (5 sc, dec) x6 (36)
R20: (4 sc, dec) x6 (30)
R21: (3 sc, dec) x6 (24)
Stuff very firmly.
R22: (2 sc, dec) x6 (18)
R23: (sc, dec) x6 (12)
R24: dec x6 (6)
FO and close.
🐈 Upper Torso (Tall Support)
This section gives the cat height to reach the roll top.
R1: MR, 6 sc
R2: inc x6 (12)
R3: (sc, inc) x6 (18)
R4: (2 sc, inc) x6 (24)
R5: (3 sc, inc) x6 (30)
R6–26: sc around (30) — tall cylinder
Stuff extremely firmly.
FO leaving long tail.
Sew torso centered on top of hip base.
Sew head on top of torso.
💪 Arms (Make 2)
R1: MR, 6 sc
R2: inc x6 (12)
R3–5: sc around
R6: (sc, dec) x4 (8)
R7–22: sc around (8)
Insert wire and stuff lightly.
Sew high on torso so paws wrap forward around roll.
🦵 Back Legs (Make 2)
R1: MR, 6 sc
R2: inc x6 (12)
R3–6: sc around
R7: (sc, dec) x4 (8)
R8: sc around
Stuff firmly and sew to hip base sides.
🐾 Tail (Striped)
R1: MR, 6 sc
R2: inc x6 (12)
R3–30: sc around (12)
Alternate colors every 3–4 rounds.
Insert wire. Sew to back base and curl forward.
🧷 Assembly
Sew torso to hip base.
Attach head centered above torso.
Position arms hugging roll.
Attach legs for seated balance.
Sew tail curling around base.
Adjust stuffing so cat stands upright.
🎀 Finishing Touches
Shape paws gently around the roll. Adjust tail curve and whiskers for expression. Ensure stuffing is firm so the structure stays tall and stable.
🌟 Final Thoughts
This construction mirrors the proportions in the photo: a rounded seated base, a tall torso that rises behind the roll, and forward-curving arms that hold it in place. The result is a sturdy, charming crochet cat that blends playful design with everyday function.
Your finished kitty becomes both a decorative centerpiece and a practical kitchen companion — a perfect mix of cute and clever. 🐱🧶✨