Bring the playful charm of a Caterpillar to life with this Amigurumi Caterpillar crochet pattern! 🐛✨ With its segment-shaped body, tiny legs, and cheerful expression, this design captures the essence of this beloved garden creature in yarn form. Whether you’re crafting for a nature-inspired décor piece, a heartfelt gift, or simply love insect-themed amigurumi, this FREE pattern is a fantastic addition to your collection.
Designed for crocheters of all skill levels, this pattern allows for customization in body colors, antenna shapes, and even tiny accessories like embroidered details or a miniature leaf setting to enhance its personality. Choose classic greens and yellows for a realistic look or experiment with rainbow hues for a whimsical twist! Whether displayed as part of a garden setup or gifted to a fellow crochet enthusiast, this amigurumi caterpillar is sure to impress.
Grab your hook, select your favorite yarn, and let’s bring this adorable little crawler to life—one stitch at a time! 🧶✨
🐛 Amigurumi Caterpillar Crochet Pattern
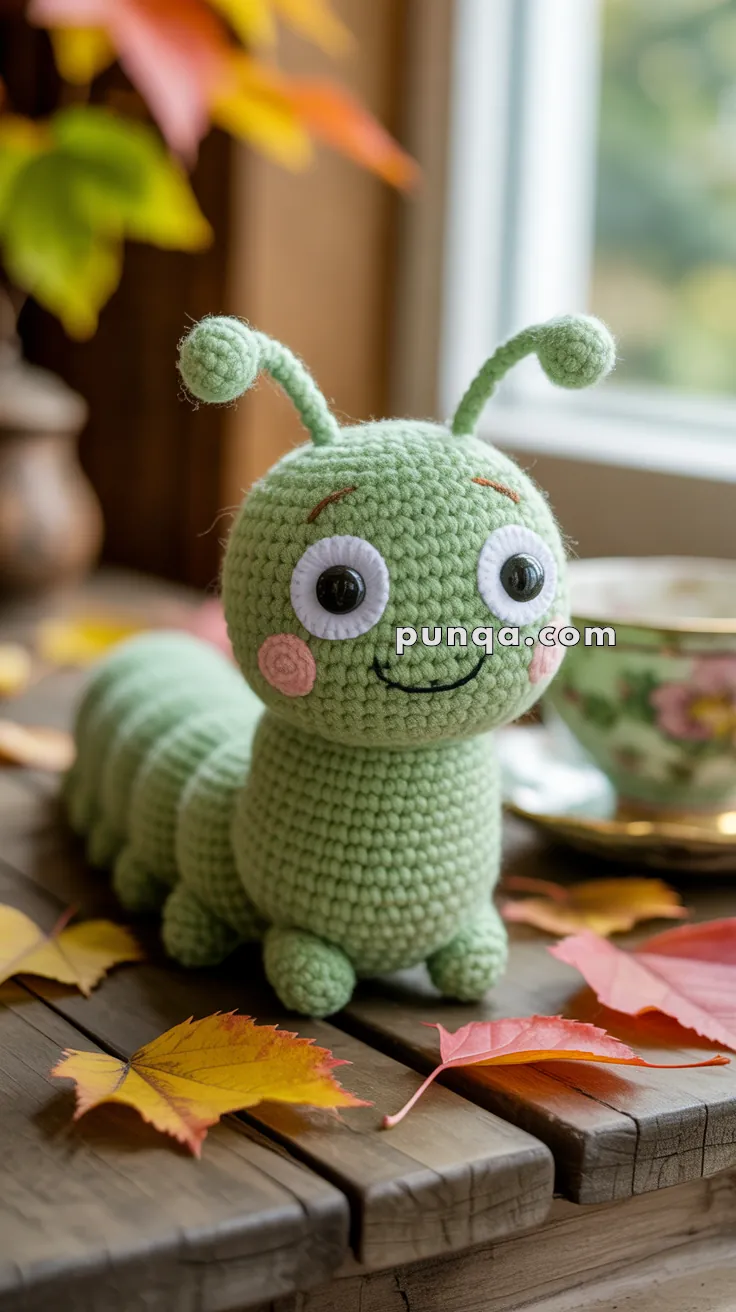
This cheerful amigurumi caterpillar is designed with a large round head, oversized white eyes, rosy cheeks, curved antennae with rounded tips, a plump segmented body, and tiny stubby feet. 💚 Its soft mint-green coloring and simple embroidered smile give it a sweet storybook personality, while the gradually tapering body creates a more natural caterpillar silhouette.
Rather than using four identical small balls for the body, the sections below are larger at the front and gradually smaller toward the tail. This gives the finished caterpillar a long, softly undulating shape instead of a string of evenly sized spheres.
✨ Skill Level
Beginner to Intermediate
This project uses:
- Continuous-round amigurumi
- Increases and invisible decreases
- Simple oval shaping
- Separate body segments
- Facial appliqués
- Embroidery
- Light stuffing and sculpting
- Small-part assembly
📏 Finished Size
Using DK or light worsted cotton yarn with a 3.0 mm crochet hook, the finished caterpillar measures approximately:
22–25 cm / 8½–10 in long
12–14 cm / 4¾–5½ in tall to the antenna tips.
Finished dimensions will vary with yarn, tension, hook size, and stuffing.
🧶 Required Yarn Amounts
For one caterpillar:
Mint / Light Green: approximately 95–115 g
Used for:
- Head
- Body segments
- Legs
- Antennae
White: approximately 12–15 g
Used for:
- Eye whites
Dusty Pink: approximately 5–7 g
Used for:
- Cheeks
Dark Brown: approximately 2–3 g
Used for:
- Eyebrows
Black: approximately 2–3 g
Used for:
- Smile
- Optional embroidered pupils
Polyester fiberfill: approximately 90–120 g
🧰 Materials
- 3.0 mm crochet hook
- Two 10–12 mm black safety eyes
- Polyester fiberfill
- Yarn needle
- Embroidery needle
- Stitch markers
- Pins
- Scissors
For a child-safe toy, embroider the pupils instead of using safety eyes.
🧵 Abbreviations — US Terms
MR — magic ring
sc — single crochet
inc — increase, 2 sc in one stitch
dec — invisible decrease
ch — chain
sl st — slip stitch
FO — fasten off
st / sts — stitch / stitches
Work in continuous rounds unless stated otherwise.
🟢 Head
The head is considerably larger than the body sections and should remain almost spherical with softly rounded cheeks.
Using mint green:
R1
MR, 6 sc.
(6)
R2
inc ×6.
(12)
R3
(sc, inc) ×6.
(18)
R4
(2 sc, inc) ×6.
(24)
R5
(3 sc, inc) ×6.
(30)
R6
(4 sc, inc) ×6.
(36)
R7
(5 sc, inc) ×6.
(42)
R8–15
sc around.
(42)
Do not insert the safety eyes directly into the head; they will be mounted through the white eye pieces.
R16
(5 sc, dec) ×6.
(36)
R17
(4 sc, dec) ×6.
(30)
R18
(3 sc, dec) ×6.
(24)
Begin stuffing firmly.
R19
(2 sc, dec) ×6.
(18)
R20
(sc, dec) ×6.
(12)
R21
dec ×6.
(6)
FO and close.
Shape into a round head with a slightly flatter lower front for the face.
👀 Large Eye Whites — Make 2
The eye whites are prominent raised discs.
Using white:
R1
MR, 6 sc.
(6)
R2
inc ×6.
(12)
R3
(sc, inc) ×6.
(18)
FO, leaving a long sewing tail.
Insert one safety eye through the center of each white disc.
Position the pupils slightly toward the inner/lower part of each eye for a friendly expression.
Pin both eyes to the face approximately 4–5 stitches apart at their closest edges.
Secure the safety-eye backs and sew the white discs flat to the head.
🩷 Cheeks — Make 2
Using dusty pink:
R1
MR, 6 sc.
(6)
R2
inc ×6.
(12)
FO.
Flatten gently.
Sew one cheek below and slightly outward from each eye.
😊 Smile
Using black embroidery thread, stitch a shallow curved smile between the cheeks.
Keep the line narrow and gently upward-curved.
🤎 Eyebrows
Using dark brown yarn or embroidery thread, stitch one short curved eyebrow above each eye.
Angle them slightly upward toward the center for a curious, cheerful expression.
🌱 Antennae — Make 2
The antennae have thin curved stems topped with noticeably round bulbs.
Begin with mint green.
Rounded Tip
R1
MR, 6 sc.
(6)
R2
inc ×6.
(12)
R3–4
sc around.
(12)
R5
dec ×6.
(6)
Stuff the ball tip lightly.
Stem
R6–14
sc around.
(6)
Do not stuff the stem heavily. A tiny amount of fiberfill is enough.
FO, leaving a long sewing tail.
🌱 Antenna Shaping
Curve each stem gently outward near the head and inward again near the bulb.
If your yarn is firm enough, the antennae will hold this curve naturally.
For display-only pieces, a safely covered short pipe cleaner can be inserted into each stem before closing.
Attach the antennae approximately 8–10 stitches apart on the top of the head.
Tilt them outward slightly.
🐛 First Body Segment
The first body segment is the largest and sits immediately behind the head.
Using mint green:
R1
MR, 6 sc.
(6)
R2
inc ×6.
(12)
R3
(sc, inc) ×6.
(18)
R4
(2 sc, inc) ×6.
(24)
R5
(3 sc, inc) ×6.
(30)
R6–11
sc around.
(30)
R12
(3 sc, dec) ×6.
(24)
R13
(2 sc, dec) ×6.
(18)
Stuff firmly but keep the segment soft enough to compress slightly when assembled.
FO, leaving a long sewing tail.
Leave the 18-stitch opening unclosed.
🐛 Second Body Segment
This section is almost as large as the first.
Using mint green:
R1
MR, 6 sc.
(6)
R2
inc ×6.
(12)
R3
(sc, inc) ×6.
(18)
R4
(2 sc, inc) ×6.
(24)
R5
(3 sc, inc) ×6.
(30)
R6–10
sc around.
(30)
R11
(3 sc, dec) ×6.
(24)
R12
(2 sc, dec) ×6.
(18)
Stuff.
FO with a long tail.
🐛 Third Body Segment
This segment begins the gradual taper.
Using mint green:
R1
MR, 6 sc.
(6)
R2
inc ×6.
(12)
R3
(sc, inc) ×6.
(18)
R4
(2 sc, inc) ×6.
(24)
R5–9
sc around.
(24)
R10
(2 sc, dec) ×6.
(18)
R11
(sc, dec) ×6.
(12)
Stuff.
FO with a long tail.
🐛 Rear Body Segment
The final segment is smaller and softly rounded.
Using mint green:
R1
MR, 6 sc.
(6)
R2
inc ×6.
(12)
R3
(sc, inc) ×6.
(18)
R4–8
sc around.
(18)
R9
(sc, dec) ×6.
(12)
R10
dec ×6.
(6)
Stuff lightly.
FO and close.
🪡 Joining the Body Segments
Arrange the caterpillar in this order:
Head → large front segment → large middle segment → medium segment → small rear segment
Pin everything before sewing.
Do not attach the pieces exactly center-to-center.
Instead:
- Attach the first body segment slightly low on the back of the head.
- Attach the second segment slightly higher.
- Attach the third slightly lower.
- Raise the final segment again very subtly.
This gentle alternating placement creates the soft wave visible along the caterpillar’s back.
Sew each section firmly with several passes.
Allow the pieces to compress slightly against one another so there are no large gaps.
🐾 Front Feet — Make 2
The front feet are slightly larger and sit beneath the chest.
Using mint green:
R1
MR, 6 sc.
(6)
R2
inc ×6.
(12)
R3–5
sc around.
(12)
R6
(sc, dec) ×4.
(8)
Stuff lightly.
FO, leaving a sewing tail.
🐾 Body Feet — Make 6
Using mint green:
R1
MR, 6 sc.
(6)
R2
(sc, inc) ×3.
(9)
R3–4
sc around.
(9)
Stuff very lightly.
FO with a sewing tail.
🪡 Foot Placement
Attach the larger front pair beneath the first body segment, close to the head.
Place the remaining six feet as three pairs:
- One pair beneath the second segment
- One pair beneath the third segment
- One small pair toward the front of the rear segment
Angle the feet slightly outward rather than straight down.
From the front, the two foremost feet should be clearly visible.
✨ Final Shaping
🟢 Head
Keep it noticeably larger than every body segment.
Massage the sides outward slightly so the face remains broad.
👀 Eyes
The white discs should be large and prominent.
Keep the eyes fairly wide apart but still centered on the face.
🩷 Cheeks
Place them low, almost level with the smile.
🌱 Antennae
Curve the stems gently rather than leaving them perfectly straight.
The round tips should face slightly inward.
🐛 Body
Compress the segments gently against one another.
The overall body should taper from large near the head to smaller at the rear.
🐾 Feet
Keep the feet short and rounded.
They should appear as little nubs beneath the body rather than long legs.
💡 Helpful Crochet Tips
Use a hook slightly smaller than your yarn label recommends. Tight stitches keep the caterpillar smooth and prevent stuffing from showing.
Stuff the head more firmly than the body segments. Softer body pieces compress together more naturally and create the segmented silhouette.
Do not make all four body sections identical. A gradual decrease in size is essential for the tapered rear shape.
Before attaching the eyes permanently, pin the white discs, cheeks, and antennae in place. Facial placement makes a large difference to the finished expression.
When sewing the segments together, pass the needle through several stitches on each piece rather than only the outermost loops. This creates a much stronger toy.
🧼 Care Instructions
Spot clean with cool water and mild detergent.
Allow the caterpillar to air dry completely.
Reshape the antennae and body segments while damp.
Avoid machine washing if safety eyes or internal wire supports have been used.
💚 A Cheerful Little Garden Friend
With its mint-green segmented body, enormous round head, bright white eyes, rosy cheeks, curled antennae, tiny feet, and sweet embroidered smile, this amigurumi caterpillar makes an adorable addition to spring décor, nursery displays, garden-themed collections, or handmade toy baskets. 🐛🌿✨
Its gradually tapered body and softly offset segments give the finished caterpillar a much more natural crawling silhouette while preserving the cuddly, rounded charm of classic amigurumi. Whether made as a gift or kept as a cheerful desk companion, this little bug is full of personality from its antenna tips to its tiny tail.