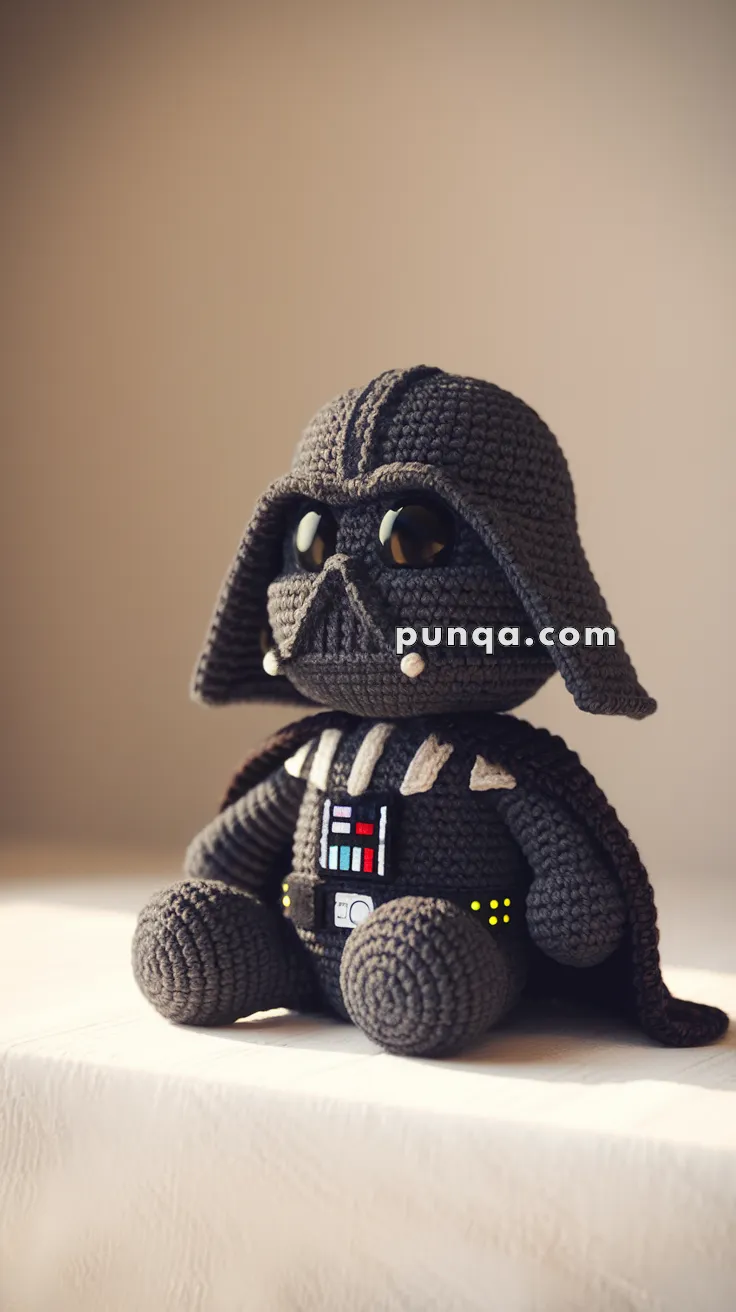
Oh, the joy of diving into the world of amigurumi! 🌟 If you haven’t heard of it yet, amigurumi is the delightful Japanese art of knitting or crocheting small stuffed creatures. It’s like bringing imagination to life with just a hook and some yarn! One of the most thrilling projects that I’ve embarked on lately is making a Darth Vader amigurumi. Yes, you heard that right! The ultimate Star Wars villain just got a whole lot cuddlier. Crafting this iconic character lets me blend my love for the epic saga with my passion for creating handmade treasures.
Creating a Darth Vader amigurumi involves an exciting blend of creativity and precision. I start by gathering my materials: black and gray yarn, a crochet hook, some stuffing, and those all-important safety eyes to give him that intense gaze. The process begins with crocheting his head and body, then moving on to his cape and helmet, each stitch adding to his imposing stature. The most fun part? Adding those tiny details that make him unmistakably Vader, like his iconic chest panel and flowing cape. Not only do I end up with a fantastic collectible, but the joy of making it is a craft lover’s dream come true! 🎨✨
Bring a dramatic galactic villain to life in an irresistibly soft chibi style with this detailed amigurumi pattern. 🖤✨
This seated character features an oversized helmeted head, deep-set glossy eyes, a sculpted breathing mask, flared helmet sides, layered gray armor accents, a miniature control panel, utility belt details, chunky rounded boots, thick arms, and a sweeping black cape.
The proportions are intentionally cute and compact: the head is almost as wide as the torso, the feet sit prominently in front, and the arms rest naturally beside the body. The helmet is made separately and fitted over the crocheted head, which creates the layered, dimensional silhouette that defines the finished doll.
✨ Skill Level
Intermediate to Advanced
This project includes:
Large amigurumi shaping
Layered helmet construction
Sculpted face-mask pieces
Small appliqués
Surface embroidery
Color changes
Seated-leg positioning
Cape construction
Miniature costume details
Careful assembly and shaping
📏 Finished Size
Using DK or light-worsted yarn with a 2.75–3 mm crochet hook, the finished doll measures approximately:
24–27 cm (9½–10½ in) tall while seated
16–18 cm (6¼–7 in) wide across the feet
13–15 cm (5–6 in) across the helmet
Finished measurements may vary depending on yarn, hook size, tension, stuffing, and assembly.
🧶 Yarn Requirements
Use smooth cotton, cotton-blend, or acrylic yarn with good stitch definition.
🖤 Black — 180–210 g
🩶 Charcoal gray — 65–80 g
🤎 Warm dark gray-brown — 20–25 g
🤍 White — 5–8 g
❤️ Red — 3–5 g
🩵 Pale blue or cyan — 2–3 g
💛 Yellow — 2–3 g
Polyester fiberfill — approximately 180–230 g
A little extra black yarn is helpful if you prefer a longer or fuller cape.
🧵 Materials
2.75–3 mm crochet hook
Optional 2.25–2.5 mm hook for costume details
Two 14–16 mm black safety eyes
Polyester fiberfill
Tapestry needle
Fine embroidery needle
Stitch markers
Pins
Scissors
Black embroidery thread
White, red, cyan, and yellow embroidery floss
Optional small pieces of felt for the control panel
Optional plastic pellets for sitting stability
Optional plastic canvas for the soles of the feet
For a child-safe version, embroider the eyes and all control-panel details instead of using small detachable pieces.
🔤 Abbreviations — US Terms
MR — Magic Ring
sc — Single Crochet
inc — Increase: 2 sc in one stitch
dec — Invisible Decrease
sl st — Slip Stitch
ch — Chain
hdc — Half Double Crochet
dc — Double Crochet
BLO — Back Loop Only
FLO — Front Loop Only
FO — Fasten Off
st — Stitch
Work in continuous rounds unless stated otherwise.
🧠 Head
The head forms the dark face beneath the helmet. It is large and round, with a slightly flattened front.
Using black yarn:
R1
MR 6. (6)
R2
inc ×6. (12)
R3
(1 sc, inc) ×6. (18)
R4
(2 sc, inc) ×6. (24)
R5
(3 sc, inc) ×6. (30)
R6
(4 sc, inc) ×6. (36)
R7
(5 sc, inc) ×6. (42)
R8
(6 sc, inc) ×6. (48)
R9–18
sc around. (48)
Insert the safety eyes between Rounds 12 and 13, approximately 10 stitches apart.
R19
(6 sc, dec) ×6. (42)
R20
(5 sc, dec) ×6. (36)
R21
(4 sc, dec) ×6. (30)
Begin stuffing firmly.
R22
(3 sc, dec) ×6. (24)
R23
(2 sc, dec) ×6. (18)
Finish stuffing.
R24
(1 sc, dec) ×6. (12)
R25
dec ×6. (6)
FO and close.
Gently flatten the front between the eyes so the facial mask will sit securely.
🖤 Upper Eye Mask
The upper eye mask creates the deep recessed area surrounding the eyes.
Using black yarn:
Row 1
Ch 19.
Starting in the second chain, sc across. (18)
Row 2
Ch 1, turn, dec, 14 sc, dec. (16)
Row 3
Ch 1, turn, dec, 12 sc, dec. (14)
Row 4
Ch 1, turn, sc across. (14)
FO, leaving a long tail.
Position this piece horizontally across the face above and around the eyes.
Stretch the center slightly downward between the eyes to create the characteristic deep brow.
Sew only around the outer edges so the center retains a subtle raised shape.
🩶 Nose Bridge
Using charcoal yarn:
R1
Ch 7.
Starting in the second chain:
sl st, sc, 2 hdc, sc, sl st.
FO.
Sew vertically between the eyes with the wider portion pointing downward.
The lower point should meet the upper edge of the breathing mask.
😷 Breathing Mask
The lower facial mask projects from the face and gives the character its unmistakable angular profile.
Using charcoal yarn:
R1
MR 6. (6)
R2
inc ×6. (12)
R3
(1 sc, inc) ×6. (18)
R4
(2 sc, inc) ×6. (24)
R5–7
sc around. (24)
R8
(2 sc, dec) ×6. (18)
Lightly stuff.
FO, leaving a long sewing tail.
Flatten the upper half slightly.
Pin it beneath the nose bridge so the lower half protrudes forward.
Sew around the back edge.
🖤 Mask Center Panel
Using black yarn:
Row 1
Ch 7.
Starting in the second chain, sc across. (6)
Row 2
Ch 1, turn, dec, 2 sc, dec. (4)
Row 3
Ch 1, turn, sc across. (4)
Row 4
Ch 1, turn, dec twice. (2)
FO.
Rotate the piece so the narrow end points upward.
Sew it to the center front of the breathing mask.
Using charcoal embroidery yarn, stitch several vertical lines across the panel to create the vented texture.
🩶 Cheek Panels — Make 2
Using charcoal yarn:
Row 1
Ch 6.
Starting in the second chain, sc across. (5)
Row 2
Ch 1, turn, dec, 1 sc, dec. (3)
Row 3
Ch 1, turn, sc across. (3)
FO.
Sew one panel to each side of the breathing mask.
Angle them upward toward the eyes.
🩶 Lower Mask Rim
Using charcoal yarn:
Ch approximately 24–28 stitches, enough to span beneath the mask.
Starting in the second chain, sl st back across.
FO.
Sew the strip beneath the mask, curving it gently upward at both ends.
⚪ Small Side Details
Using pale gray or white yarn, make two tiny knots or French knots at the lower sides of the breathing mask.
Keep them small and symmetrical.
🪖 Helmet Crown
The helmet is separate from the head and slightly larger so it sits over the crown.
Using charcoal-black yarn:
R1
MR 6. (6)
R2
inc ×6. (12)
R3
(1 sc, inc) ×6. (18)
R4
(2 sc, inc) ×6. (24)
R5
(3 sc, inc) ×6. (30)
R6
(4 sc, inc) ×6. (36)
R7
(5 sc, inc) ×6. (42)
R8
(6 sc, inc) ×6. (48)
R9
(7 sc, inc) ×6. (54)
R10–16
sc around. (54)
FO.
Do not stuff.
Fit the crown over the head. It should cover the back and top while leaving the mask visible.
🩶 Helmet Center Ridge
Using medium charcoal yarn:
Row 1
Ch 17.
Starting in the second chain, sc across. (16)
Rows 2–3
Ch 1, turn, sc across. (16)
FO.
Sew the strip from the front crown toward the back center.
Add two narrow black embroidered lines along the sides of the ridge for added depth.
🖤 Helmet Brow Rim
Join charcoal yarn to the front lower edge of the helmet crown.
Work approximately 20–24 sc across the front.
Row 2
Ch 1, turn, sc across.
Row 3
Ch 1, turn, sl st across.
FO.
Allow the brow to project slightly beyond the forehead.
Do not sew it completely flat.
🪖 Helmet Side Flares — Make 2
The helmet sides extend downward beside the cheeks.
Using charcoal-black yarn:
Row 1
Ch 14.
Starting in the second chain, sc across. (13)
Row 2
Ch 1, turn, inc, 11 sc, inc. (15)
Row 3
Ch 1, turn, sc across. (15)
Row 4
Ch 1, turn, inc, 13 sc, inc. (17)
Rows 5–7
sc across. (17)
Row 8
Ch 1, turn, dec, 13 sc, dec. (15)
FO.
Make two identical pieces.
Sew one to each side of the helmet, beginning near the brow and extending downward beside the face.
The lower ends should flare away from the cheeks.
🪡 Helmet Assembly
Place the crown securely over the head.
Attach in this order:
Crown
Center ridge
Brow rim
Side flares
Use hidden black stitches around the back and crown.
Leave the lower edges of the side flares slightly free so they retain a rigid helmet-like appearance.
🧍 Body
The body is compact and barrel-shaped.
Using black yarn:
R1
MR 6. (6)
R2
inc ×6. (12)
R3
(1 sc, inc) ×6. (18)
R4
(2 sc, inc) ×6. (24)
R5
(3 sc, inc) ×6. (30)
R6
(4 sc, inc) ×6. (36)
R7
(5 sc, inc) ×6. (42)
R8–18
sc around. (42)
R19
(5 sc, dec) ×6. (36)
R20–22
sc around. (36)
R23
(4 sc, dec) ×6. (30)
R24–25
sc around. (30)
Begin stuffing firmly.
R26
(3 sc, dec) ×6. (24)
R27
sc around. (24)
FO, leaving a long tail for attaching the head.
🩶 Shoulder Armor Strips
Make several narrow armor appliqués in charcoal and light gray.
Long Strip — Make 2
Ch 10.
Starting in the second chain, sc across. (9)
FO.
Medium Strip — Make 2
Ch 8.
Starting in the second chain, sc across. (7)
FO.
Short Strip — Make 2
Ch 6.
Starting in the second chain, sc across. (5)
FO.
Arrange them in angled groups across the upper chest and shoulders.
Sew securely.
🖤 Chest Panel Base
Using black yarn and the smaller hook:
Row 1
Ch 10.
Starting in the second chain, sc across. (9)
Rows 2–8
Ch 1, turn, sc across. (9)
FO.
Sew the rectangle to the center chest.
🔴 Chest Control Details
Using embroidery floss, stitch small rectangular blocks onto the black chest panel.
Include:
Two white or pale-gray blocks
Two red blocks
Two cyan or light-blue blocks
Thin white vertical divider lines
Keep the blocks small and neatly aligned.
For a cleaner finish, tiny felt rectangles may be sewn on instead.
🖤 Belt
Using black yarn:
Ch enough stitches to fit around the waist, approximately 40–44 chains.
Join without twisting.
R1–3
sc around.
FO.
Sew the belt around the lower torso.
⚪ Belt Buckle
Using pale gray yarn:
Row 1
Ch 6.
Starting in the second chain, sc across. (5)
Rows 2–4
sc across. (5)
FO.
Sew to the center front of the belt.
Embroider a small black circle or line on the buckle.
💛 Belt Lights
Using yellow embroidery floss, add three or four tiny French knots to each side of the belt.
Keep them evenly spaced.
💪 Arms — Make 2
Using black yarn:
R1
MR 6. (6)
R2
inc ×6. (12)
R3
(1 sc, inc) ×6. (18)
R4–7
sc around. (18)
R8
(4 sc, dec) ×3. (15)
R9–17
sc around. (15)
R18
(3 sc, dec) ×3. (12)
R19–20
sc around. (12)
Stuff the hands and lower arms firmly.
Stuff the shoulder ends more lightly.
Flatten the upper opening.
FO, leaving a long sewing tail.
🩶 Glove Ribbing
Using charcoal embroidery yarn, work several horizontal lines around the lower half of each arm.
Space them about one crochet round apart.
The ribbing should remain subtle rather than covering the entire arm.
🪡 Attaching the Arms
Position the arms on the upper sides of the body.
Angle them downward and slightly forward.
The hands should rest beside the thighs.
Sew through the flattened shoulder openings.
🦵 Seated Legs — Make 2
The feet and legs are worked as one rounded piece.
Using charcoal-black yarn:
R1
MR 6. (6)
R2
inc ×6. (12)
R3
(1 sc, inc) ×6. (18)
R4
(2 sc, inc) ×6. (24)
R5
(3 sc, inc) ×6. (30)
R6–10
sc around. (30)
R11
(3 sc, dec) ×6. (24)
R12–16
sc around. (24)
R17
(2 sc, dec) ×6. (18)
R18–19
sc around. (18)
Stuff firmly, especially at the round foot end.
Flatten the upper opening.
FO, leaving a long sewing tail.
🪡 Positioning the Legs
Attach the legs to the lower front body.
They should:
Sit wide apart
Point forward
Angle slightly outward
Rest fully on their rounded ends
Create a stable seated pose
Pin both legs before sewing.
Add hidden stitches between each leg and body for additional stability.
🖤 Cape
The cape begins narrow at the shoulders and widens gradually toward the bottom.
Using black yarn:
Row 1
Ch 21.
Starting in the second chain, sc across. (20)
Row 2
Ch 1, turn, (3 sc, inc) ×5. (25)
Row 3
sc across. (25)
Row 4
Ch 1, turn, (4 sc, inc) ×5. (30)
Row 5
sc across. (30)
Row 6
Ch 1, turn, (5 sc, inc) ×5. (35)
Rows 7–20
sc across. (35)
Row 21
Ch 1, turn, (6 sc, inc) ×5. (40)
Rows 22–25
sc across. (40)
FO.
🖤 Cape Border
Join black yarn at one upper corner.
Work sc evenly down one side, across the bottom, and up the other side.
Work 3 sc in each bottom corner.
For a heavier cape edge, work one additional round of loose slip stitches.
FO.
🪡 Attaching the Cape
Position the narrow top edge across the shoulders behind the neck.
Sew only the upper edge.
Let the cape fall freely behind the arms.
The lower cape should spread across the back and rest near the sitting surface.
Tack the sides lightly beneath the arms if needed.
🩶 Neck Guard
Using charcoal yarn:
Ch approximately 25 stitches.
Join without twisting.
R1–2
sc around.
FO.
Place around the neck before attaching the head.
Sew at the back.
The guard should remain visible beneath the helmet and above the shoulder armor.
🪡 Head-to-Body Assembly
Place the finished head over the body.
Because the helmet is large, reinforce the neck heavily.
Add extra stuffing inside the upper torso.
Sew around the neck opening at least twice.
The head should sit upright, with the helmet brow approximately parallel to the floor.
✨ Final Shaping
Check the finished doll from every angle.
The final proportions should include:
An oversized helmeted head
Large dark eyes visible beneath the brow
A projecting triangular breathing mask
Wide flared helmet sides
Compact torso
Layered gray shoulder armor
Centered control panel
Visible utility belt
Thick rounded arms
Large forward-facing feet
A full cape falling behind the body
Gently pinch and reshape the helmet edges with your fingers.
If necessary, lightly dampen the helmet flares and pin them in position until completely dry.
💡 Stability Tips
For a sturdy seated display:
Place a sealed pouch of plastic pellets in the bottom of the body.
Stuff both feet firmly.
Insert plastic-canvas circles into the foot ends.
Reinforce the head-to-body seam several times.
Tack each arm lightly to the nearest thigh.
Let the cape rest on the surface behind the doll for additional support.
Avoid overstuffing the helmet.
🧼 Care Instructions
Spot clean gently with a damp cloth.
Allow the doll to air dry completely.
Avoid machine washing when safety eyes, pellets, plastic canvas, felt, or other rigid details are used.
Store upright without placing weight on the helmet flares, breathing mask, chest panel, or cape.
🌟 Final Thoughts
Your dark galactic warrior is complete. 🌌🖤
With his enormous sculpted helmet, deep-set eyes, layered breathing mask, armored chest details, miniature illuminated control panel, utility belt, rounded boots, heavy gloves, and flowing cape, this chibi amigurumi packs plenty of dramatic character into a wonderfully cuddly seated design.