Oh, let me tell you about the absolute joy of creating amigurumi! 🎉 There’s something incredibly satisfying about taking a simple ball of yarn and turning it into a delightful little character, and what better character to bring to life than Deadpool himself? 🕶️ Amigurumi, the Japanese art of knitting or crocheting small, stuffed yarn creatures, is a crafting world that combines creativity, skill, and a whole lot of fun. With Deadpool’s quirky personality and striking outfit, he makes for the perfect subject. Picture this: a miniature merc with a mouth grinning cheekily at you from your desk or shelf, ready to be a conversation starter with anyone who drops by.
Creating an amigurumi Deadpool pattern is a fascinating journey from start to finish. 🧶 The process begins with choosing the right yarn—think bold reds and deep blacks to capture his iconic look. Next comes crafting the body and limbs, a step-by-step adventure that allows me to experiment with different stitches and techniques. 🪡 One of my favorite parts is adding those little details, like his expressive eyes and those infamous katanas. Each stitch is like a brushstroke on a canvas, slowly building up the cheeky mercenary we all know and love. And when it’s all done, I have not just a cute, huggable Deadpool, but also the satisfaction of having crafted something truly unique with my own two hands.
🧶 Amigurumi Deadpool Crochet Pattern 💥
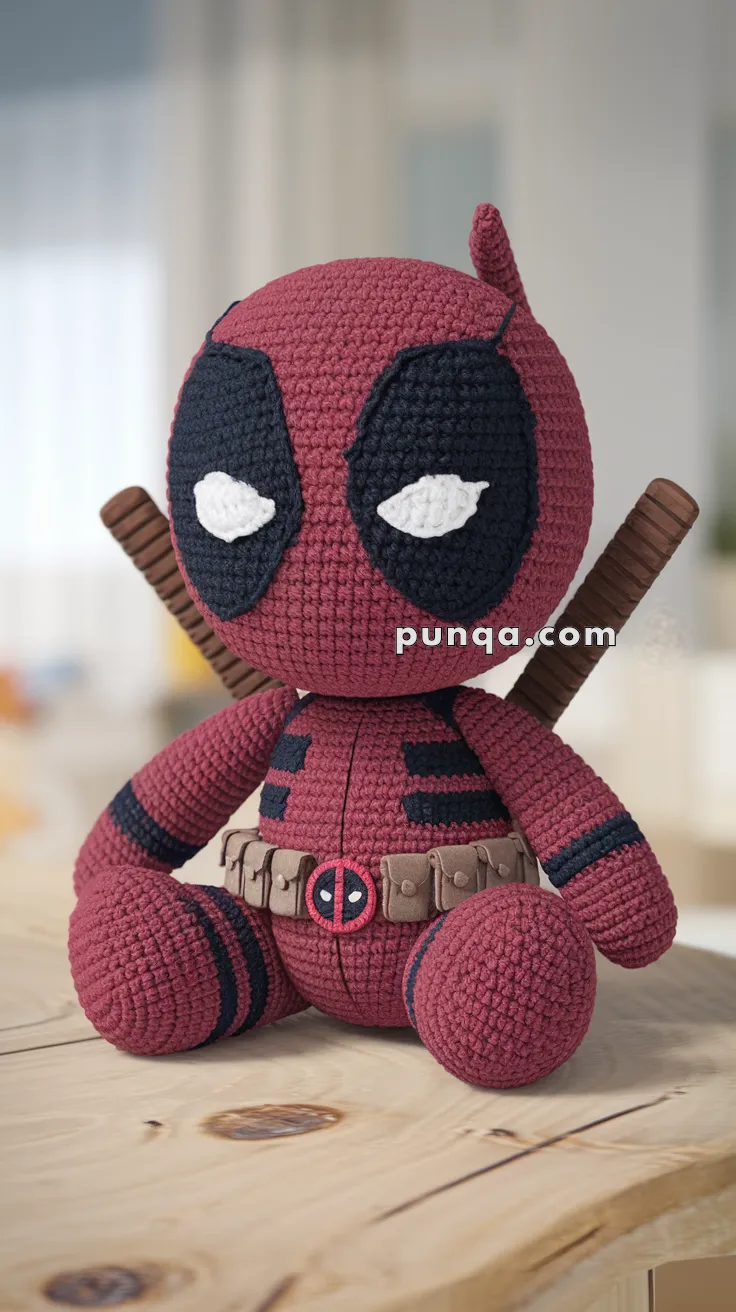
Create a bold seated Deadpool doll with an oversized masked head, dramatic black eye panels, narrow white eyes, a muscular red-and-black suit, chunky arms, enormous rounded boots, a detailed utility belt, and two crossed katana handles rising behind the shoulders. ⚔️
The doll is designed with exaggerated chibi proportions: the head is almost as wide as the entire torso, the body is compact and barrel-shaped, and the legs sit forward with broad circular soles. Layered appliqués form the mask and suit markings, while individually crocheted belt pouches and a dimensional emblem complete the costume.
✨ Skill Level
Intermediate to Advanced
This project includes:
- Large spherical head shaping
- Layered angular mask appliqués
- Pointed eye construction
- Color changes and surface details
- Oversized seated legs and boots
- Dimensional utility-belt pouches
- Cross-body harness straps
- Crocheted katana handles
- Embroidery and careful multi-piece assembly
📏 Finished Size
Using DK or light-worsted cotton yarn with a 3 mm crochet hook, the finished doll measures approximately:
- 27–30 cm (10½–12 in) tall while seated
- 22–24 cm (8¾–9½ in) wide across the legs
- 17–19 cm (6¾–7½ in) across the head
The crossed sword handles add approximately 7–9 cm (2¾–3½ in) to the overall height.
Finished dimensions may vary with yarn, hook size, tension, stuffing, and limb placement.
🧶 Yarn Requirements
Use smooth DK cotton, cotton-blend, or light-worsted yarn for a clean, structured finish.
- ❤️ Deep muted red — 210–240 g
- 🖤 Charcoal black — 65–80 g
- 🤍 White — 8–12 g
- 🤎 Medium brown — 30–40 g
- 🟤 Taupe or light brown — 40–50 g
- Dark brown embroidery yarn — 5 g
Polyester fiberfill — approximately 250–320 g
🧵 Materials
- 3 mm crochet hook
- Optional 2.5 mm hook for the eyes, buckle, and pouch details
- Polyester fiberfill
- Tapestry needle
- Fine embroidery needle
- Stitch markers
- Pins for positioning
- Scissors
- Optional plastic pellets for sitting stability
- Optional plastic canvas for the boot soles
- Optional 2 mm craft wire or wooden skewers for the sword handles
- Floral tape for wrapping wire
- Optional snap fastener or small hook-and-loop tape for a removable belt
Omit wire, skewers, and detachable accessories when making the doll for a young child.
🔤 Abbreviations — US Terms
- MR — Magic Ring
- sc — Single Crochet
- inc — Increase: 2 sc in the same stitch
- dec — Invisible Decrease
- sl st — Slip Stitch
- ch — Chain
- hdc — Half Double Crochet
- dc — Double Crochet
- BLO — Back Loop Only
- FLO — Front Loop Only
- FO — Fasten Off
- st — Stitch
Work in continuous rounds unless instructed otherwise.
🧠 Oversized Masked Head
The head is very large, round, and slightly wider through the middle than at the top and chin.
Using deep-red yarn:
R1
MR 6.
(6)
R2
inc ×6.
(12)
R3
(1 sc, inc) ×6.
(18)
R4
(2 sc, inc) ×6.
(24)
R5
(3 sc, inc) ×6.
(30)
R6
(4 sc, inc) ×6.
(36)
R7
(5 sc, inc) ×6.
(42)
R8
(6 sc, inc) ×6.
(48)
R9
(7 sc, inc) ×6.
(54)
R10
(8 sc, inc) ×6.
(60)
R11–24
sc around.
(60)
The eyes are constructed as appliqués, so safety eyes are not required.
R25
(8 sc, dec) ×6.
(54)
R26
(7 sc, dec) ×6.
(48)
R27
(6 sc, dec) ×6.
(42)
Begin stuffing firmly.
R28
(5 sc, dec) ×6.
(36)
R29
(4 sc, dec) ×6.
(30)
Continue stuffing, keeping the front smooth.
R30
(3 sc, dec) ×6.
(24)
R31
(2 sc, dec) ×6.
(18)
R32
(1 sc, dec) ×6.
(12)
R33
dec ×6.
(6)
FO and close.
Gently shape the head into a broad sphere. Flatten the face only slightly so the black mask panels lie smoothly.
🖤 Black Mask Panels — Make 2
Each mask panel is a large elongated shape with a pointed upper inner corner and a tapered lower end.
Using charcoal-black yarn:
R1
Ch 12.
Starting in the second chain:
10 sc, 3 sc in the final chain.
Continue along the opposite side:
9 sc, inc.
(24)
R2
inc, 9 sc, 3 inc, 9 sc, 2 inc.
(30)
R3
sc around.
(30)
R4
2 sc, inc, 11 sc, inc ×3, 11 sc, inc ×2.
(36)
R5–7
sc around.
(36)
FO, leaving a long sewing tail.
Flatten each piece.
To create the angular mask shape:
- Pinch the upper inner edge into a high point.
- Pull the outer upper edge slightly outward.
- Taper the lower edge toward the cheek.
- Fold the lower third inward very slightly.
The finished panel should resemble a tall irregular teardrop rather than a simple oval.
👀 White Eye Shapes — Make 2
The white eyes are small, narrow, and sharply pointed toward the center of the face.
Using white yarn and the smaller hook:
R1
Ch 7.
Starting in the second chain:
sl st, sc, hdc, 2 dc, 5 dc in the final chain.
Continue along the opposite side:
2 dc, hdc, sc, sl st.
Join and FO.
Flatten the piece and pinch both ends into soft points.
For a narrower expression, fold the lower edge slightly upward before sewing.
🪡 Assembling the Mask
Sew one white eye near the center of each black panel.
Leave a wide black border visible around every side.
Position the completed panels on the face so:
- The upper inner corners rise toward the forehead.
- The inner edges angle inward.
- The lower points extend toward the cheeks.
- The white eyes point toward the center.
- A red strip approximately 3–4 stitches wide remains visible between the panels.
Pin both panels before sewing.
Sew around each black edge using small, evenly spaced stitches.
🖤 Mask Seam Details
Using black embroidery thread or fine black yarn, add:
- One short diagonal seam from the top of each mask panel toward the crown
- One narrow line extending from the lower outer edge toward the side of the head
- Optional short seam marks along the back of the mask
Do not add facial features beneath the mask.
❤️ Mask Tie Tab
A small red tab rises from the upper rear side of the head.
Using red yarn:
R1
MR 5.
(5)
R2–8
sc around.
(5)
Do not stuff.
FO.
Flatten the piece and sew it near the upper back-right side of the head.
Angle it slightly backward.
Add one short black embroidered line from the base of the tab toward the mask seam.
🧍 Compact Barrel Body
The body is shorter and narrower than the head but remains broad enough to support the large arms, legs, belt, and harness.
Using deep-red yarn:
R1
MR 6.
(6)
R2
inc ×6.
(12)
R3
(1 sc, inc) ×6.
(18)
R4
(2 sc, inc) ×6.
(24)
R5
(3 sc, inc) ×6.
(30)
R6
(4 sc, inc) ×6.
(36)
R7
(5 sc, inc) ×6.
(42)
R8
(6 sc, inc) ×6.
(48)
R9–19
sc around.
(48)
Begin stuffing firmly.
R20
(6 sc, dec) ×6.
(42)
R21–23
sc around.
(42)
R24
(5 sc, dec) ×6.
(36)
R25–27
sc around.
(36)
R28
(4 sc, dec) ×6.
(30)
R29–30
sc around.
(30)
R31
(3 sc, dec) ×6.
(24)
Finish stuffing firmly.
FO, leaving a long tail for attaching the head.
The lower half should remain broad and rounded, while the shoulder area tapers slightly.
🖤 Shoulder Harness Straps — Make 2
Using black yarn:
Ch 32.
Starting in the second chain, sl st or sc across.
FO, leaving sewing tails.
Place the straps diagonally over the shoulders:
- One strap runs from the right shoulder toward the left waist.
- The second runs from the left shoulder toward the right waist.
Most of the lower sections will be hidden beneath the utility belt.
Sew the straps flat to the torso.
🖤 Chest Suit Panels
The upper torso has asymmetrical black armor-like markings.
Left Chest Panel
Using black yarn:
Row 1
Ch 7.
Starting in the second chain, sc across.
(6)
Rows 2–4
sc across.
(6)
FO.
Sew the panel to the upper-left chest, close to the shoulder strap.
Right Chest Bars — Make 3
Using black yarn:
Row 1
Ch 9.
Starting in the second chain, sc across.
(8)
Row 2
sc across.
(8)
FO.
Sew the three bars horizontally on the right chest with one or two rounds of red space between them.
Shorten the upper bar slightly if necessary.
🧵 Center Suit Seam
Using black embroidery yarn, stitch a straight vertical line from the neck to the belt.
Continue the line below the belt toward the lower body if visible.
Keep the seam centered beneath the gap between the mask panels.
💪 Arms — Make 2
The arms are thick, long, and slightly tapered, with rounded fists.
Using red yarn:
R1
MR 6.
(6)
R2
inc ×6.
(12)
R3
(1 sc, inc) ×6.
(18)
R4
(2 sc, inc) ×6.
(24)
R5–10
sc around.
(24)
R11
(2 sc, dec) ×6.
(18)
R12–22
sc around.
(18)
R23
(4 sc, dec) ×3.
(15)
R24–25
sc around.
(15)
Stuff the fist and lower arm firmly.
Stuff the upper section more lightly.
Flatten the shoulder opening.
FO, leaving a long sewing tail.
🖤 Forearm Bands
Before attaching the arms, embroider or surface-crochet two black bands around each forearm.
Place them approximately:
- One band 5 rounds above the fist
- A second band 2 rounds above the first
Work two passes for each band so the lines remain clearly visible.
🦵 Oversized Seated Legs — Make 2
The legs are broad, rounded, and positioned forward.
Using red yarn:
R1
Ch 11.
Starting in the second chain:
9 sc, 3 sc in the final chain.
Continue along the opposite side:
8 sc, inc.
(22)
R2
inc, 8 sc, 3 inc, 8 sc, 2 inc.
(28)
R3
(3 sc, inc) ×7.
(35)
R4
(4 sc, inc) ×7.
(42)
R5–11
sc around.
(42)
R12
(5 sc, dec) ×6.
(36)
R13–17
sc around.
(36)
R18
(4 sc, dec) ×6.
(30)
R19–22
sc around.
(30)
Stuff the rounded foot end firmly.
Keep the upper section moderately stuffed.
R23
(3 sc, dec) ×6.
(24)
R24–26
sc around.
(24)
Flatten the upper opening.
FO, leaving a long sewing tail.
🖤 Leg Bands
Using black yarn or embroidery thread, add two horizontal bands around the outer section of one leg and one narrow band around the other.
For thicker bands, surface-crochet two rounds of slip stitches.
Keep the bands asymmetrical.
🪡 Attaching the Arms and Legs
Arms
Position the arms high on the sides of the body.
Angle them downward and slightly forward.
The fists should rest near the upper legs.
Sew through the flattened shoulder openings.
Legs
Pin the legs to the lower front sides of the body.
Angle them forward and outward.
The broad rounded ends should face the viewer and rest completely on the display surface.
Leave a visible gap between the legs for the lower body.
Add hidden stitches between the legs and body if extra support is required.
🟤 Utility Belt Base
Using taupe yarn:
Ch enough stitches to wrap around the waist, approximately 52–58 chains.
Join without twisting.
R1–4
sc around.
FO.
Position the belt around the widest waist section.
Do not sew it permanently until the pouches and buckle are attached.
🟤 Utility Pouches — Make 7
Make a mixture of slightly different widths.
Standard Pouch — Make 5
Using taupe yarn:
Row 1
Ch 7.
Starting in the second chain, sc across.
(6)
Rows 2–5
sc across.
(6)
FO.
Wide Pouch — Make 2
Row 1
Ch 9.
Starting in the second chain, sc across.
(8)
Rows 2–5
sc across.
(8)
FO.
🟤 Pouch Flaps
For each pouch:
Join yarn to the upper edge.
Row 1
sc across.
Row 2
dec, sc across to final 2 stitches, dec.
FO.
Fold the flap downward.
Add a small circular knot, French knot, or embroidered dot at the center to imitate a snap.
Lightly stuff the lower half of each pouch if a dimensional look is desired.
Sew the side and lower edges closed.
🪡 Arranging the Pouches
Sew:
- Three pouches to the left side of the buckle
- Three pouches to the right side
- One smaller pouch slightly toward the back
Keep narrow gaps between the pouches.
Attach each pouch to the belt along its upper back edge so the lower section projects slightly.
⭕ Circular Belt Buckle
Black Buckle Base
Using black yarn:
R1
MR 6.
(6)
R2
inc ×6.
(12)
R3
(1 sc, inc) ×6.
(18)
FO.
Red Outer Ring
Join red yarn to the black circle.
Work one round of sc evenly around the edge.
FO.
👁️ Buckle Eye Marks
Using white yarn:
Make two tiny pointed eye shapes.
Each Eye
Ch 4.
Starting in the second chain:
sl st, sc, hdc.
FO.
Sew the eyes to the black center, angled toward each other.
Using black embroidery yarn, add one thin vertical line down the center of the buckle.
Sew the buckle to the front-middle of the belt.
⚔️ Katana Handles — Make 2
The visible swords consist mainly of textured brown handles rising behind the shoulders.
Using dark-brown yarn:
R1
MR 6.
(6)
R2
inc ×6.
(12)
R3–24
sc around.
(12)
Stuff firmly as you work.
For greater rigidity, insert a wrapped wire or narrow wooden support before closing.
R25
dec ×6.
(6)
FO and close.
The finished handle should measure approximately 12–14 cm (4¾–5½ in).
🟤 Handle Wrapping
Using a slightly lighter or darker brown yarn, embroider diagonal lines around each handle.
Cross the lines in the opposite direction to create a wrapped grip texture.
Alternatively, surface-crochet narrow rings every two rounds.
🖤 Sword Guards — Make 2
Using black yarn:
R1
MR 6.
(6)
R2
inc ×6.
(12)
FO.
Cut a small center opening if necessary and slide the guard over the base of each handle.
Sew securely.
🖤 Back Sword Harness
Using black yarn:
Ch 38.
Starting in the second chain, sc across.
Make two straps.
Cross them over the upper back and sew them to the body.
Slide one katana handle beneath each diagonal strap.
Position them so:
- One rises behind the left shoulder.
- The other rises behind the right shoulder.
- The handles cross behind the head.
- Both remain visible from the front.
Sew the lower handle ends firmly to the back.
🪡 Head Assembly
Center the head over the body.
The head should appear much larger than the torso and tilt only slightly forward.
Add extra stuffing between the two pieces if needed.
Sew around the neck opening several times using red yarn.
The head must be firmly attached because the sword handles sit directly behind it.
✨ Final Shaping
- Keep the head broad and nearly spherical.
- Angle the white eyes inward.
- Maintain a narrow red strip between the black mask panels.
- Position the top mask tab slightly off-center.
- Keep the body compact but broad through the waist.
- Angle the arms toward the legs.
- Turn the oversized boots forward and outward.
- Center the buckle beneath the chest seam.
- Space the belt pouches evenly.
- Cross the katana handles behind the head.
- Confirm that the doll sits securely without leaning backward.
💡 Stability Tips
- Place a small pouch of plastic pellets inside the lower body.
- Stuff the legs and boot ends firmly.
- Add plastic-canvas ovals to the leg soles if necessary.
- Reinforce the neck seam several times.
- Tack each fist lightly to the nearest leg for a stable seated pose.
- Secure the sword handles to both the harness and the body.
- Avoid making the head or sword handles excessively heavy.
🧼 Care Instructions
Spot clean gently with a damp cloth.
Allow the doll to air dry completely.
Avoid machine washing when wire, wooden supports, plastic canvas, or weighted pellets are used.
Store upright and avoid placing pressure on the mask panels, belt pouches, or sword handles.
💥 Final Thoughts
Your Deadpool amigurumi is ready for action—and probably a few inappropriate jokes. ❤️🖤
With his enormous masked head, angular eye panels, chunky red suit, black tactical markings, thick arms, giant seated boots, fully equipped utility belt, dimensional emblem, and crossed katana handles, this handmade character has plenty of attitude from every angle.
Happy Crocheting! 🧶⚔️