Welcome to the adorable and playful world of amigurumi! 🐶✨ Today, I’m excited to share my free crochet pattern for an Amigurumi Dog Pup—a cuddly and charming creation perfect for dog lovers, nursery décor, or anyone who enjoys crafting expressive and heartwarming plush designs! 🧶 Whether you love stitching up cute animals, creating textured and lifelike figures, or simply want to add a lovable pup to your handmade lineup, this pattern will guide you through crafting a beautifully sculpted plush with floppy ears, a wagging tail, and a touch of puppy charm! 💖
This design embraces soft textures, rounded shapes, and delightful details to bring a cheerful and comforting presence to your crochet projects! 🧶✨ I’ve carefully outlined each step to ensure your Amigurumi Dog Pup turns out just right—ready to brighten up your space or become a treasured handmade gift! 🎁 So grab your hooks, pick out warm browns, soft creams, or playful spots, and let’s stitch up an adorable pup! 🐾
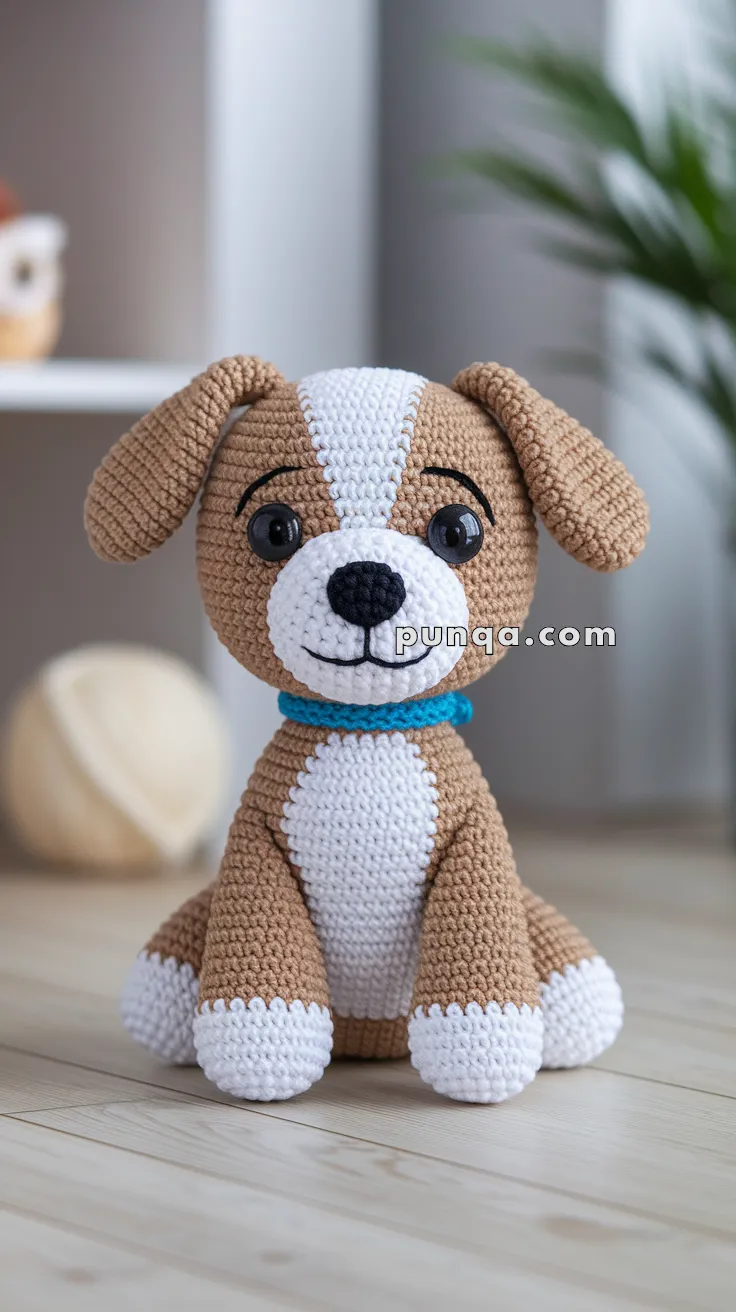
🐶 Amigurumi Dog Pup Crochet Pattern
Meet your new loyal companion! This adorable dog pup amigurumi features a sweet expression, floppy ears, and a classic sitting pose. With contrasting muzzle and paw tips, it’s a fun project that works up beautifully as a gift or keepsake.
✨ Skill Level
Intermediate
Includes:
- shaped color transitions
- soft sculpting
- embroidery
- plush shaping
- careful assembly positioning
📏 Finished Size
Approx. 25–28 cm (10–11 inches) tall
using DK yarn and a 3 mm hook.
🧶 Yarn Requirements
Warm Beige Brown
Approx. 90 g
Used for:
- head
- body
- ears
- tail
- limbs
White
Approx. 55 g
Used for:
- blaze
- muzzle
- paws
- chest
- belly
Aqua Blue
Approx. 8 g
Used for:
- collar
Black
Small amount
Used for:
- nose
- mouth
- eyebrows
🧵 Supplies
- 3 mm crochet hook
- 10–12 mm safety eyes
- Polyester stuffing
- Yarn needle
- Stitch markers
- Embroidery needle
🔤 Abbreviations (US Terms)
- MR – magic ring
- sc – single crochet
- inc – increase
- dec – invisible decrease
- sl st – slip stitch
- ch – chain
- FO – fasten off
🐶 Head
The head is very large and nearly spherical with soft cheek shaping.
Begin With Beige Brown Yarn
R1: MR 6 sc (6)
R2: inc x6 (12)
R3: (1 sc, inc) x6 (18)
R4: (2 sc, inc) x6 (24)
R5: (3 sc, inc) x6 (30)
R6: (4 sc, inc) x6 (36)
R7: (5 sc, inc) x6 (42)
R8: (6 sc, inc) x6 (48)
R9: (7 sc, inc) x6 (54)
R10: (8 sc, inc) x6 (60)
R11–R15:
sc around (60)
🤍 Sculpted White Face Blaze
The white face section is shaped — not rectangular.
It starts narrow on the forehead and gradually widens downward into the muzzle area.
R16
25 brown, 10 white, 25 brown
R17
23 brown, 14 white, 23 brown
R18
21 brown, 18 white, 21 brown
R19
20 brown, 20 white, 20 brown
R20
21 brown, 18 white, 21 brown
R21
23 brown, 14 white, 23 brown
This creates:
- narrow forehead stripe
- widened nose bridge
- rounded white cheeks
matching the plush puppy proportions.
👀 Eye Placement
Insert safety eyes between Rounds 18–19.
Position them:
- low on the face
- wide apart
- directly beside the white blaze
This creates the sweet puppy expression.
🐽 Raised Muzzle
The muzzle is softly rounded and noticeably raised.
White Yarn
R1: MR 6 sc (6)
R2: inc x6 (12)
R3: (1 sc, inc) x6 (18)
R4:
sc around (18)
R5:
(2 sc, inc) x6 (24)
R6:
sc around (24)
FO leaving long tail.
Lightly stuff before sewing.
Attach centered over the lower white blaze.
👃 Nose & Mouth
Nose
Using black yarn:
Embroider a rounded oval nose centered on the muzzle.
Mouth
Embroider:
- short vertical stitch
- soft curved smile
Eyebrows
Add gentle curved brows above eyes.
🧸 Finish Head
Continue with beige brown yarn.
R22:
(8 sc, dec) x6 (54)
R23:
(7 sc, dec) x6 (48)
R24:
(6 sc, dec) x6 (42)
Begin stuffing firmly.
R25:
(5 sc, dec) x6 (36)
R26:
(4 sc, dec) x6 (30)
R27:
(3 sc, dec) x6 (24)
R28:
(2 sc, dec) x6 (18)
R29:
(1 sc, dec) x6 (12)
R30:
dec x6 (6)
FO and close tightly.
👂 Ears (Make 2)
The ears are wide, floppy, and naturally curved downward.
Beige Brown Yarn
R1: MR 6 sc (6)
R2: inc x6 (12)
R3: (1 sc, inc) x6 (18)
R4: (2 sc, inc) x6 (24)
R5–R11:
sc around (24)
R12:
(2 sc, dec) x6 (18)
R13–R15:
sc around (18)
Do not stuff.
Flatten lightly.
FO leaving long tail.
Sew high on the head so they droop naturally.
🐾 Body
The body is compact, rounded, and slightly pear-shaped.
Start With White
R1: MR 6 sc (6)
R2: inc x6 (12)
R3: (1 sc, inc) x6 (18)
R4: (2 sc, inc) x6 (24)
🤍 Belly Shaping
R5
8 brown, 8 white, 8 brown
R6
7 brown, 10 white, 7 brown
R7
6 brown, 12 white, 6 brown
R8–R14
repeat Round 7
This creates the rounded chest panel visible on the plush.
🧸 Shape Body
R15:
(2 sc, dec) x6 (18)
R16–R17:
sc around (18)
R18:
(1 sc, dec) x6 (12)
Stuff firmly.
FO leaving long tail.
🐾 Front Legs (Make 2)
Front paws are oversized and rounded.
Begin With White
R1: MR 6 sc (6)
R2: inc x6 (12)
R3: (1 sc, inc) x6 (18)
R4–R8:
sc around (18)
Switch to beige brown.
R9–R16:
sc around (18)
Stuff firmly in paws only.
Flatten top slightly.
FO.
🐾 Back Legs (Make 2)
Smaller and angled outward.
White Yarn
R1: MR 6 sc (6)
R2: inc x6 (12)
R3–R5:
sc around (12)
Switch to beige brown.
R6–R11:
sc around (12)
Lightly stuff.
FO.
🐕 Tail
The tail is tiny, rounded, and slightly curved sideways.
Beige Brown Yarn
R1: MR 6 sc (6)
R2:
sc around (6)
R3:
(1 sc, inc) x3 (9)
R4–R7:
sc around (9)
Lightly stuff.
Curve gently before attaching.
💙 Collar
Aqua Blue Yarn
Ch 30
Join carefully without twisting.
R1:
sc around
R2:
sl st around
FO.
Wrap around neck and sew neatly.
🪡 Assembly
Step 1
Attach head slightly forward on body.
Step 2
Attach front paws close together beneath chest.
Step 3
Attach back paws angled outward.
Step 4
Attach ears high and slightly forward.
Step 5
Attach tail low on back.
Step 6
Wrap and sew collar around neck.
✨ Finishing Touches
- Shape muzzle gently with fingers
- Slightly flatten underside so puppy sits securely
- Keep eyes low for sweet puppy expression
- Let ears fold naturally downward
- Curve tail softly to one side
- Add tiny blush beneath eyes if desired
🌸 Final Thoughts
This cozy sitting puppy combines oversized plush proportions with beautifully sculpted facial markings and soft cuddly details. The rounded head, floppy ears, chunky paws, raised muzzle, and gentle little smile create the perfect handmade companion for nurseries, reading corners, or thoughtful gifts for dog lovers. 🐶💙