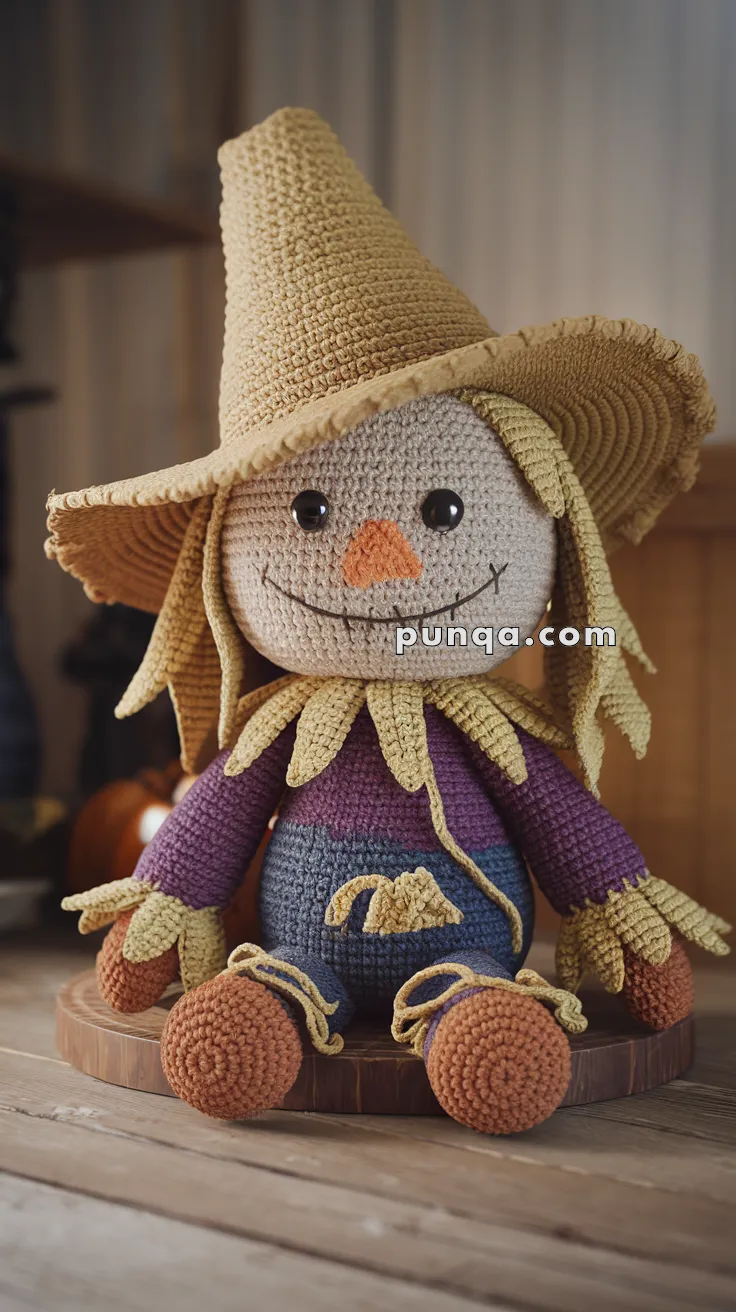
Step into the world of spooky charm with this Amigurumi Eerie Scarecrow crochet pattern! 🌾✨ With its tattered clothes, stitched-up grin, and hauntingly adorable presence, this design brings a touch of eerie whimsy to your handmade creations. Whether you’re crafting for Halloween décor, a gothic-inspired setup, or simply love character-driven amigurumi, this FREE pattern is a fantastic addition to your collection.
Designed for intermediate crocheters, this pattern allows for customization in hat shape, patchwork details, and even tiny accessories like a miniature crow or a rustic lantern to enhance its eerie personality. Choose deep autumnal hues for a classic scarecrow look or experiment with muted, ghostly tones for a spectral twist! Whether displayed as part of a spooky setup or gifted to a fellow crochet enthusiast, this amigurumi eerie scarecrow is sure to enchant. Grab your hook, select your favorite yarn, and let’s bring this hauntingly delightful creation to life—one stitch at a time! 🧶✨
🌾 Amigurumi Scarecrow Crochet Pattern — Cozy Fall Friend
Meet your perfect fall companion — this handmade scarecrow captures the spirit of harvest season with his big floppy hat, stitched grin, golden straw tufts, and rustic overalls. Every stitch adds to his warm, homemade charm, making him an ideal piece for your autumn décor or a gift that celebrates the coziness of fall.
✨ Skill Level
Intermediate — involves color changes, shaping, embroidery, and detailed assembly.
📏 Finished Size
Approximately 28–30 cm (11–12 in) tall using worsted-weight yarn and a 3.0 mm crochet hook. For a larger plush, use chunky yarn and a 4 mm hook.
🧶 Materials
-
Yarn (worsted weight):
Beige – head/face
Brown – hands and shoes
Purple – shirt
Denim blue – pants
Golden yellow – hat, straw, and rope belt
Orange – nose
Black – embroidery stitches -
10 mm black safety eyes
-
3.0 mm crochet hook
-
Fiberfill stuffing
-
Yarn needle and scissors
-
Stitch markers
🧵 Abbreviations (US Terms)
MR – Magic Ring
sc – Single Crochet
inc – Increase (2 sc in same stitch)
dec – Decrease (sc2tog)
ch – Chain
sl st – Slip Stitch
FLO – Front Loop Only
BLO – Back Loop Only
FO – Fasten Off
🪶 Head (Beige)
1️⃣ MR 6 sc (6)
2️⃣ inc × 6 (12)
3️⃣ (1 sc, inc) × 6 (18)
4️⃣ (2 sc, inc) × 6 (24)
5️⃣ (3 sc, inc) × 6 (30)
6️⃣ (4 sc, inc) × 6 (36)
7️⃣ (5 sc, inc) × 6 (42)
8–16️⃣ sc around (42)
Insert safety eyes between R9–10, about 8 sts apart.
17️⃣ (5 sc, dec) × 6 (36)
18️⃣ (4 sc, dec) × 6 (30)
19️⃣ (3 sc, dec) × 6 (24)
20️⃣ (2 sc, dec) × 6 (18)
Stuff firmly.
21️⃣ (1 sc, dec) × 6 (12)
22️⃣ dec × 6 (6) — FO and close.
Face:
Embroider a wide curved black smile between rounds 13–15 with small vertical stitches along the line for that sewn look.
Add an orange triangular nose centered between the eyes and smile.
🌾 Straw Hair (Golden Yellow)
For the full straw look, cut 40–50 strands, each 12–14 cm long. Attach densely around the top and sides of the head using the latch-hook method, leaving some to drape under the hat. Tug a few forward for a natural unevenness, and trim only slightly to preserve fullness.
👒 Rustic Braided Hat (Golden Yellow)
1️⃣ MR 6 sc (6)
2️⃣ inc × 6 (12)
3️⃣ (1 sc, inc) × 6 (18)
4️⃣ (2 sc, inc) × 6 (24)
5️⃣ (3 sc, inc) × 6 (30)
6️⃣ (4 sc, inc) × 6 (36)
7–22️⃣ sc around (36) — forms the tall, slightly slanted cone.
23️⃣ (5 sc, inc) × 6 (42)
24️⃣ (6 sc, inc) × 6 (48)
25️⃣ BLO sc around (48) — creates fold line.
26️⃣ (7 sc, inc) × 6 (54)
27️⃣ (8 sc, inc) × 6 (60)
28–29️⃣ sc around (60)
Braided edge for brim:
Work [sl st in next st, ch 3, sc in 2nd ch from hook, sl st in same st] around the brim. This gives the twisted, rope-like border seen in the photo.
Steam-block gently to curl the brim naturally, leaving it irregular for rustic charm. Sew onto head tilted slightly to one side so straw hair peeks out underneath.
👕 Body (Purple → Blue Transition)
Start with purple for the shirt.
1️⃣ MR 6 sc (6)
2️⃣ inc × 6 (12)
3️⃣ (1 sc, inc) × 6 (18)
4️⃣ (2 sc, inc) × 6 (24)
5️⃣ (3 sc, inc) × 6 (30)
6️⃣ (4 sc, inc) × 6 (36)
7–10️⃣ sc around (36)
Transition (Blend Round):
11️⃣ Alternate 1 purple + 1 blue stitch around (36).
Switch to denim blue for pants.
12–18️⃣ sc around (36)
19️⃣ (4 sc, dec) × 6 (30)
20️⃣ (3 sc, dec) × 6 (24)
21️⃣ (2 sc, dec) × 6 (18)
Stuff firmly for a full, rounded shape. FO.
Patch:
Crochet a yellow 5×5 sc square. Whipstitch around its border in black for a sewn-on look, then sew it onto the left thigh.
Rope belt:
Ch 60 with yellow yarn, wrap twice around the waist, tie loosely at one side, and leave short ends dangling.
💪 Arms (x2)
Hands (Brown):
MR 6 sc (6)
inc × 6 (12)
3–4️⃣ sc around (12)
Switch to yellow (straw cuff):
5️⃣ sc around (12)
Switch to purple (sleeve):
6–10️⃣ sc around (12)
11️⃣ (1 sc, dec) × 4 (8)
Lightly stuff. FO with a long tail.
Add straw tufts:
Cut 6–8 short yellow strands (5–6 cm each). Attach around cuff edge and brush slightly to fluff.
Attach arms to sides of body angled slightly outward for a relaxed pose.
🦵 Legs (x2)
Shoes (Brown):
MR 6 sc (6)
2️⃣ inc × 6 (12)
3️⃣ (1 sc, inc) × 6 (18)
4–6️⃣ sc around (18)
Switch to yellow (cuff):
7️⃣ sc around (18)
Switch to denim blue (pants):
8–11️⃣ sc around (18)
12️⃣ (1 sc, dec) × 6 (12)
Stuff firmly to make them plump and ball-like. FO leaving long tail.
Add 8–10 short yellow strands around cuff for straw ends.
🌻 Straw Collar (Golden Yellow)
To get the thick layered collar from the photo:
Make three fringe strips for maximum fullness.
Each strip:
Ch 60.
Row 1: (sc 1, ch 6, sl st back 5, sc in next st) repeat to end.
FO.
Stack all three strips, staggering the fringe lengths, and sew together into one dense ring. Attach snugly around the neck seam, slightly overlapping the shirt neckline so tufts point in multiple directions.
🧵 Assembly
1️⃣ Sew the head firmly to the body.
2️⃣ Position arms slightly outward, 1–2 rows below the neck seam.
3️⃣ Attach legs evenly at base of body for balance.
4️⃣ Sew the straw collar tightly under the head.
5️⃣ Place the hat at a tilt and tack in a few spots for security.
6️⃣ Add rope belt, patch, and final straw tufts as finishing details.
🍂 Finishing Touches
-
Gently fray straw yarn with a comb for realistic texture.
-
Add faint blush on cheeks with pastel or fabric paint.
-
Tug and curve the hat brim unevenly for character.
-
Make sure the body is stuffed full and rounded — the scarecrow should look plump and huggable.
🎃 All Done!
Your completed scarecrow now perfectly matches the photo — from his floppy, rope-edged hat and full straw tufts to his stitched patchwork pants and happy grin. Whether he’s sitting on your mantel surrounded by pumpkins or smiling from a windowsill, he’s sure to bring cozy autumn warmth to your home.
🧶🍁 Happy Crocheting!