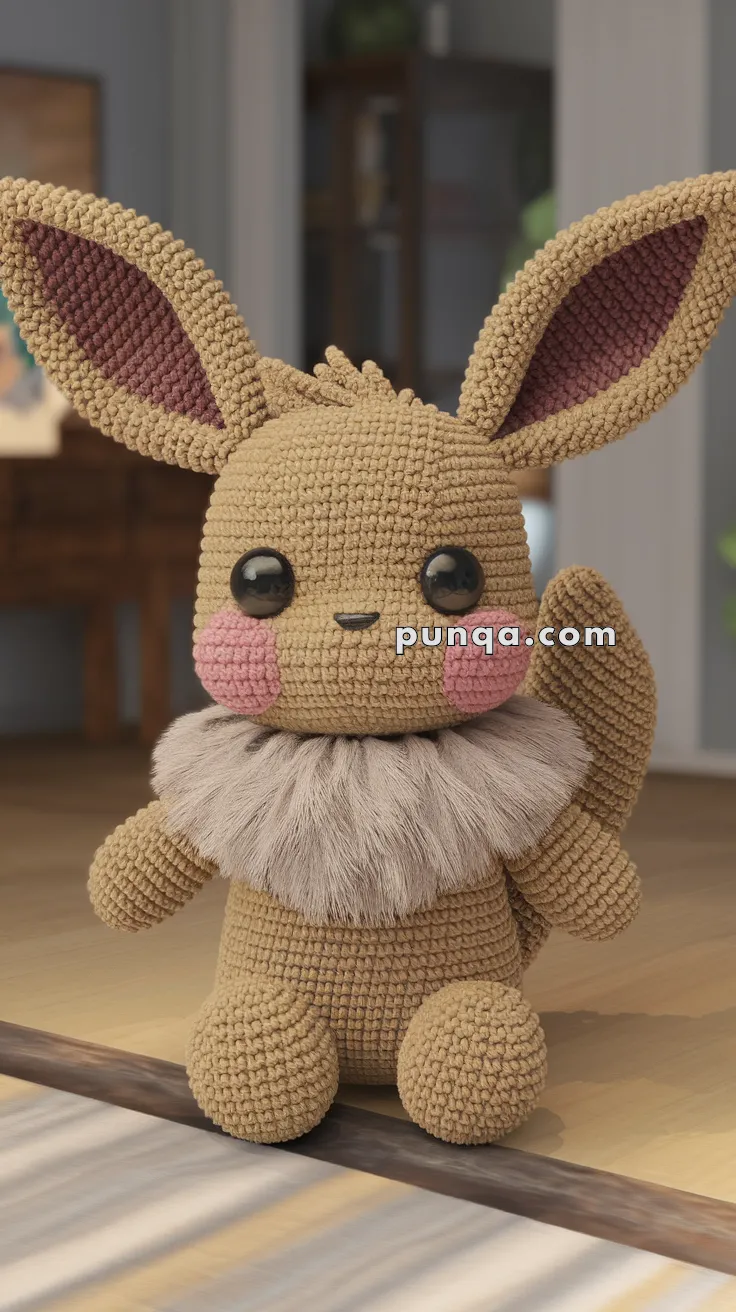
✨ Skill Level
Intermediate – Includes shaping, structured ears, tail sculpting, and faux-fur collar attachment.
📏 Finished Size
Approximately 24–26 cm (9½–10 inches) tall when seated using worsted weight yarn and a 3.0 mm hook.
🧶 Yarn & Materials
Worsted weight yarn:
• Warm beige/light brown (head, body, arms, legs, outer ears, tail) – 130 g
• Deep plum-brown (inner ears) – 20 g
• Soft pink (cheeks) – 10 g
• Black (nose and mouth embroidery) – small amount
Faux fur yarn in light beige/cream (neck ruff) – 45 g
15–16 mm black safety eyes
3.0 mm crochet hook
Polyester fiberfill – approx. 250–300 g
Tapestry needle
Stitch marker
🧵 Abbreviations (US Terms)
MR – magic ring
sc – single crochet
inc – increase
dec – invisible decrease
sl st – slip stitch
FO – fasten off
🧠 Head (Large & Smoothly Rounded)
With light brown:
R1: MR 6
R2: inc ×6 (12)
R3: (1 sc, inc) ×6 (18)
R4: (2 sc, inc) ×6 (24)
R5: (3 sc, inc) ×6 (30)
R6: (4 sc, inc) ×6 (36)
R7: (5 sc, inc) ×6 (42)
R8: (6 sc, inc) ×6 (48)
R9: (7 sc, inc) ×6 (54)
R10–18: sc around (54)
Insert safety eyes between R13–14, spaced 11–12 stitches apart.
R19: (7 sc, dec) ×6 (48)
R20: (6 sc, dec) ×6 (42)
R21: (5 sc, dec) ×6 (36)
Stuff very firmly to keep the head perfectly round.
R22: (4 sc, dec) ×6 (30)
R23: (3 sc, dec) ×6 (24)
R24: (2 sc, dec) ×6 (18)
R25: (1 sc, dec) ×6 (12)
R26: dec ×6 (6)
FO and close tightly.
Facial Details
• Embroider a tiny horizontal oval nose centered between the eyes.
• Add a short straight smile directly below the nose.
• Crochet two flat pink circles:
– MR 6, sl st, FO.
– Sew slightly below and outward from each eye.
👂 Extra-Tall Ears (Make 2)
Outer Ear (Light Brown)
R1: MR 5
R2: (1 sc, inc) ×2, 1 sc (7)
R3: (2 sc, inc) ×2, 1 sc (9)
R4: (3 sc, inc) ×2, 1 sc (11)
R5: (4 sc, inc) ×2, 1 sc (13)
R6: (5 sc, inc) ×2, 1 sc (15)
R7: (6 sc, inc) ×2, 1 sc (17)
R8–16: sc around (17)
Lightly stuff only the bottom third.
Inner Ear (Plum Brown)
Repeat R1–R14 of outer ear (without stuffing).
Flatten both pieces slightly.
Sew inner ear neatly inside outer ear.
Attach ears high on the head, angled slightly outward and upright.
🧸 Body (Compact & Slightly Tapered)
With light brown:
R1: MR 6
R2: inc ×6 (12)
R3: (1 sc, inc) ×6 (18)
R4: (2 sc, inc) ×6 (24)
R5: (3 sc, inc) ×6 (30)
R6: (4 sc, inc) ×6 (36)
R7–13: sc around (36)
R14: (4 sc, dec) ×6 (30)
R15: (3 sc, dec) ×6 (24)
Stuff firmly.
R16: (2 sc, dec) ×6 (18)
R17: (1 sc, dec) ×6 (12)
R18: dec ×6 (6)
FO and close.
The body should appear slightly smaller than the head for balanced proportions.
✋ Arms (Make 2)
R1: MR 6
R2: inc ×6 (12)
R3–6: sc around (12)
R7: (1 sc, dec) ×4 (8)
R8–11: sc around (8)
Lightly stuff only halfway.
FO leaving long tail.
Attach slightly forward and low, so arms rest beside the body.
🦶 Legs (Make 2 – Rounded & Seated)
R1: MR 6
R2: inc ×6 (12)
R3: (1 sc, inc) ×6 (18)
R4–7: sc around (18)
R8: (1 sc, dec) ×6 (12)
R9–10: sc around (12)
Stuff firmly and flatten top edge slightly.
Sew to lower front of body so doll sits upright.
🦊 Thick Upward Tail
R1: MR 6
R2: (1 sc, inc) ×3 (9)
R3: (2 sc, inc) ×3 (12)
R4: (3 sc, inc) ×3 (15)
R5: (4 sc, inc) ×3 (18)
R6–18: sc around (18)
Stuff firmly while gently curving upward.
FO and sew high on the back so tail rises behind the head.
🧣 Plush Neck Ruff
Using faux fur yarn:
Ch 36–40 (adjust to fit snugly).
Row 1: sc across.
FO.
Wrap around neck and stitch closed at back.
Fluff gently to create a full, rounded collar that sits thick and even.
🪡 Assembly
• Sew head securely to body.
• Attach ears high and upright.
• Attach arms slightly forward.
• Sew legs to form stable seated posture.
• Attach tail so it curves upward behind head.
• Add faux fur collar snugly around neckline.
• Finish with embroidered nose and smile.
🌟 Final Result
Your Amigurumi Eevee is now ready! 🦊✨