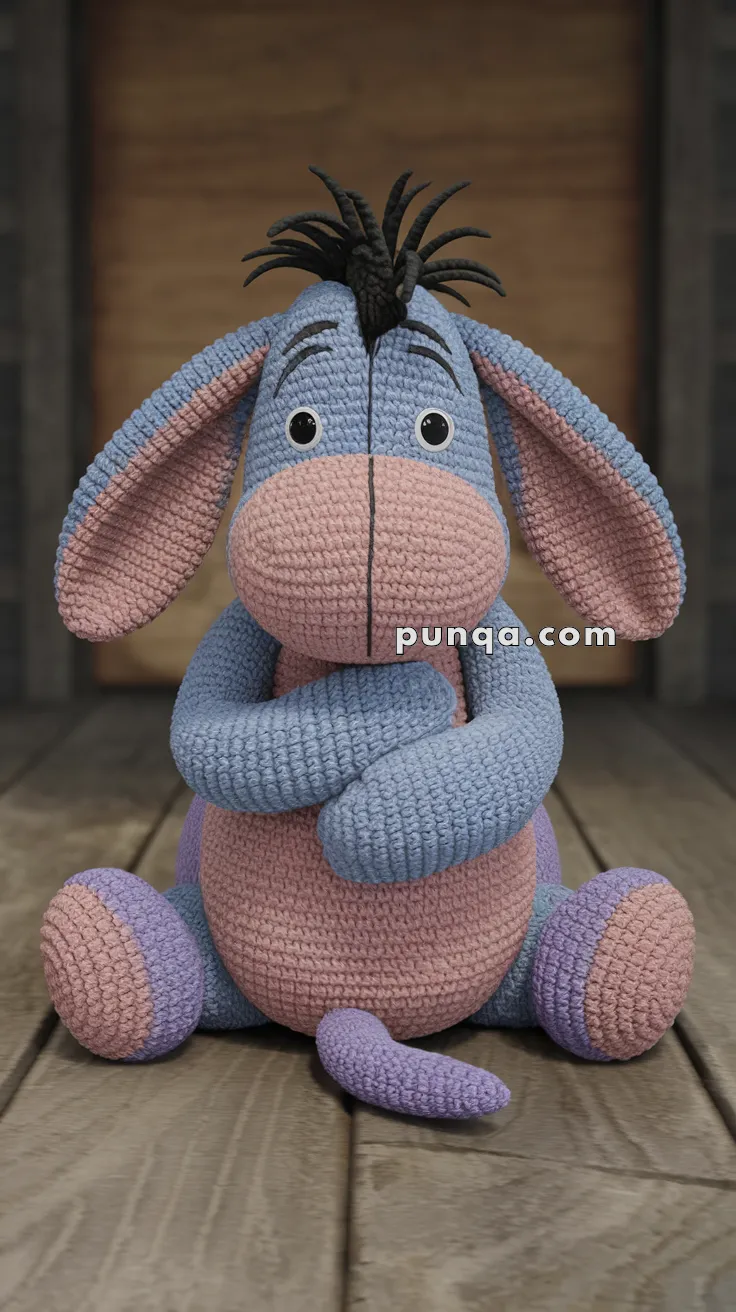
Soft, shy, and utterly adorable — this Eeyore brings to life every detail of the classic character: long droopy ears, stitched muzzle seam, bent arms, and a slightly tilted head full of charm.
✨ Skill Level
Intermediate
Includes oval muzzle shaping, color panel changes, structured ear assembly, seated leg construction, and hair tuft attachment.
📏 Finished Size
Approximately 28–30 cm (11–12 inches) tall when seated
Using DK / light worsted yarn and a 3.0 mm hook.
🧶 Materials & Yarn Amount
Periwinkle Blue (head, body, outer ears, arms, legs) – approx. 130 g
Dusty Rose / Mauve (muzzle, belly panel, inner ears, soles) – approx. 90 g
Soft Lavender (tail) – approx. 20 g
Black (mane, tail tuft, embroidery) – approx. 20 g
10 mm safety eyes
Polyester stuffing – approx. 220 g
3.0 mm crochet hook
Tapestry needle
Stitch marker
Work in continuous rounds unless stated.
🧵 Abbreviations (US Terms)
MR – magic ring
sc – single crochet
inc – increase (2 sc in one stitch)
dec – invisible decrease
ch – chain
sl st – slip stitch
FO – fasten off
🐴 Head (Periwinkle Blue)
The head is tall and slightly oval, with gentle cheek fullness and a rounded forehead.
Round 1: MR, 6 sc (6)
Round 2: inc ×6 (12)
Round 3: (1 sc, inc) ×6 (18)
Round 4: (2 sc, inc) ×6 (24)
Round 5: (3 sc, inc) ×6 (30)
Round 6: (4 sc, inc) ×6 (36)
Round 7: (5 sc, inc) ×6 (42)
Rounds 8–18: sc around (42)
Insert safety eyes between R10–11, 6–7 stitches apart.
Round 19: (5 sc, dec) ×6 (36)
Round 20: (4 sc, dec) ×6 (30)
Round 21: (3 sc, dec) ×6 (24)
Round 22: (2 sc, dec) ×6 (18)
Stuff firmly, shaping into a slightly elongated oval.
Round 23: (1 sc, dec) ×6 (12)
Round 24: dec ×6 (6)
FO and close.
🐽 Large Rounded Muzzle (Dusty Rose)
The muzzle is wide and softly domed, covering most of the lower half of the face.
Ch 10
Round 1: sc 8, 3 sc in last stitch, working opposite side sc 7, inc (20)
Round 2: inc, sc 7, inc ×3, sc 7, inc ×2 (26)
Rounds 3–8: sc around (26)
Round 9: (3 sc, dec) ×5, sc 6 (21)
Lightly stuff so it remains plush but not stiff.
Sew centered low on the face so the top edge sits just beneath the eyes and the bottom curves gently toward the chin.
Using black embroidery thread, stitch a clean vertical seam from the top center of the muzzle downward, continuing slightly onto the face for definition.
👁 Eyes & Brows
Safety eyes should sit just above the top edge of the muzzle.
Embroider soft, slightly curved brows one round above each eye, angled gently inward for a tender expression.
👂 Long Drooping Ears (Make 2)
The ears are long, flat, and floppy, hanging well below the muzzle line.
Outer Ear (Blue)
Round 1: MR, 6 sc
Round 2: inc ×6 (12)
Round 3: (1 sc, inc) ×6 (18)
Round 4: (2 sc, inc) ×6 (24)
Rounds 5–18: sc around (24)
Round 19: (2 sc, dec) ×6 (18)
Round 20: sc around (18)
FO, flatten without stuffing.
Inner Ear (Rose)
Work same as outer ear through Round 17 only (no decrease round).
FO.
Sew inner ear centered inside outer ear panel.
Attach ears low on the sides of the head so they hang naturally downward and slightly forward, reaching near the shoulder line.
🖤 Mane Tuft
Cut 16–20 strands of black yarn approximately 7–8 cm long.
Attach strands along the top center of the head from R3 to R8 using a latch-hook method.
Trim slightly shorter toward the front and leave crown strands a bit longer so the tuft stands upright and slightly forward.
🧍 Body (Blue with Rose Belly Panel)
Round 1: MR, 6 sc (6)
Round 2: inc ×6 (12)
Round 3: (1 sc, inc) ×6 (18)
Round 4: (2 sc, inc) ×6 (24)
Round 5: (3 sc, inc) ×6 (30)
Round 6: (4 sc, inc) ×6 (36)
Rounds 7–12: sc around (36)
Begin rose belly panel centered on front.
Rounds 13–22: continue 36 sc per round, working 14 center stitches in rose and remaining stitches in blue.
Round 23: (4 sc, dec) ×6 (30)
Round 24: (3 sc, dec) ×6 (24)
Round 25: (2 sc, dec) ×6 (18)
Round 26: (1 sc, dec) ×6 (12)
Stuff very firmly to achieve a round seated belly.
Round 27: dec ×6 (6)
FO.
💪 Arms (Make 2 – Blue)
Arms are slightly curved and positioned crossed in front.
Round 1: MR, 6 sc
Round 2: inc ×6 (12)
Rounds 3–6: sc around (12)
Round 7: (2 sc, dec) ×3 (9)
Rounds 8–20: sc around (9)
Lightly stuff lower portion only.
Flatten top slightly when sewing.
Attach high on body and cross arms gently in front. Tack wrists together for stability.
🦶 Seated Legs & Feet (Make 2)
Sole (Rose)
Round 1: MR, 6 sc
Round 2: inc ×6 (12)
Round 3: (1 sc, inc) ×6 (18)
Rounds 4–6: sc around (18)
Switch to blue.
Rounds 7–14: sc around (18)
Round 15: (1 sc, dec) ×6 (12)
Stuff firmly.
Round 16: dec ×6 (6)
FO.
Attach low on front of body so soles face slightly outward and the doll sits securely.
🦴 Tail (Lavender)
Ch 16
Row 1: sc in 2nd ch from hook and across (15)
Rows 2–4: sc across
Lightly stuff bottom half if desired for shape.
FO and sew centered low on back so it curves slightly forward.
Attach 6–8 short black strands to tail tip and trim into a neat tuft.
🧵 Assembly & Finishing
-
Sew muzzle firmly before final head shaping.
-
Attach ears low and forward-angled so they hang naturally.
-
Join head to body with slight forward tilt.
-
Attach legs first to ensure stable seated balance.
-
Sew arms crossed and lightly tack together.
-
Add mane tuft and tail tuft.
-
Embroider muzzle seam and brows last for precise placement.
🎉 Finished Eeyore
Your lovable, droopy-eared Eeyore is complete — with perfect proportions, stitched details, and that unmistakable gentle charm. A delightful project for Disney lovers and anyone who adores soft-hearted characters. 💙