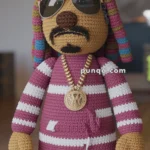
Welcome to the rock ‘n’ roll world of musical amigurumi! 🎸✨ Today, I’m thrilled to share my free crochet pattern for Amigurumi Elvis Presley—the King of Rock ‘n’ Roll in hip-shaking yarn form! Whether you’re an Elvis fanatic, love crafting pop culture icons, or simply want to add some retro charm to your collection, this pattern will have you stitching your very own pocket-sized legend with his iconic pompadour, dazzling jumpsuit, and legendary microphone!
This design captures Elvis’ showstopping energy through bold details and playful flair! 🧶💙 I’ve carefully outlined each step to help you create his signature hairstyle, bedazzled costume details, and that famous smoldering smile. Perfect for display, gifting to music lovers, or keeping your craft room rocking all night long! So grab your hooks, pick out your flashiest yarns, and let’s crochet a hunk-a hunk of burning yarn love! ✨

🎸 Amigurumi Elvis Presley Crochet Pattern
Get ready to shake, rattle, and roll with this dazzling amigurumi Elvis doll! Complete with a classic pompadour, white jumpsuit, and flashy belt, this King of Rock ‘n’ Roll plush is perfect for fans of vintage vibes and iconic music legends.
✨ Skill Level
Intermediate – Includes shaping, garment construction, and detailed finishing.
📏 Finished Size
Approx. 28–31 cm (11–12.5 inches) tall
🧶 Materials
DK cotton yarn:
- Skin tone – approx. 40 g (~110 m)
- White (jumpsuit, boots, collar) – approx. 130 g (~360 m)
- Black (hair, eyebrows) – approx. 30 g (~90 m)
- Gold (belt) – approx. 10 g (~25 m)
- Black embroidery thread – small amount
Other supplies:
- 10–12 mm safety eyes
- 2.5–3.0 mm crochet hook
- Polyester stuffing
- Tapestry needle, stitch marker, scissors
🧵 Abbreviations (US Terms)
MR – magic ring
sc – single crochet
inc – increase
dec – invisible decrease
ch – chain
sl st – slip stitch
FO – fasten off
👤 Head
With skin tone yarn:
Rnd 1: MR 6
Rnd 2: inc ×6 (12)
Rnd 3: (1 sc, inc) ×6 (18)
Rnd 4: (2 sc, inc) ×6 (24)
Rnd 5: (3 sc, inc) ×6 (30)
Rnd 6: (4 sc, inc) ×6 (36)
Rnd 7: (5 sc, inc) ×6 (42)
Rnd 8–15: sc around (42)
Insert eyes between R11–12, spaced evenly
Rnd 16: (5 sc, dec) ×6 (36)
Rnd 17: (4 sc, dec) ×6 (30)
Rnd 18: (3 sc, dec) ×6 (24)
Stuff firmly
Rnd 19: (2 sc, dec) ×6 (18)
Rnd 20: (1 sc, dec) ×6 (12)
Rnd 21: dec ×6 (6)
FO and close
👃 Nose
MR 6
Rnd 2: sc around
Lightly stuff and sew centered below eyes for a subtle raised shape
👂 Ears (Make 2)
MR 6
Rnd 2: sc around
Flatten slightly and sew aligned with eyes
💇 Hair (Structured Pompadour Style)
Hair Cap
MR 6 → 12 → 18 → 24 → 30 → 36 → 42
Rnd 8–10: sc around
FO and sew snugly to head
Pompadour Roll
Ch 16
Row 1–6: sc across
Roll tightly into a thick cylinder and sew at the front top of the head, slightly lifted upward to create height
Side Panels (Make 2)
Ch 10
Rows 1–7: sc across
Attach along the sides of the head, covering from temple to below ear for a clean, full hairstyle
🧍 Body & Jumpsuit
Lower Body (Worked in Rounds)
With white yarn:
Rnd 1: MR 6
Rnd 2: inc ×6 (12)
Rnd 3: (1 sc, inc) ×6 (18)
Rnd 4: (2 sc, inc) ×6 (24)
Rnd 5: (3 sc, inc) ×6 (30)
Rnd 6: (4 sc, inc) ×6 (36)
Rnd 7–11: sc around (36)
🔥 Deep V-Neck Construction
Mark the center front.
Work one side at a time to shape the opening:
Row 12: sc 18, turn
Row 13: sc 18, turn
Row 14: dec, sc 14, dec (16), turn
Row 15: sc 16, turn
Row 16: dec, sc 12, dec (14), turn
Row 17: sc 14, turn
Row 18: dec, sc 10, dec (12)
FO
Reattach yarn on the opposite side and repeat the same shaping symmetrically.
Once both sides are complete, rejoin:
Rnd 19: sc evenly around entire torso (including row edges)
Rnd 20–23: sc around
Stuff firmly to maintain structure
Rnd 24: (3 sc, dec) ×6 (24)
Rnd 25: (2 sc, dec) ×6 (18)
FO leaving a tail
👔 Chest Insert
With skin tone yarn:
Ch 6
Rows 1–10: sc across
Lightly taper the top edges
Sew inside the V opening so it sits slightly recessed, creating a clean deep neckline
👕 Wide Collar (Make 2)
Ch 14
Row 1: sc across
Row 2: inc, sc across, inc
Row 3: sc across
Row 4: inc, sc across, inc
Row 5: sc across
FO
Attach along neckline edges and angle outward for a dramatic open look
💪 Arms (Make 2)
Start with skin tone:
MR 6
Rnd 2: (1 sc, inc) ×3 (9)
Rnd 3–6: sc around (9)
Switch to white:
Rnd 7–18: sc around (9)
Lightly stuff top only
FO and sew slightly angled forward
👖 Legs & Boots (Make 2)
Boot Base
MR 6
Rnd 2: inc ×6 (12)
Rnd 3: (1 sc, inc) ×6 (18)
Rnd 4: (2 sc, inc) ×6 (24)
Rnd 5–8: sc around (24)
Stuff very firmly for rounded shape
Leg
Rnd 9: (2 sc, dec) ×6 (18)
Rnd 10–22: sc around (18)
FO
Flatten bottom slightly for stability
🪙 Belt
With gold yarn:
Ch 44
Rows 1–3: sc across
Wrap around waist and sew securely
Embroider square sections and a bold central buckle
😊 Face Details
- Embroider a soft curved smile
- Add thick, slightly arched eyebrows
- Keep expression relaxed and confident
🧩 Assembly
Sew head securely to body
Attach legs evenly for standing balance
Attach arms slightly forward
Insert chest panel neatly inside V opening
Attach collar wide and open
Sew hair pieces and shape carefully
✨ Finishing Touches
Gently shape the pompadour upward
Adjust collar for a wide, dramatic stance
Ensure the V-neck is clean and symmetrical
Balance the figure so it stands firmly
🎶 Final Thoughts
This design blends clean structure with expressive styling, creating a bold and recognizable silhouette. The carefully shaped neckline, sculpted hair, and tailored outfit bring personality and movement into the piece, making it feel almost alive with stage presence.
Take your time refining the details—especially the neckline and hair shaping—and you’ll end up with a truly striking handmade character that captures timeless charm in every stitch 🧶✨